# What is FormSG?

{% hint style="info" %}
If you are unable to view this guide properly on the intranet, we recommend using your personal devices.
{% endhint %}

<figure><img src="/files/lOImhmMo4IL7kQJRFUlx" alt="FormSG"><figcaption></figcaption></figure>

**Build secure government forms in minutes**&#x20;

FormSG is a self-service, easy-to-use and feature rich form builder that enables public officers to collect citizen data quickly and securely. The best way to learn about FormSG is to [login](https://www.form.gov.sg/#!/signin) and create your first form.

Since launching in September 2017, FormSG has replaced almost 270 million paper form submissions and is used by over 160 public agencies. More than 245k public officers are users of FormSG today.&#x20;

{% embed url="<https://app.arcade.software/share/AhBLTO9z99bYXCxki7Ap>" %}


# What data can FormSG handle?

The platform can handle security classification and info sensitivity as shown below:

<table data-header-hidden><thead><tr><th>Response data</th><th>Security Classification </th><th>Info Sensitivity</th><th data-hidden></th></tr></thead><tbody><tr><td><strong>Response Data</strong></td><td><strong>Security Classification</strong></td><td><strong>Info Sensitivity</strong></td><td>Stored in email inbox</td></tr><tr><td>Stored on FormSG database (GCC-OGP) encrypted and sent to admin's email inbox<br><br>Data residency in Singapore</td><td>up to <br><strong>Confidential (Cloud-Eligible)</strong></td><td>Up to <br><strong>Sensitive (High)</strong></td><td>up to <strong>Sensitive (High)</strong></td></tr></tbody></table>

FormSG systems have been endorsed with Medium-Risk RML, with the mandatory controls. WOG users may refer to the [Digital Governance platform](http://dgp.grc.tech.gov.sg/RSAarcher/apps/ArcherApp/Home.aspx) and look for FormSG (5745963). *You may also later refer to the* [*WOG IM8 portal*](http://portal.standards.tech.gov.sg/)*.*\
\
In addition, OGP/FormSG does not dictate who agencies' disclose such data to via the platform, as this is subject to the agency's operational considerations and own internal governance processes to implement the relevant IMs. Ensure that receiving systems can support the security classification and info sensitivity. The unauthorised disclosure of information can cause damage to an agency, business or individual. \
\
If you require further clarification, you may wish to approach your CDO or the Government's Data Office (i.e. GDO) at SNDGO, which oversees the various WOG IMs on data security, governance and sharing.


# Is FormSG secure?

{% tabs %}
{% tab title="Are form responses collected secure?" %}

* Form responses submitted are stored in **encrypted** format and/or sent directly to email addresses indicated.<br>

* During form creation, the user’s client/browser generates a **secret key** that is never seen by the FormSG team. The secret key is used to activate your form, unlock and view responses, ensuring that only form admins can access and view responses.&#x20;

* FormSG does not store any form response data in our servers. If you opt to receive emails, do ensure mailboxes are not over-capacity, or else form responses will be lost.

Should our servers be compromised, attackers would not be able to view all form response data unless they have access to your forms, secret keys and inboxes.
{% endtab %}

{% tab title="What is Form's infrastructure? (Developers)" %}
FormSG has undergone rigorous penetration testing, vulnerability assessment and infrastructure review by both world renowned security testers and CSG.&#x20;

FormSG's infrastructure consists of:

* **NodeJS web servers**, hosted on AWS Singapore zone.
* **MongoDB Atlas** for managing NoSQL database that stores only form fields and not response data, hosted on AWS Singapore zone.
* **AWS SES** is used to send out mails, which are not open mail relays, have valid SPF and DKIM records, and encrypts form data before sending.&#x20;
* **Cloudflare SSL** web servers protection with Anti-DDoS protection and Web Application Firewall.&#x20;
* **Datadog** is used for website performance and availability monitoring.
* **AWS CloudWatch** for alarms.
* **CloudTrail** for activity monitoring.
* **GuardDuty** for threat intelligence monitoring and attachment virus scanning.&#x20;

<figure><img src="/files/lrI2ocoyo4wdNRWryKmJ" alt=""><figcaption></figcaption></figure>
{% endtab %}
{% endtabs %}


# Features

There are many features of FormSG, and the best way is to learn about that is to try it yourself!

### <img src="/files/b5bzzzTDgALReJla13pS" alt="" data-size="line">Drag and drop builder

Create and publish forms in minutes using our user-friendly drag and drop builder, with over 65 field types including attachments, dates, tables, ratings, and many more.

<figure><img src="/files/DzW1rsb9NvIzqALMrA1i" alt=""><figcaption></figcaption></figure>

### <img src="/files/G8gplUvBUT0bkVvwyxQ2" alt="" data-size="line">Conditional Logic

Create advanced [logic](/user-guides/advanced-guide/logic) for your forms, and show or hide fields and/or sections based on your user’s input, personalising their experience.

### <img src="/files/LVnXW4m9kPGkrwENewVT" alt="" data-size="line">Prefill

[Pre-fill](/user-guides/advanced-guide/pre-fill) known fields on respondents’ behalf.

### <img src="/files/VmR5PPujKqh76sHxt7dS" alt="" data-size="line">National Identity

Authenticate individuals and businesses with [Singpass](/user-guides/advanced-guide/singpass-and-myinfo), and get MyInfo data pre-filled.

### <img src="/files/LveWR24DYDPY5Fh5dnB4" alt="" data-size="line">Webhooks

Get every form response sent straight to a compatible web app or URL using [webhooks](/user-guides/advanced-guide/webhooks).

### <img src="/files/ldyOjC0101omFRo17o7F" alt="" data-size="line">Accessible

All our forms are fully responsive and aim to meet [Web Content Accessibility Guidelines](https://www.w3.org/TR/WCAG21/) (WCAG 2.1), which makes web content more accessible to people with disabilities. Respondents can use screen readers when filling the form.

... and more!


# Features (To update to)

There are many features of FormSG, and the best way is to learn about that is to try it yourself!

### <img src="/files/b5bzzzTDgALReJla13pS" alt="" data-size="line">Drag and drop builder

Create and publish forms in minutes using our user-friendly drag and drop builder, with over 65 field types including attachments, dates, tables, ratings, and many more.

<figure><img src="/files/DzW1rsb9NvIzqALMrA1i" alt=""><figcaption></figcaption></figure>

### <img src="/files/G8gplUvBUT0bkVvwyxQ2" alt="" data-size="line">Conditional Logic

Create advanced [logic](/user-guides/advanced-guide/logic) for your forms, and show or hide fields and/or sections based on your user’s input, personalising their experience.

### <img src="/files/Qcaonww5zbuXwh6LWicy" alt="" data-size="line"> Workflow builder

Collect data from multiple respondents with our inbuilt workflow builder.&#x20;

* **Form routing** — automatically route the form to the next respondent in sequence. Assign their email at each step, or let respondents specify it. The next respondent can see previously filled fields before adding their own.
* **Assign fields** — lock specific fields so later respondents cannot edit them.
* **Approval workflows** — enable approvals at any step to control whether the workflow continues or stops.
* **Export responses** — download collated responses from all respondents into a single CSV file.

### <img src="/files/VmR5PPujKqh76sHxt7dS" alt="" data-size="line">National Identity

Authenticate individuals and businesses with [Singpass](/user-guides/advanced-guide/singpass-and-myinfo), and get MyInfo data pre-filled.

### <img src="/files/LveWR24DYDPY5Fh5dnB4" alt="" data-size="line">Webhooks

Get every form response sent straight to a compatible web app or URL using [webhooks](/user-guides/advanced-guide/webhooks).

### <img src="/files/ldyOjC0101omFRo17o7F" alt="" data-size="line">Accessible

All our forms are fully responsive and aim to meet [Web Content Accessibility Guidelines](https://www.w3.org/TR/WCAG21/) (WCAG 2.1), which makes web content more accessible to people with disabilities. Respondents can use screen readers when filling the form.

... and more!


# What's new

## Upcoming

Watch this space for more updates!

<table data-view="cards"><thead><tr><th><select><option value="1bd36e67fde24806bfbf7d8495ec3526" label="New" color="blue"></option><option value="2mPIDCJKP2pp" label="Beta" color="blue"></option></select></th><th></th><th></th></tr></thead><tbody><tr><td></td><td><strong>No modes on FormSG</strong></td><td>Storage and MRF will combine.</td></tr></tbody></table>

## Released

<table data-view="cards"><thead><tr><th><select><option value="f17c5668a38a449faefcc5bffae9bc02" label="New" color="blue"></option><option value="Ed9NIVl020Jt" label="Beta" color="blue"></option></select></th><th></th><th></th><th><select><option value="i3R8xs5Xa4l7" label="Q4 2025" color="blue"></option><option value="RDeyvgZ1BHCW" label="Q1 2026" color="blue"></option></select></th><th data-hidden data-card-cover data-type="image">Cover image</th></tr></thead><tbody><tr><td></td><td><strong>Charts support for up to 10k responses and MRF</strong></td><td><p>1. Up to 10k responses — an increase from the previous limit of 1k.</p><p>2. Date filter — Filter responses within the period you would like to visualise.</p><p>3. Multi-respondent forms — Charts are now supported. Note that details such as step number and status progress are not yet reflected.</p></td><td></td><td><a href="/files/dPGr0ahDd7Tv4xlC7X4L">/files/dPGr0ahDd7Tv4xlC7X4L</a></td></tr><tr><td><span data-option="Ed9NIVl020Jt">Beta</span></td><td><strong>Save draft</strong></td><td>Respondents can now save their progress and continue later.</td><td></td><td><a href="/files/ObZUpolApQPGZc90jzmw">/files/ObZUpolApQPGZc90jzmw</a></td></tr><tr><td><span data-option="f17c5668a38a449faefcc5bffae9bc02">New</span></td><td><strong>Singpass for MRF (step 1)</strong></td><td>Support for Multi-respondent forms to allow Singpass authentication and Myinfo prefilled data on step 1 of the workflow.</td><td><span data-option="RDeyvgZ1BHCW">Q1 2026</span></td><td><a href="/files/Xcghza0cIhEApxWNaw1P">/files/Xcghza0cIhEApxWNaw1P</a></td></tr><tr><td><span data-option="f17c5668a38a449faefcc5bffae9bc02">New</span></td><td><strong>WOG AD</strong></td><td>Government officers can now log in to FormSG using WOG AD — an alternative to Email OTP and Singpass login.</td><td><span data-option="i3R8xs5Xa4l7">Q4 2025</span></td><td><a href="/files/EA2lWEzI97qVvFbivzFz">/files/EA2lWEzI97qVvFbivzFz</a></td></tr><tr><td><span data-option="f17c5668a38a449faefcc5bffae9bc02">New</span></td><td><strong>MRF: Email confirmation &#x26; PDF copy</strong></td><td>Support for Multi-respondent forms to allow respondents to receive an email confirmation and copy of their responses.</td><td><span data-option="i3R8xs5Xa4l7">Q4 2025</span></td><td><a href="/files/C14VLU3hSnS39ADSvbbb">/files/C14VLU3hSnS39ADSvbbb</a></td></tr><tr><td><span data-option="f17c5668a38a449faefcc5bffae9bc02">New</span></td><td><strong>Bulk PDF downloads</strong></td><td>Download multiple PDF copies of responses quickly in the Results page. Use these PDFs instead of storing physical or printed copies for audit.</td><td><span data-option="RDeyvgZ1BHCW">Q1 2026</span></td><td><a href="/files/e0ByvxfdpNZVOGzNdboU">/files/e0ByvxfdpNZVOGzNdboU</a></td></tr><tr><td></td><td><strong>Signature field</strong></td><td>This field allows respondents to draw their signature directly on your form.</td><td><span data-option="i3R8xs5Xa4l7">Q4 2025</span></td><td><a href="/files/hyXvedmTcZZfB2358wm7">/files/hyXvedmTcZZfB2358wm7</a></td></tr></tbody></table>


# What's new (To update to)

## Upcoming

Watch this space for more updates!

## Released

<table data-view="cards"><thead><tr><th><select><option value="f17c5668a38a449faefcc5bffae9bc02" label="New" color="blue"></option><option value="Ed9NIVl020Jt" label="Beta" color="blue"></option></select></th><th></th><th></th><th><select><option value="i3R8xs5Xa4l7" label="Q4 2025" color="blue"></option><option value="RDeyvgZ1BHCW" label="Q1 2026" color="blue"></option><option value="CeQkx4BqgsJC" label="Q2 2026" color="blue"></option></select></th><th data-hidden data-card-cover data-type="image">Cover image</th></tr></thead><tbody><tr><td></td><td><strong>Simplification of form modes</strong></td><td>Admins no longer have to choose between storage mode and Multi-respondent forms when creating forms.</td><td><span data-option="CeQkx4BqgsJC">Q2 2026</span></td><td><a href="/files/e7nlKNkgzY3B7aJkVYSi">/files/e7nlKNkgzY3B7aJkVYSi</a></td></tr><tr><td></td><td><strong>Charts support for up to 10k responses and MRF</strong></td><td><p>1. Up to 10k responses — an increase from the previous limit of 1k.</p><p>2. Date filter — Filter responses within the period you would like to visualise.</p><p>3. Multi-respondent forms — Charts are now supported. Note that details such as step number and status progress are not yet reflected.</p></td><td><span data-option="CeQkx4BqgsJC">Q2 2026</span></td><td><a href="/files/dPGr0ahDd7Tv4xlC7X4L">/files/dPGr0ahDd7Tv4xlC7X4L</a></td></tr><tr><td><span data-option="Ed9NIVl020Jt">Beta</span></td><td><strong>Save draft</strong></td><td>Respondents can now save their progress and continue later.</td><td><span data-option="RDeyvgZ1BHCW">Q1 2026</span></td><td><a href="/files/ObZUpolApQPGZc90jzmw">/files/ObZUpolApQPGZc90jzmw</a></td></tr><tr><td><span data-option="f17c5668a38a449faefcc5bffae9bc02">New</span></td><td><strong>Singpass for MRF (step 1)</strong></td><td>Support for Multi-respondent forms to allow Singpass authentication and Myinfo prefilled data on step 1 of the workflow.</td><td><span data-option="RDeyvgZ1BHCW">Q1 2026</span></td><td><a href="/files/Xcghza0cIhEApxWNaw1P">/files/Xcghza0cIhEApxWNaw1P</a></td></tr><tr><td><span data-option="f17c5668a38a449faefcc5bffae9bc02">New</span></td><td><strong>WOG AD</strong></td><td>Government officers can now log in to FormSG using WOG AD — an alternative to Email OTP and Singpass login.</td><td><span data-option="i3R8xs5Xa4l7">Q4 2025</span></td><td><a href="/files/EA2lWEzI97qVvFbivzFz">/files/EA2lWEzI97qVvFbivzFz</a></td></tr><tr><td><span data-option="f17c5668a38a449faefcc5bffae9bc02">New</span></td><td><strong>MRF: Email confirmation &#x26; PDF copy</strong></td><td>Support for Multi-respondent forms to allow respondents to receive an email confirmation and copy of their responses.</td><td><span data-option="i3R8xs5Xa4l7">Q4 2025</span></td><td><a href="/files/C14VLU3hSnS39ADSvbbb">/files/C14VLU3hSnS39ADSvbbb</a></td></tr><tr><td><span data-option="f17c5668a38a449faefcc5bffae9bc02">New</span></td><td><strong>Bulk PDF downloads</strong></td><td>Download multiple PDF copies of responses quickly in the Results page. Use these PDFs instead of storing physical or printed copies for audit.</td><td><span data-option="RDeyvgZ1BHCW">Q1 2026</span></td><td><a href="/files/e0ByvxfdpNZVOGzNdboU">/files/e0ByvxfdpNZVOGzNdboU</a></td></tr><tr><td></td><td><strong>Signature field</strong></td><td>This field allows respondents to draw their signature directly on your form.</td><td><span data-option="i3R8xs5Xa4l7">Q4 2025</span></td><td><a href="/files/hyXvedmTcZZfB2358wm7">/files/hyXvedmTcZZfB2358wm7</a></td></tr></tbody></table>


# Basic guide

Basic Guide contains all you need to know to start using FormSG!


# Login

Form is built for public officers. It is accessible from both the Internet and Singapore Government Intranet. There is no onboarding process or any installation required. Simply [login](https://form.gov.sg/#!/signin) with one of the following options:

* Email (e.g. @tech.gov.sg)
* WOG AD (government only)
* Singpass (selected agencies onboarded to POCDEX)

<figure><img src="/files/VzgPvsabbuOCxARgkam9" alt=""><figcaption></figcaption></figure>


# Admin dashboard

The admin dashboard is the first thing you see once you have successfully login. This is where you can see all forms you have created. On your dashboard, these are various actions you can take.

{% tabs %}
{% tab title="Admin Dashboard" %}

* **A - Create form**&#x20;
* **B - Edit form**

<figure><img src="/files/xmWsvf44lMntbQrTaqCV" alt=""><figcaption></figcaption></figure>

* **C - More form options**: Preview, duplicate, share form, manage collaborators and delete form.

<figure><img src="/files/ebVJkXX89aLLejyVMHCG" alt=""><figcaption></figcaption></figure>

* **D - Search and Filter**

<figure><img src="/files/2blbrMbnAxBI0AXWf6VA" alt=""><figcaption></figcaption></figure>

* **E - Create folders**

<figure><img src="/files/zReDWJG335EnmFsFM230" alt=""><figcaption></figcaption></figure>

* **F - Transfer all forms**

<figure><img src="/files/longWzORX5Om97Wmk8tJ" alt=""><figcaption></figcaption></figure>
{% endtab %}
{% endtabs %}


# Create form

<figure><img src="/files/vEH9qUJwna6Cl5J5dRsk" alt=""><figcaption></figcaption></figure>

When you click **Create form**, it will prompt you to choose between these modes:

* One respondent ([Storage Mode](/user-guides/basic-guide/create-form/create-form))
* Two or more respondents ([Multi-respondent forms](https://go.gov.sg/formsg-guide-mrf))

To compare between modes, click the next section.&#x20;

{% hint style="info" %}
Multi-respondent forms are a type of storage mode form. We will review how the creation of form can be improved later.
{% endhint %}


# Modes

<figure><img src="/files/jHjfTisxcowszM9VrCFt" alt=""><figcaption></figcaption></figure>

Form admins can choose these modes when creating a new form.

<table data-header-hidden><thead><tr><th width="193.10546875"></th><th width="277.62109375"></th><th></th></tr></thead><tbody><tr><td></td><td><mark style="background-color:purple;"><strong>Storage Mode</strong></mark></td><td><mark style="background-color:orange;"><strong>Multi-respondent forms</strong></mark></td></tr><tr><td><strong>Form Responses</strong></td><td>Download with secret key on FormSG or receive in email inbox</td><td>View or download with secret key on FormSG or receive in email inbox.</td></tr><tr><td><strong>Attachments</strong></td><td>Up to 20mb per form</td><td>Up to 20 mb per form</td></tr><tr><td><strong>Data Classification</strong></td><td>Up to Confidential (Cloud-Eligible) </td><td>Up to Confidential (Cloud-Eligible) </td></tr><tr><td><strong>Data Sensitivity</strong></td><td>Up to Sensitive (High)</td><td>Up to Sensitive (High)</td></tr><tr><td><strong>Webhook integration</strong></td><td>Yes</td><td>No</td></tr></tbody></table>

{% hint style="info" %}
Multi-respondent forms is a additional type of mode that is similar to Storage mode. There will be some functionalities that are currently disabled as the team will gradually offer them when ready.
{% endhint %}


# Create form

{% tabs %}
{% tab title="Video Tutorial" %}

### <img src="/files/L6aeyturpbmqLw0lGpTf" alt="" data-size="line"> Video Tutorial: Create Form

{% embed url="<https://www.youtube.com/watch?v=jdGaDNAAMBA>" %}
{% endtab %}

{% tab title="Text Tutorial" %}

### <img src="/files/j6GutTRDRrofXv3qKMKQ" alt="" data-size="line"> Text Tutorial: Create form

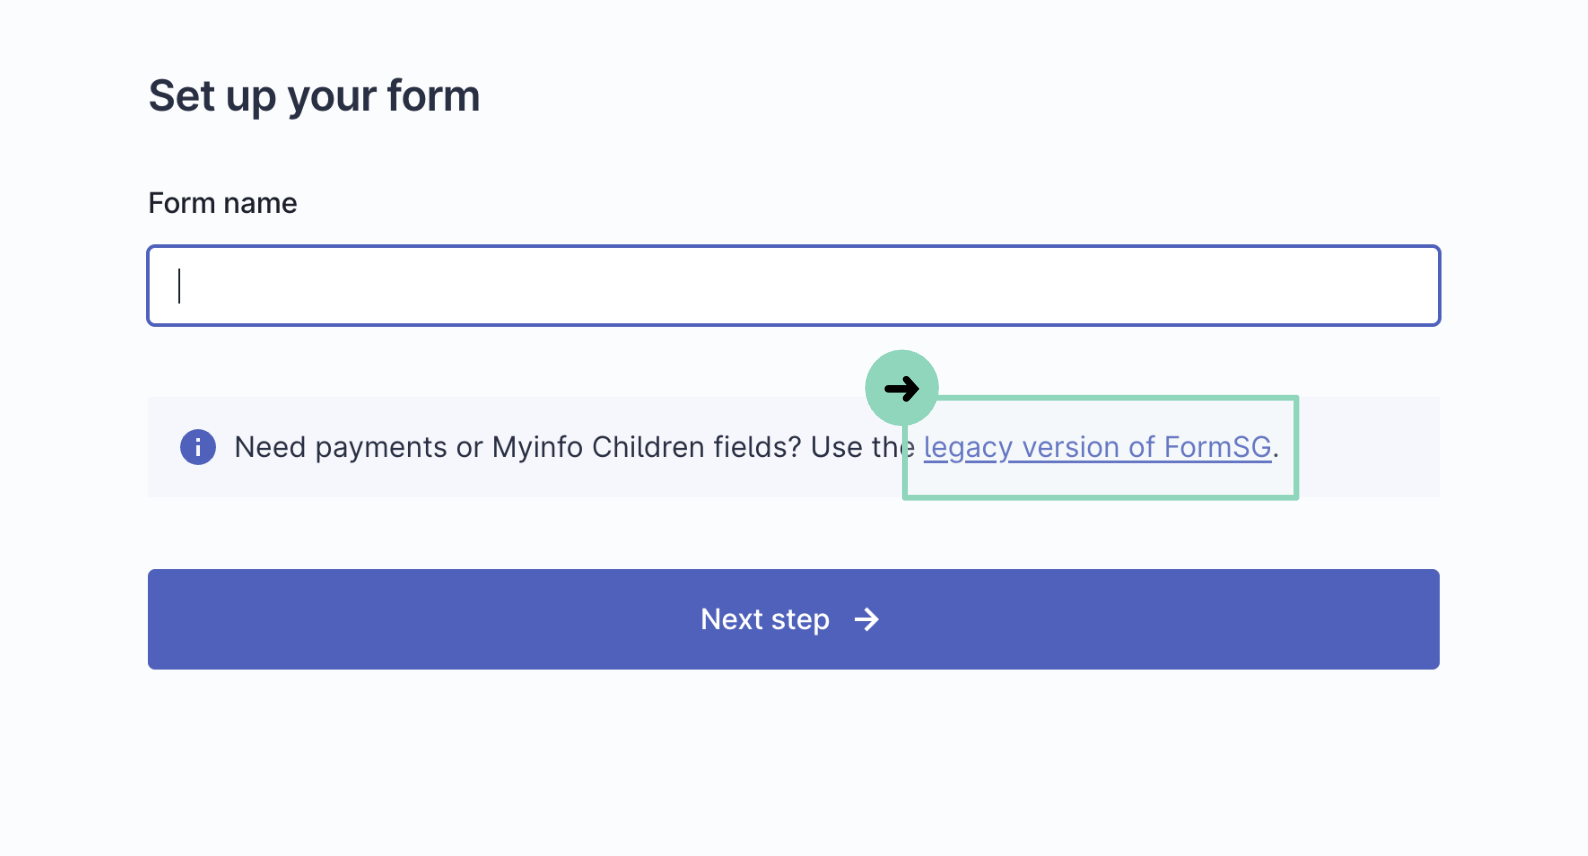
**Step 1: Enter form name**

<figure><img src="/files/O5GwNJpX8NTweY67mMBr" alt=""><figcaption></figcaption></figure>

**Step 2: Click Storage Mode**

<figure><img src="/files/IkkI0nAOdjKbJWfiI4nP" alt=""><figcaption></figcaption></figure>

**Step 3: Download Secret Key**

A secret key will now be generated only once. This **secret key is not seen by FormSG.** To proceed, you need to download the key. Optionally, you may also email the secret key to yourself or colleagues.&#x20;

<figure><img src="/files/NQHzCjvvL3WXOzLds5ep" alt=""><figcaption></figcaption></figure>

{% hint style="success" %}
You may also use a password manager or spreadsheet to store this secret key.
{% endhint %}

**Step 4: Tick the box to proceed**

To proceed, acknowledge by ticking the box.

<figure><img src="/files/cdzp31nhHI8UOFu6pwVI" alt=""><figcaption></figcaption></figure>

{% hint style="danger" %}
If you lose your secret key, FormSG team cannot retrieve your secret key or responses for you.&#x20;
{% endhint %}

**Step 5: Build your form**

You may now start building your form using various fields!

<figure><img src="/files/qp06JBWvc2i42JuyR646" alt=""><figcaption></figcaption></figure>
{% endtab %}
{% endtabs %}


# Using templates

To use a public form as template, you may simply add **/use-template** to the back of the form link.&#x20;

\
Example: <https://form.gov.sg/6680e3ffe827f5869eae608a/use-template>\ <br>


# Create fields with AI

{% hint style="info" %}
If you want to generate fields based on an existing form, please upload a PDF file of the form. Other file types (e.g., Word, Excel) are not supported at the moment.
{% endhint %}

**`Create fields with AI`** is a tool that can help generate form fields based on a simple prompt or a PDF file in seconds.&#x20;

This feature can be used to:&#x20;

* Quick-start your forms
* Digitise existing paper forms
* Get inspiration for new form layouts

{% tabs %}
{% tab title="Text Tutorial" %}

## <img src="https://guide.form.gov.sg/~gitbook/image?url=https%3A%2F%2F4000418884-files.gitbook.io%2F%7E%2Ffiles%2Fv0%2Fb%2Fgitbook-x-prod.appspot.com%2Fo%2Fspaces%252FPFgP7DGKSubWBlNdSCQd%252Fuploads%252FHvQoMuH9RPvCWZOfX8bW%252FText%2520tutorial.jpeg%3Falt%3Dmedia%26token%3D14ec1731-d8f5-4150-b18a-b90da084dc36&#x26;width=40&#x26;dpr=4&#x26;quality=100&#x26;sign=3d164e68&#x26;sv=2" alt="" data-size="line"> Text Tutorial: Create Fields with AI

### **Accessing the AI tool**

**For existing forms:**&#x20;

* Click **`Add fields`** at the top of the form builder

<figure><img src="/files/B6KM68BWDpf16XFNfum7" alt=""><figcaption></figcaption></figure>

* Then, click the **magic wand** icon located next to the search bar

<div align="center"><figure><img src="/files/VehCByZiRoQ7dPvHFCN0" alt=""><figcaption></figcaption></figure></div>

**For new or blank forms:**&#x20;

* Click the **`Create fields with AI`** button in the center of the form builder

<figure><img src="/files/ybfKlgPXxSvMMPZ1rlvP" alt=""><figcaption></figcaption></figure>

### **Choose how you want to generate your form fields**

After launching the AI tool, you can choose between:

1. **Text Prompt**: Type a description of your form
2. **PDF Upload**: Upload a PDF version of your existing form

<figure><img src="/files/MXrlkRafn5KxHtEZ6bVr" alt=""><figcaption></figcaption></figure>

**Option A: Using a text prompt**&#x20;

**A)** In the **`Text`** tab, describe what your form should collect. Example: *“I want to create a form that collects employee satisfaction feedback across departments and roles.”*

**B)** You may also choose to click any of the quick-start suggestions

<figure><img src="/files/vWchfm8Foc5dPOjcWLFO" alt=""><figcaption></figcaption></figure>

**C)** Once you are ready, click **`Create fields`** and wait for the tool to generate the fields

<figure><img src="/files/1lR9OGKIpwAGKou28uiq" alt=""><figcaption></figcaption></figure>

#### **Option B: Upload a PDF**

**A)** Click on the **`PDF`** tab

**B)** Upload a PDF version of your form. Not&#x65;*: Make sure your PDF file does not exceed 10 pages*

<figure><img src="/files/SKx9kJ4vOUWCvdKnWj5z" alt=""><figcaption></figcaption></figure>

**C)** Click **`Create fields`** and wait for the tool to generate the fields

<figure><img src="/files/ozTl19EA4BWQYo0giIm2" alt=""><figcaption></figcaption></figure>

**D)**  Review and edit the generated fields directly in the builder. You can confirm the fields by selecting **`Yes, keep them`** or delete them entirely by selecting **`No, delete them`**

<figure><img src="/files/J5F6xESyejmD9wFMMMCk" alt=""><figcaption></figcaption></figure>
{% endtab %}
{% endtabs %}


# Create form (To update to)

{% tabs %}
{% tab title="Text Tutorial" %}

### <img src="/files/jDBdeZFskPnuTz6UKskv" alt="" data-size="line"> Text Tutorial: Create form

**Step 1: Click Create form at the admin dashboard**

<figure><img src="/files/bLZwGIQvxzVqTplLD8vS" alt=""><figcaption></figcaption></figure>

**Step 2: Enter form name**

<figure><img src="/files/uG2kIHC491ZDHsDROvR9" alt=""><figcaption></figcaption></figure>

**Step 3: Download Secret Key**

A secret key will now be generated only once. This **secret key is not seen by FormSG.** To proceed, you need to download the key. Optionally, you may also email the secret key to yourself or colleagues.&#x20;

<figure><img src="/files/NQHzCjvvL3WXOzLds5ep" alt=""><figcaption></figcaption></figure>

{% hint style="success" %}
You may also use a password manager or spreadsheet to store this secret key.
{% endhint %}

**Step 4: Tick the box to proceed**

To proceed, acknowledge by ticking the box.

<figure><img src="/files/cdzp31nhHI8UOFu6pwVI" alt=""><figcaption></figcaption></figure>

{% hint style="danger" %}
If you lose your secret key, FormSG team cannot retrieve your secret key or responses for you.&#x20;
{% endhint %}

**Step 5: Build your form**

You may now start building your form using various fields!
{% endtab %}
{% endtabs %}


# Using templates

To use a public form as template, you may simply add **/use-template** to the back of the form link.&#x20;

\
Example: <https://form.gov.sg/6680e3ffe827f5869eae608a/use-template>\ <br>


# Create fields with AI

{% hint style="info" %}
If you want to generate fields based on an existing form, please upload a PDF file of the form. Other file types (e.g., Word, Excel) are not supported at the moment.
{% endhint %}

**`Create fields with AI`** is a tool that can help generate form fields based on a simple prompt or a PDF file in seconds.&#x20;

This feature can be used to:&#x20;

* Quick-start your forms
* Digitise existing paper forms
* Get inspiration for new form layouts

{% tabs %}
{% tab title="Text Tutorial" %}

## <img src="https://guide.form.gov.sg/~gitbook/image?url=https%3A%2F%2F4000418884-files.gitbook.io%2F%7E%2Ffiles%2Fv0%2Fb%2Fgitbook-x-prod.appspot.com%2Fo%2Fspaces%252FPFgP7DGKSubWBlNdSCQd%252Fuploads%252FHvQoMuH9RPvCWZOfX8bW%252FText%2520tutorial.jpeg%3Falt%3Dmedia%26token%3D14ec1731-d8f5-4150-b18a-b90da084dc36&#x26;width=40&#x26;dpr=4&#x26;quality=100&#x26;sign=3d164e68&#x26;sv=2" alt="" data-size="line"> Text Tutorial: Create Fields with AI

### **Accessing the AI tool**

**For existing forms:**&#x20;

* Click "Fields" at the top of the form builder

<figure><img src="/files/B6KM68BWDpf16XFNfum7" alt=""><figcaption></figcaption></figure>

* Then, click the **magic wand** icon located next to the search bar

<div align="center"><figure><img src="/files/VehCByZiRoQ7dPvHFCN0" alt=""><figcaption></figcaption></figure></div>

**For new or blank forms:**&#x20;

* Click the "Create field with AI" button in the center of the form builder

<figure><img src="/files/ybfKlgPXxSvMMPZ1rlvP" alt=""><figcaption></figcaption></figure>

### **Choose how you want to generate your form fields**

After launching the AI tool, you can choose between:

1. **Text Prompt**: Type a description of your form
2. **PDF Upload**: Upload a PDF version of your existing form

<figure><img src="/files/MXrlkRafn5KxHtEZ6bVr" alt=""><figcaption></figcaption></figure>

**Option A: Using a text prompt**&#x20;

**A)** In the "Text" tab, describe what your form should collect. Example: *“I want to create a form that collects employee satisfaction feedback across departments and roles.”*

**B)** You may also choose to click any of the quick-start suggestions

<figure><img src="/files/vWchfm8Foc5dPOjcWLFO" alt=""><figcaption></figcaption></figure>

**C)** Once you are ready, click "Create fields" and wait for the tool to generate the fields

<figure><img src="/files/1lR9OGKIpwAGKou28uiq" alt=""><figcaption></figcaption></figure>

#### **Option B: Upload a PDF**

**A)** Click on the "PDF" tab

**B)** Upload a PDF version of your form. Not&#x65;*: Make sure your PDF file does not exceed 10 pages*

<figure><img src="/files/SKx9kJ4vOUWCvdKnWj5z" alt=""><figcaption></figcaption></figure>

**C)** Click "Create fields" and wait for the tool to generate the fields

<figure><img src="/files/ozTl19EA4BWQYo0giIm2" alt=""><figcaption></figcaption></figure>

**D)**  Review and edit the generated fields directly in the builder. You can confirm the fields by selecting "Yes, keep them" or delete them entirely by selecting "No, delete them"

<figure><img src="/files/J5F6xESyejmD9wFMMMCk" alt=""><figcaption></figcaption></figure>
{% endtab %}
{% endtabs %}


# Edit form


# Header and instructions

The Header and Instructions section <img src="/files/Ko7pPtrtFQPucLhJ6dNc" alt="" data-size="line"> allows you to customise what respondents see when they load your form.&#x20;

This includes how the form looks and instructions where your respondent will pay the most attention.

{% tabs %}
{% tab title="Video Tutorial" %}

### <img src="/files/L6aeyturpbmqLw0lGpTf" alt="" data-size="line"> Video Tutorial: Header and Instructions

{% embed url="<https://youtu.be/KEDYyJ5NtCI>" %}
{% endtab %}

{% tab title="Text Tutorial" %}

### <img src="/files/j6GutTRDRrofXv3qKMKQ" alt="" data-size="line"> Text Tutorial: **Header and Instructions**

**Click the "Create" tab** at the top of your form, and then **click the** <img src="/files/Ko7pPtrtFQPucLhJ6dNc" alt="" data-size="line"> **headers and instructions** logo on the left.&#x20;

<figure><img src="/files/eNRUXsYn5jc8PEWbdtkO" alt=""><figcaption></figcaption></figure>

**A - Logo** -> Choose logo (agency's default logo, no logo or custom logo)

<figure><img src="/files/D8RwSLGh9zN6FslSqQoJ" alt=""><figcaption></figcaption></figure>

**B - Theme colour**

<figure><img src="/files/w11dtOXSCTOCQUinz1pn" alt=""><figcaption></figcaption></figure>

**C - Time taken to complete form** -> You can share how long it takes to complete the form which can be useful for the respondents to know before they begin filling in the form.

<figure><img src="/files/n7HoJbOu7NWyQSC6QTz6" alt=""><figcaption></figcaption></figure>

**D - Instructions** -> You may put additional instructions/information here (e.g. privacy policy, website link).&#x20;

<figure><img src="/files/gAL5HgfMLeo4eZxTpG8t" alt=""><figcaption></figcaption></figure>
{% endtab %}
{% endtabs %}


# Thank you page

The Thank You page is what the respondent sees once they have submitted the form. Here, you can provide follow-up instructions or redirect them.

{% tabs %}
{% tab title="Video Tutorial" %}

### <img src="/files/L6aeyturpbmqLw0lGpTf" alt="" data-size="line"> Video Tutorial: Thank You Page

{% hint style="info" %}
The video below has some discrepancies. You may find the Thank you page button to the left as well <img src="/files/XcAODNKqgzOIuST5vgaE" alt="" data-size="line">.
{% endhint %}

{% embed url="<https://youtu.be/59CGcNSPoq4>" %}
{% endtab %}

{% tab title="Text Tutorial" %}

### <img src="/files/j6GutTRDRrofXv3qKMKQ" alt="" data-size="line"> Text Tutorial: **Thank You Page**

{% hint style="info" %}
The tutorial below has some discrepancies. You may also find the Thank you page button to the left by clicking on this icon <img src="/files/XcAODNKqgzOIuST5vgaE" alt="" data-size="line">.
{% endhint %}

**Click the "Create" tab** at the top of your form, and then **click the "Customise Thank you page"** button at the bottom of your form.&#x20;

<figure><img src="/files/jAWW3smSSAIvLjrm7qcW" alt=""><figcaption></figcaption></figure>

**A - Title/Instructions** -> You can share additional information here which will be shown after a response has been submitted (e.g. part 2 survey, website link).

<figure><img src="/files/ok8NywoM9msU6wZQd3ek" alt=""><figcaption><p>outdated</p></figcaption></figure>

**B - Button** -> By default, the button redirects the respondent back to the same form. However, you can make changes to this button to redirect elsewhere (e.g. [go.gov.sg](https://guide.form.gov.sg/user-guides/basic-guide/edit-form/www.go.gov.sg) file image link, website, another form).

<figure><img src="/files/tsqPXpkoSkNbQXlPgA2L" alt=""><figcaption><p>outdated</p></figcaption></figure>
{% endtab %}
{% endtabs %}


# Publish form

Congrats on building your form! This section guides you on how to publish your forms!&#x20;

{% tabs %}
{% tab title="Video Tutorial" %}

### <img src="/files/L6aeyturpbmqLw0lGpTf" alt="" data-size="line"> Video Tutorial: Publish Form

{% embed url="<https://youtu.be/6GYrEFBmM7s>" %}
{% endtab %}

{% tab title="Text Tutorial" %}

### <img src="/files/j6GutTRDRrofXv3qKMKQ" alt="" data-size="line"> Text Tutorial: **Publish Form**

**Step 1: Publish your form in settings**

To make your form public, click **settings** and press the toggle button below.&#x20;

<figure><img src="/files/o0txesY90MWvTP2Lty2P" alt=""><figcaption></figcaption></figure>

**Step 2: Enter or upload the secret key you downloaded at form creation.**&#x20;

<figure><img src="/files/reZOuMTh7tu3JnV1gWVp" alt=""><figcaption></figcaption></figure>

**Step 3: Tick the statement and activate form.**

<figure><img src="/files/p0NuoUC77EUJ7zNNHhJw" alt=""><figcaption></figcaption></figure>

{% hint style="info" %}
If you encounter any error, you may have:\
a) used an incorrect secret key

b) made amendments to the secret key by accident&#x20;

c) duplicated a form which generated a new secret key&#x20;
{% endhint %}

**Step 4: Share your form link and start collecting responses!**

<figure><img src="/files/7seTkj6WUNKevrPWwfwI" alt=""><figcaption></figcaption></figure>

<figure><img src="/files/eDN0JDMomLCOVA0hvr8H" alt=""><figcaption></figcaption></figure>

Responses will be stored encrypted on FormSG database.

**Step 5: Receive email responses to your inboxes (optional)**

In the same settings page, click "Email notifications". You may add additional email addresses here to receive responses.&#x20;

<figure><img src="/files/7t2hkQSikQ1yXJFvaW7X" alt=""><figcaption></figcaption></figure>
{% endtab %}
{% endtabs %}


# Export Responses

Good job on publishing your form! In this section, learn how to export your responses to a CSV format.

{% tabs %}
{% tab title="Video Tutorial" %}

### <img src="/files/L6aeyturpbmqLw0lGpTf" alt="" data-size="line"> Video Tutorial: Export Responses

{% embed url="<https://youtu.be/e5_kAZLLUB8>" %}
{% endtab %}

{% tab title="Text Tutorial" %}

### <img src="/files/j6GutTRDRrofXv3qKMKQ" alt="" data-size="line"> Text Tutorial: Export Responses

You may specify which recipients can receive in the settings.

<figure><img src="/files/qCElpIfkNLAV9NvCve9b" alt=""><figcaption></figcaption></figure>

To export your results as a CSV, see below.

**Step 1: View responses**

To view storage mode responses, click the **results** tab.&#x20;

<figure><img src="/files/a13bd9neeg2xthquH9F2" alt=""><figcaption></figcaption></figure>

**Step 2: Enter or upload your secret key and click "Unlock responses".**&#x20;

<figure><img src="/files/Seucj8C9JAmDSyBpmVno" alt=""><figcaption></figcaption></figure>

**Step 3: View responses**

You will now be able to see all your responses in the results page. If you would like to see individual responses, you may click on the Reference ID.

<figure><img src="/files/rb6vPOdQSGdoXnLCB3nJ" alt=""><figcaption></figcaption></figure>

Clicking on arrow buttons allows you to see other responses in order of submission time.

<figure><img src="/files/f9TRHcEiiCNSYko1Eych" alt=""><figcaption></figcaption></figure>

**Step 4: Export responses**

To export, click on the download button. You may also use the date selector to filter responses within a timeframe, before exporting.

<figure><img src="/files/AfajWwUomZVW1cwBm8cj" alt=""><figcaption></figcaption></figure>

You can select which of the following are required:

<figure><img src="/files/ebvXsKdYsqWx3y3w3y2u" alt=""><figcaption></figcaption></figure>

{% hint style="info" %}
Why do I have an additional quote in some of my responses? Read [here](https://formsg.gitbook.io/form-user-guide/faq/faq/storage-mode#security-enhancements-to-exports).
{% endhint %}
{% endtab %}
{% endtabs %}


# Export Responses (to be updated to)

Good job on publishing your form! In this section, learn how to export your responses to a CSV format.

{% tabs %}
{% tab title="Text Tutorial" %}

### <img src="/files/j6GutTRDRrofXv3qKMKQ" alt="" data-size="line"> Text Tutorial: Export Responses

You may specify which recipients can receive in the settings.

<figure><img src="/files/qCElpIfkNLAV9NvCve9b" alt=""><figcaption></figcaption></figure>

To export your results as a CSV, see below.

**Step 1: View responses**

To view storage mode responses, click the **results** tab.&#x20;

<figure><img src="/files/DXKZl3wXdENAlQj4hahm" alt=""><figcaption></figcaption></figure>

**Step 2: Enter or upload your secret key and click "Unlock responses".**&#x20;

<figure><img src="/files/JaHS8VVjkQ1ScGZcUU9e" alt=""><figcaption></figcaption></figure>

**Step 3: View responses**

You will now be able to see all your responses in the results page. If you would like to see individual responses, you may click on the Reference ID.

Note: 'Workflow status' and 'Pending response' at will be empty if there's no [workflow](/user-guides/advanced-guide/workflows) enabled on this form.&#x20;

<figure><img src="/files/VStPMQpmS9nMI478wdZ4" alt=""><figcaption></figcaption></figure>

Clicking on arrow buttons allows you to see other responses in order of submission time.

<figure><img src="/files/TTDADrw1svQqZBWBgnsR" alt=""><figcaption></figcaption></figure>

**Step 4: Export responses**

To export, click on the download button. You may also use the date selector to filter responses within a timeframe, before exporting.

<figure><img src="/files/TFcCyOHMXVUvp1uQU82p" alt=""><figcaption></figcaption></figure>

You can select which of the following are required:

<figure><img src="/files/HYGXX9t53oSl6cgXXo25" alt=""><figcaption></figcaption></figure>

{% hint style="info" %}
Why do I have an additional quote in some of my responses? Read [here](https://formsg.gitbook.io/form-user-guide/faq/faq/storage-mode#security-enhancements-to-exports).
{% endhint %}
{% endtab %}
{% endtabs %}


# Add or Remove Collaborators

Upon creating a form, the creator will become the **owner** and the only collaborator on the form. We recommend adding more collaborators to prevent sudden loss of access to the form.

These are three different access levels (owner, editor and viewer).&#x20;

<table><thead><tr><th width="200"></th><th width="141"></th><th width="139"></th><th width="137"></th></tr></thead><tbody><tr><td><strong>Rights</strong></td><td>       <strong>Owner</strong></td><td>        <strong>Editor</strong></td><td>       <strong>Viewer</strong></td></tr><tr><td>Delete form</td><td>          ✅</td><td>          ❌</td><td>          ❌</td></tr><tr><td>Edit form</td><td>          ✅</td><td>          ✅</td><td>          ❌</td></tr><tr><td>Edit settings</td><td>          ✅</td><td>          ✅</td><td>          ❌</td></tr><tr><td>View results</td><td>          ✅</td><td>          ✅</td><td>          ✅</td></tr><tr><td>Add/remove collaborators</td><td>          ✅</td><td>          ✅</td><td>          ❌</td></tr><tr><td>Share form</td><td>          ✅</td><td>          ✅</td><td>          ✅</td></tr></tbody></table>

* **Owner**: Full rights
* **Editor**: Same rights as form owner, but is unable to **delete** the form or make someone the owner.&#x20;
* **Viewer**: Can only view **results** and **share** form.&#x20;

Learn how to edit collaborators below:

{% tabs %}
{% tab title="Video Tutorial" %}

### <img src="/files/L6aeyturpbmqLw0lGpTf" alt="" data-size="line"> Video Tutorial: Edit Collaborators

{% embed url="<https://youtu.be/dlDu-SRnNI8>" %}
{% endtab %}

{% tab title="Text Tutorial" %}

### <img src="/files/j6GutTRDRrofXv3qKMKQ" alt="" data-size="line"> Text Tutorial: Edit Collaborators

**Step 1: Click on this button** <img src="/files/E7GdfynfGia0WTYEVhvs" alt="" data-size="line">&#x20;

You can add/remove collaborators on the **top right hand corner** of each form by clicking on this button below.

<figure><img src="/files/ncYN7qplj1ZEICxNdjSc" alt=""><figcaption></figcaption></figure>

**Step 2: Enter collaborator's email and choose** [**access**](#access-levels) **levels**

<figure><img src="/files/YKfjtF02gemBHvtHywDl" alt=""><figcaption></figcaption></figure>

{% hint style="warning" %}
Adding a collaborator in Email mode does not mean that they receive responses immediately. You need to add them as [recipients](broken://pages/Xj4Kcg9dHMTsCzWibaRC) in the email mode form's settings.
{% endhint %}
{% endtab %}
{% endtabs %}


# Settings

This section covers settings for beginners. The other settings will be covered by different sections in the guide.

<figure><img src="/files/DwrKWLC1K7x5wx22v5B0" alt=""><figcaption></figcaption></figure>

* **A - Close/Open your forms** -> When closed, your form will not be able to collect responses.
* **B - Set message for closed forms** -> You may use this setting to redirect your users to a newly created form.

<figure><img src="/files/lk8k8bYlHi0TN21cxYUN" alt=""><figcaption></figcaption></figure>

* **C -** [**Manage collaborators**](/user-guides/basic-guide/add-or-remove-collaborators) -> Add/remove collaborators and manage their access levels
* **D - Preview form** -> See how your form looks to your respondents. Submitting here will not capture any responses.
* **E - Share your form** -> A randomly generated form link that can be disseminated to respondents. You may also share a template of the form.&#x20;

<figure><img src="/files/npClx2LVwQgJgc3sjaz8" alt=""><figcaption></figcaption></figure>

* **F - Enable reCAPTCHA** -> This option will occasionally provide challenges to your respondents, which must be completed in order to submit the form. This is to prevents bots or spam submissions for your form.
* **G - Receive email notifications for issues reported** -> For cases where respondents reports on any form issues, you can choose to have them sent directly to your email. &#x20;
* **H- Change form name**

<figure><img src="/files/GLMxS0o76pEk92CVmCuH" alt=""><figcaption></figcaption></figure>

**I - Add email recipients** -> Every recipient here will receive all responses submitted. Being a collaborator does not automatically make you a recipient.

<figure><img src="/files/rlbVmFkkLWUgX0c59Qjd" alt=""><figcaption></figcaption></figure>


# Advanced guide

Now that you know all the basics, it is time to level up and explore what you can do on FormSG!


# Workflows (to update to)

Adding workflows to your forms lets multiple people fill in and/or approve the form in sequence.

{% hint style="info" %}
Forms with workflows was previously known as Multi-respondent forms. We are [simplifying form modes](/faq/faq/simplifying-form-modes) and bringing the workflow feature to all forms by default.&#x20;
{% endhint %}

### Why add workflows?

1. Customise your workflows
   * Use a **workflow builder** to **assign fields** that each respondent are allowed to fill at each step.
   * Enable **respondent** **approvals** to determine whether an existing workflow should continue
2. Save time to collect data from multiple respondents.
   * **Automatic routing** to the next respondent in sequence.
3. Export collated responses securely&#x20;
   * Responses from different respondents can be **exported from one database with secret key**.


# Example use cases

{% hint style="info" %}
You may use /use-template at the back of any public form link to use the template.\
E.g. <https://form.gov.sg/65a0c954399a250012906319/use-template>
{% endhint %}

**Case Studies (Operations):**

{% embed url="<https://youtu.be/DevGiA8ubTg>" %}

{% embed url="<https://form.gov.sg/65a0c954399a250012906319>" %}

{% embed url="<https://form.gov.sg/668039e9ff07f079327582a9>" %}

**Case Studies (Manpower/HR)**

{% embed url="<https://form.gov.sg/66d951aad607d961cf65ae55>" %}

{% embed url="<https://form.gov.sg/66d98a6eb1173bf5b49cec5d>" %}

**Case Studies (Finance)**

{% embed url="<https://form.gov.sg/6680e3ffe827f5869eae608a>" %}

**Case Studies (Schools)**

{% embed url="<https://form.gov.sg/667260371a9506387e8deb42>" %}

{% embed url="<https://form.gov.sg/6680d7ad8abd79e1b3697822>" %}


# Create a form with workflow

{% tabs %}
{% tab title="Text tutorial" %}

### <img src="/files/Evbqvm1BnUx6ONI3szxV" alt="" data-size="line"> Text Tutorial: Form with workflow

If you are new to FormSG, we recommend to first learn how to [create forms](/user-guides/basic-guide/create-form) (without workflows) before adding workflows. Once you have learnt the basics, please proceed to add a workflow in the following tutorial.

***

### **Step 1: Create form**&#x20;

<figure><img src="/files/Ol5KNUiqAIwSshyCjOGY" alt=""><figcaption></figcaption></figure>

In this example, I would like to design an account creation approval form. There is an applicant and a reporting officer (RO). I have populated the fields as follows.

{% hint style="info" %}
Before you proceed, you will either need to send the form to a RO using a (1) specific email or (2) from an email field. If it is scenario 2, please create an email field for the tutorial purposes.
{% endhint %}

<figure><img src="/files/fU3wGeZw069OHGCFbvGc" alt="" width="375"><figcaption></figcaption></figure>

You will notice that respondent 1 is able to fill all parts of the form at this point, which includes an email and Yes/No field (approve/reject) meant for RO to fill in. How do we restrict the fields that can be answered for each respondent? \
\
Let's fix that in the workflow builder in step 2.

### **Step 2: Determine your form routing under "Workflow"**<img src="/files/rw9X2UYsN92FhfKIMtjU" alt="" data-size="line">&#x20;

First, click on the workflow icon <img src="/files/rw9X2UYsN92FhfKIMtjU" alt="" data-size="line"> to the left.

<figure><img src="/files/SoxlIrnKGGmSzfHJR2Wp" alt=""><figcaption></figcaption></figure>

This brings you to the workflow builder, which allows you to set-up the routing and questions to fill at each step.&#x20;

Create workflow.

<figure><img src="/files/PGY2vhwsPo75mrHBZ5ul" alt=""><figcaption></figcaption></figure>

Select fields that respondent 1 needs to fill

<figure><img src="/files/OKm0yCQQm472gBpm1yUy" alt=""><figcaption></figcaption></figure>

Questions need to be filled by respondent 1 have to be checked.

<figure><img src="/files/zgqj7VGXI4RaTrylL6nh" alt=""><figcaption></figcaption></figure>

Once you have made your selection, click on save.&#x20;

<figure><img src="/files/On44qQAc1hiCBOxGKKD6" alt=""><figcaption></figcaption></figure>

This is the updated view when an applicant opens up the form as respondent 1.

<figure><img src="/files/8SeF9pBfYSwL8e9fZ2XS" alt="" width="375"><figcaption></figcaption></figure>

### **Step 3: Choose how to determine the next respondent**&#x20;

In forms with workflow, you can route submissions to the next person. In the workflow section again, click on "+ Add step".&#x20;

<figure><img src="/files/PtncFF3GaL61gGo8WMXa" alt=""><figcaption></figcaption></figure>

You will be presented with three options on routing rules:

a) Specific email(s) → Send to the **same** email each time

b) An email field from the form → Send to a **different** email each time, specified by the previous respondent.

c) Emails assigned to options in a dropdown field → Send to **certain** email(s), based on **an option that the previous respondent chooses**&#x20;

<figure><img src="/files/Nao9K2sg9d7a2vdIwQos" alt=""><figcaption></figcaption></figure>

If you choose "Specific email(s)", simply add an email address like this example:

<figure><img src="/files/Qh7RQsGYerNsNCqNYLDu" alt=""><figcaption></figcaption></figure>

If you choose "An email field from the form", pick an email field you have created.

<figure><img src="/files/JybMaigow6ded2K6dypm" alt=""><figcaption></figcaption></figure>

If you choose "emails assigned to options in a dropdown field", you will need to:&#x20;

* Choose an existing dropdown field in your form&#x20;
* Select "add emails to options"
* Download and edit the CSV template provided
* Assign email(s) to each option in the CSV template

<figure><img src="/files/7q85EPkdcI7I2A606bwJ" alt=""><figcaption></figcaption></figure>

*Refer below to more detailed steps:*&#x20;

<div><figure><img src="/files/s1CZBpWU4OapeYhQACcO" alt=""><figcaption></figcaption></figure> <figure><img src="/files/j9uem4x3TxS6CAhCTwvo" alt=""><figcaption></figcaption></figure> <figure><img src="/files/B6CBQ98F4sDsG23fB4Gt" alt=""><figcaption></figcaption></figure> <figure><img src="/files/0b2WfXuQWzqNzVERV4GK" alt=""><figcaption></figcaption></figure> <figure><img src="/files/ojC4U3zcsfFrPZKD7n7i" alt=""><figcaption></figcaption></figure></div>

### **Step 4: Assign fields to the next respondent** &#x20;

You may then specify which questions respondent 2 (RO) can fill. In our use case, we have selected the email and the Yes/No (approve/reject) fields.

<figure><img src="/files/wnLd6UoTbfTDppZaaqWZ" alt=""><figcaption></figcaption></figure>

### **Step 5: Add approval steps to your workflow (optional)**

If your workflow has approvals, you may enable "This respondent is an approval" from step 2 onwards. This requires a Yes/No field. When enabled:

* Yes - The workflow will continue to proceed to the next step
* No - The workflow will end here.&#x20;

<figure><img src="/files/sHLIZso8AMEHk2urXPd1" alt=""><figcaption></figcaption></figure>

Enable approval using the toggle.

<figure><img src="/files/hjEqBqkqs0iXxnAeEyhZ" alt=""><figcaption></figcaption></figure>

Select a Yes/No field on your form. If you currently do not have one, you would need to create one under the Create Field tab. Do also ensure that the field has been assigned to this respondent in this step.

<figure><img src="/files/RDyQwuV305ZwF6SctJRT" alt=""><figcaption></figcaption></figure>

Save the field.

<figure><img src="/files/1gjcG5ZQSnfkiPxKDcty" alt=""><figcaption></figcaption></figure>

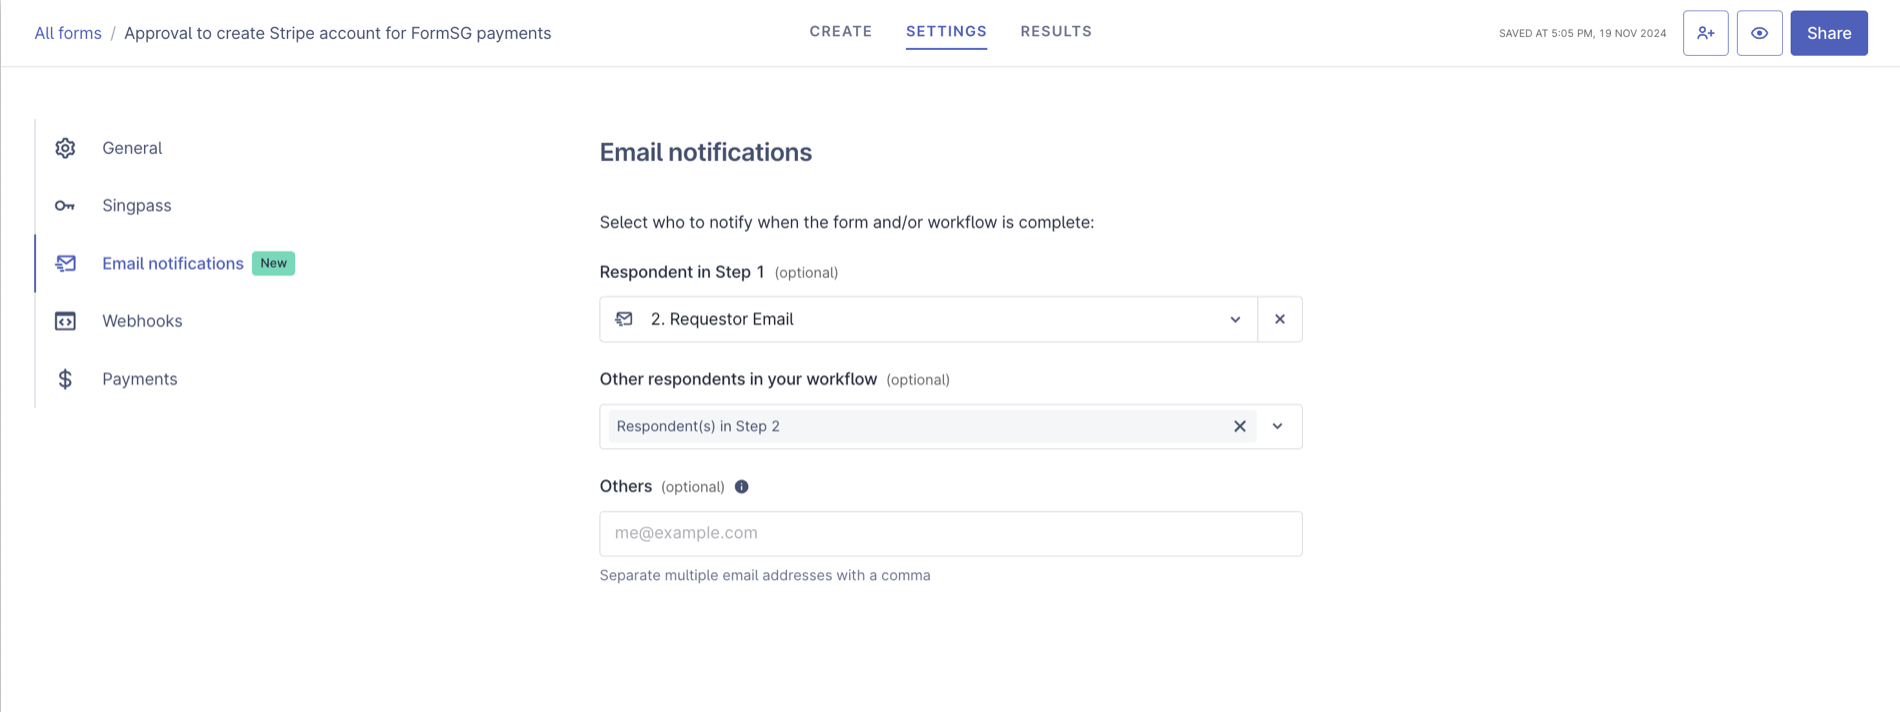
### **Step 6: Determine who will receive email notifications (optional)**

Click on Settings, and then Email notifications

<figure><img src="/files/qVik85D1EDcmg8ny8ufc" alt=""><figcaption></figcaption></figure>

<figure><img src="/files/8U7fRgNM12Sd09Bq8cgR" alt=""><figcaption></figcaption></figure>

Select and enter respondents to be notified after the entire workflow has been completed

* Notify respondent in Step 1 -> Select an email field from the form that represents Step 1.
* Notify other respondents in your workflow -> Toggle the steps in your workflow for which respondents should receive notifications.
* Notify others -> If there are any recipients outside your form and workflow, you can specify them here.

<figure><img src="/files/c0XFCP1VVPqPnzeAPClI" alt=""><figcaption></figcaption></figure>

### **Step 7: Enable status tracking (optional)**

If you would like your respondents view and track their submission status, you may refer to [this page](/user-guides/multi-respondent-form-guide/managing-responses/status-tracking-link) on how to set this up.&#x20;

### **Step 8: Sharing the form**

Once you are ready, you may share your form!

<figure><img src="/files/RQzUuCAnYP1AB1p9U9D7" alt=""><figcaption></figcaption></figure>

<figure><img src="/files/Xhg847iTrIJ8WoFaYQ6N" alt="" width="375"><figcaption></figcaption></figure>

Upon submission of form by the applicant, an email will be forwarded to the RO.&#x20;

<figure><img src="/files/9YCaQouM5kniqIq6kg39" alt=""><figcaption></figcaption></figure>

They will be prompted to click on "fill form."

<figure><img src="/files/2BP5wkoMgiqXJ1pv5xKQ" alt=""><figcaption></figcaption></figure>

When the form is opened, notice that the RO can see applicant's submission but the responses cannot be amended, as configured in the workflow builder.

<figure><img src="/files/lSr4Pyoiwu6s31uXSOvY" alt="" width="375"><figcaption></figcaption></figure>

That's it!

If you have more steps, it will be routed to the next person and so on. Once the workflow has been completed, a notification will be sent to all selected parties. The final approval status will also be included if this has been enabled in the workflow.

<figure><img src="/files/mv2A8VVredBty4M2bJUg" alt=""><figcaption></figcaption></figure>
{% endtab %}
{% endtabs %}


# Managing responses


# Results dashboard

Form admins can view the workflow status and the pending step of a workflow directly on the Results page. The displayed workflow statuses will differ depending on whether the approval feature is enabled in the workflow.

<figure><img src="/files/6v0jnEQu7ChLGbXdn3I1" alt=""><figcaption></figcaption></figure>

The workflow status and the pending step of a workflow are also included in the exported CSV.

<figure><img src="/files/piU4R34NrDEFKM8nNIxv" alt=""><figcaption></figcaption></figure>


# Sending reminders

To send a reminder email for pending respondents/approvers to take action, you can identify 'Pending' submissions on the Results page and click on the “Send reminder” button.

<figure><img src="/files/5XUpRRwk3ggnhIdu2S8p" alt=""><figcaption></figcaption></figure>

An email reminder will be sent to the pending respondents/approvers to review and complete their part of the form.

<figure><img src="/files/yicqLgKEkVb05aMQ9eky" alt=""><figcaption></figcaption></figure>


# Status tracking link

If you would like your respondents to be able to view and track their submission status, you can enable the “Allow respondents to track their submission status” toggle at the top of the Workflow page.

<figure><img src="/files/zoAtLxwA0BuI4FAKha55" alt=""><figcaption></figcaption></figure>

This will display a status tracking link on the Thank You page upon submission, allowing respondents to view the status tracking page anytime later.

<figure><img src="/files/S4D5M3P4sXkLHM4bEanG" alt=""><figcaption></figcaption></figure>

The status tracking page displays the response ID, each workflow step and the current status. There will also be colour indicators for different statuses. The status tracking page looks like [this](https://go.gov.sg/mrf-status-tracking-13aug):

<figure><img src="/files/CGk7czCnDl7TIlRaANwj" alt=""><figcaption></figcaption></figure>

Form admins can also retrieve the status tracking link by clicking into individual response under the Results page.

<figure><img src="/files/3p3ChiUQamsSdFaUB67c" alt=""><figcaption></figcaption></figure>

To edit the step name on the status tracking page, go to the Workflow page. Click on the pencil icon to edit the workflow step.

<figure><img src="/files/M4nxIcjFoB4PrH4KL84a" alt=""><figcaption></figcaption></figure>

You may then change the step name and click on the "Save step" button.

<figure><img src="/files/0ucWxK60y9kwGkDhw4gD" alt=""><figcaption></figcaption></figure>

Note: Workflows started will retain all the step names configured previously, even if it is not completed yet.


# Secret key extension

{% hint style="info" %}
This extension may not work on government devices' browsers.
{% endhint %}

Tired of selecting your keys repeatedly whenever accessing your form results? Formkeys is an extension that helps you to fill out your keys with a simple click.&#x20;

Download this extension on either Microsoft Edge or Google Chrome:

{% embed url="<https://chromewebstore.google.com/detail/formkeys/dgocoljbehnnmcfdeaiikacpncpgdhoa>" %}

{% embed url="<https://microsoftedge.microsoft.com/addons/detail/formkeys/ddldbmkegajdhongfkjbanfgghnjglch>" %}

{% hint style="warning" %}
Note: The extension is NOT a password manager. This mainly helps admins fill out keys easily from the browser. If you lose access to your device, you will still lose access to all the keys as FormSG team does not store the keys.

For important forms, please additionally save the keys for handover.
{% endhint %}


# Formatting

You can use markdown to do some basic formatting on your form

{% hint style="info" %}
Do note that the following is only available for headers & instructions, paragraph fields and description of fields.&#x20;
{% endhint %}

<table><thead><tr><th width="175">Element</th><th width="310">Markdown syntax</th><th>result</th></tr></thead><tbody><tr><td>Bold</td><td>**text**</td><td><strong>text</strong></td></tr><tr><td>Italic</td><td>*text*</td><td><em>text</em></td></tr><tr><td>Strikethrough</td><td>~text~</td><td><del>text</del></td></tr><tr><td>Ordered list</td><td><ol><li>. text</li><li>. text</li><li>. text</li></ol></td><td><ol><li>. first item</li><li>. second item</li><li>. third item</li></ol></td></tr><tr><td>Unordered list</td><td>- text<br>- text<br>- text</td><td><ul><li>first item</li><li>second item</li><li>third item</li></ul></td></tr><tr><td>Link</td><td>[title](https://www.example.com)</td><td><a href="https://www.example.com">title</a></td></tr></tbody></table>


# Short links / QR code

You may use [go.gov.sg](https://go.gov.sg) to shorten your FormSG links and generate a QR code.&#x20;

{% hint style="success" %}
Government officials with a .gov.sg email can now create a short link conveniently in the **share** button of your form! This is only available once per form.
{% endhint %}

{% hint style="info" %}
For approved healthcare institutions, please use [for.sg](https://for.sg)

For approved education institutions, please use [for.edu.sg ](https://for.edu.sg)
{% endhint %}

{% tabs %}
{% tab title="Text tutorial" %}

### <img src="/files/j6GutTRDRrofXv3qKMKQ" alt="" data-size="line"> Text Tutorial: Short links / QR code

**Step 1: Click on "create link"**

<figure><img src="/files/27G8ryndPjeCMCBsEmll" alt=""><figcaption></figcaption></figure>

**Step 2: Think of a short link**&#x20;

Copy your original form link to this section and create a short link!

<figure><img src="/files/odL2oNj7bvAsei2LcjlY" alt=""><figcaption></figcaption></figure>

**Step 3: Share your new short link**

<figure><img src="/files/auF451x2Rg0xKcQ1bmYv" alt=""><figcaption></figcaption></figure>

If you need a QR code instead, proceed to step 4!

**Step 4: Click into the short link**

<figure><img src="/files/8JBqZJwUjnUZeOtOu8k3" alt=""><figcaption></figcaption></figure>

**Step 5: Download QR code and share**

<figure><img src="/files/WXpF3W6H9M1AlJ60AOcc" alt=""><figcaption></figcaption></figure>

{% hint style="info" %}
You may also visit GoGov's [guide](https://guide.go.gov.sg/) and support team for more information.
{% endhint %}
{% endtab %}
{% endtabs %}


# Email confirmations, PDF and verification

The Email field has many customisable options, including email confirmation notifications, PDF response copy (for respondents), email verifications and domain restrictions.

{% embed url="<https://form.gov.sg/698b4e2da447c6d0511a371d>" %}

{% tabs %}
{% tab title="Video Tutorial" %}

### <img src="/files/L6aeyturpbmqLw0lGpTf" alt="" data-size="line"> Video Tutorial: Email confirmations, PDF, verifications

{% embed url="<https://youtu.be/1c6ryOTicXY>" %}
{% endtab %}

{% tab title="Text Tutorial" %}

### <img src="/files/j6GutTRDRrofXv3qKMKQ" alt="" data-size="line"> Text Tutorial: Email confirmations, PDF, verifications

Email field has several customisable options.&#x20;

<figure><img src="/files/JCZgPExxkOw59ZnG3IBh" alt=""><figcaption></figcaption></figure>

* **A - Enable email confirmation** -> When enabled, an email is sent to the email entered by respondent.&#x20;
* **B - Customise email confirmation** -> Include links, instructions, etc!
* **C - Enable PDF response** (*email confirmation (A) must be enabled*) -> When enabled, a PDF copy of the responses is attached and sent to the respondent after submission.&#x20;

{% hint style="info" %}
**(A) Enable email confirmation** and **(C) Enable PDF response** are currently only available in Storage mode.
{% endhint %}

<figure><img src="/files/vIXJ5UvZyVQApJcUSZHg" alt=""><figcaption></figcaption></figure>

* **D - Enable OTP verification** -> When enabled, respondent needs to verify the email that they have entered.
* **E - Restrict email domains** -> When enabled, allow only emails with domains indicated by you.

{% hint style="info" %}
**Examples of email domain restrictions:**

1. `@open.gov.sg` → \[Specific] Covers all email addresses belonging to open.gov.sg&#x20;
2. `@*.gov.sg` → \[Wildcard] Covers all email addresses belonging to .gov domains (e.g. agencyA.gov.sg, agencyB.gov.sg, etc.)
3. `@*.agency.gov.sg` → \[Wildcard] Covers all email addresses belonging to your agency subdomains  (e.g. mail.agency.gov.sg, hr.agency.gov.sg, etc.)&#x20;
   {% endhint %}

<figure><img src="/files/MCV1AnLqlajjRgrdyQ0b" alt="" width="563"><figcaption></figcaption></figure>
{% endtab %}
{% endtabs %}


# Logic

![](/files/TdPPotLUwE65AVKzaabd)

You can show or hide fields or disable form submission for invalid answers depending on user selection/input. See examples on how to apply conditional logic to your form below:

{% embed url="<https://form.gov.sg/63805d282d7633001114c34a>" %}

{% embed url="<https://form.gov.sg/64e366ca72aa130012c2eb98>" %}

{% tabs %}
{% tab title="Text Tutorial" %}

#### <img src="/files/j6GutTRDRrofXv3qKMKQ" alt="" data-size="line"> Text Tutorial: Logic

**Step 1:** To the left of your form, click on this symbol <img src="/files/zPdel6d8w3rlOgaKwu1K" alt="" data-size="line">.

![](/files/KBcBaJpfQ6YhaBCk4QhV)

**Step 2:** Press the "Add Logic" button.

![](/files/p9xh57jOrClZ0ep4omWJ)

**Step 3: Customise Logic**

* **A - Choose allowed fields to apply logic** -> Radio, Rating, Number, Decimal, Dropdown and Yes/No fields only.
* **B - Choose condition** -> Depending on field chosen, conditions will differ.
* **C - Add multiple conditions**: conditions within the same logic block work as AND (all conditions must be met). To set up an OR condition, create a separate logic block for each condition instead.
* **D - Choose what happens** -> Choose what fields to display or disable submission
* **E - Finish creating logic**

![](/files/MisIGf23OfVrbMQmVOiE)
{% endtab %}
{% endtabs %}


# Signatures

### **Ordinary Electronic Signatures**

FormSG provides options that can be considered as Ordinary Electronic Signatures (OES) under the Electronics Transaction Act (ETA). When implementing OES, admins must ensure that they capture respondents' identity and intention, in clear proximity. This is so that the individuals are explicit in confirming their identity and agreeing to the stated declaration or purpose of the transaction. The form of OES adopted should be calibrated to the stakes of the transaction.

When the risk mitigation steps are applied and documented, you can create a stronger form of OES that is more defensible.

For more information about electronic signatures, refer to the [circular](https://intranet.mof.gov.sg/portal/IM/Circulars/ICT/Circular-Minutes/2021/Use-of-Electronic-Signatures.aspx) (government intranet-only) by SNDGO.&#x20;

{% embed url="<https://form.gov.sg/68464f193da243231cfd812c>" %}

***

<table><thead><tr><th width="147.21484375"></th><th>Examples</th></tr></thead><tbody><tr><td>Identity</td><td><ul><li><p>Singpass &#x26; MyInfo</p><ul><li>e.g Name, NRIC</li></ul></li><li><p>Email field</p><ul><li>Enable email OTP verification</li><li>Enable email domain restriction</li></ul></li><li><p>Phone number field</p><ul><li>Enable SMS OTP verification</li></ul></li><li><p>Signature field</p><ul><li>Verify against specimen signature</li></ul></li></ul></td></tr><tr><td>Intention</td><td><ul><li>Checkbox field</li><li>Signature field</li><li>Yes/No field</li></ul></td></tr><tr><td>Risk mitigation</td><td><ul><li>Results page</li><li>Copies of the response (e.g. PDFs, emails)</li><li>Witnesses</li></ul></td></tr></tbody></table>

{% hint style="success" %}
Form admins can use a different combination and need to calibrate based on the stakes of their use cases.
{% endhint %}

***

### **Identity**

1. **Singpass + MyInfo authentication**

Using MyInfo, you may display the signer's name as a non-editable Name field.&#x20;

<figure><img src="/files/SbVokM1PxNkbEnraE4cP" alt=""><figcaption></figcaption></figure>

<figure><img src="/files/eqbvpydvxJ3MkoCnvg3U" alt=""><figcaption></figcaption></figure>

2. **Email field with One-Time Password (OTP) feature enabled**

By enabling OTP, the respondent must have access to their email inbox at the time of submission.

<figure><img src="/files/5C4l4i0doeRQFRQZUV42" alt=""><figcaption></figcaption></figure>

***

### **Intention**

1. **Checkbox field acknowledgement**

Include a clear checkbox option requiring signer to confirm their identity and acknowledge that ticking the box constitutes their electronic signature. Checkbox must be mandatory before submission.&#x20;

<figure><img src="/files/6u2z6t18apyZaYJ9xeoy" alt=""><figcaption></figcaption></figure>

2. [**Workflow**](https://go.gov.sg/formsg-guide-mrf) **approvals**

In a workflow involving 2 or more respondents, you can use the Yes/No field for the respondent to provide their intention.

<figure><img src="/files/u1WKSj9snTJhMyrqjdZM" alt=""><figcaption></figcaption></figure>

3. **Signature field**

Include a signature draw field requiring signer to confirm their identity and acknowledge that providing the drawn signature constitutes their electronic signature. Signature field must be mandatory before submission.&#x20;

<figure><img src="/files/QQHDi18ZueEPQuU85qi9" alt=""><figcaption></figcaption></figure>

***

### Risk mitigation

An encrypted submission stored on FormSG may look something like this:

```
4x/NUd2bHR0HFMScOCo/GES0S3rKi9m5vatyeM0njnk=;wS2+yKR41S0aKlr4AK0/vn9BT6Ehwfot:zAa5tjq2IYVjJLiEea85kd5wePmfojzCTa9oZiZdFY9AEHmfDU8z++TrqwfGFuj28KB3MHC+4UC+aJX+XCY0Q4ruSxttDU3lMtrqV/st3J7DgwuhgXekRSKlxfhSP0wz6VmNZdjO/wlcmwfuH3VPqhUvpi+hQw+DCeUEFuLK502Iwxq7PU0Wm+VJgUcJqgDdMW/qcPq0H4YSxzIWY12C9dXGijDTaHClBPCbAFbasPaFYIehOEcTlwSZI8/J2bF2taAR+YyI/eq4p0ff3NnSWB1B4nU64T6LPnB0W+uuSywHZPYtXKAZb765zWz6iIkawvdHezoqAR+hHZYJik1nOCCpRnstAhxqxMkB7HR+ir+qpPlpZ70PRJyiaak81vzZtpSmKgIPsWE0oml7emkIj7IJLNygwo7z8LMRiNkV4oyEyimrOXEpJEqLIiFSDhp/7r5fAtSQjsxQ0BN592QrGHHaONd0YFJZ3CuZBLKL5iQrA8heebZBsBAkjydsZV3G3VKb68H4limpefbsSJFlsEDV0hMJDSXCJ/JZ9szOm+FgeZXsYz0mbZ02PxuC2x0ckIQWwkhRbyqL/iy9ZlAQeKjWdidWhuL7bIrPcOrV2ppif6UTKaAckLNcR8ZEujAxiDnJKIkH/As1tItx3cB8tWFMG3ug0c75NSv9D674pnrddxC0yeBc1FGRkKsieYWyGHu4I4HKAt8Lbn2SVs4HzkzVwY+XGbUs6uxVRBIRatQMtUygKlS3jRdljZ3Yzd3zNr5lDZwwgJTUs/QPbXEMIA7IaEV11rCx01xS/epuW4JZqFStM1xOt4S83uyoBxNDopcC8E4ZSCt3OInbg8ocbzYdihs21XS6FsldR9tYUndkr0Qhb0xMGCd9CT/mVDGmfPtvCDXf4uEbxr6tWKegnUvv+FLGhj+byXJMBb8zB61Z1PnY0Ph5p3lWv2wD4jDOiCmSysHxGYaVKi7q3Hjc/gGspY7/HNEUebUBxwneegxE4LZknjl4rWk6a3B5mceztap8f8jKz1qa0YoCsrrJoLXPIE+3NaxhU+WfK2RyEsvKtiyqXadmEJzWjNbGeSE2Buxzp/5BbOvincnpQIFb5dIYQiiOrNVE3Q6NyaVKLAP+9jXcallPKOauSiL9Dkj+SInFxPwCxt9IyNS93p6lg63b5umemDhXfi3GLO3f/qr0xdV/B+htXH9cq72vB7int+HiCsQZVNjPBeSews39TncrJSTbiYToYJXYFOvHW4V7qLo435rYKRdmxqz1o7aZJurzgZAxHk9+R5bezYEiT19ltY1NfgPbuc4cO0oNgqjSB0g7Sf1C9867SP789pX68LGIA+BhT4vJ3vaD2FOEHMTc22fXwgyY4dKPIIh/BFWitCt1X0Y+S+Qn++NcsCzry/hlHgmm2O+aoBqS1V0FY3yPAFXkGt4gGC5LEXVSwkeaohZqB44iX9LI1J+1iqcLQZNGXDvnqPcY4vrKosvYA0UTGgkssumavA1pMA+z3ZMbRAgKav3m6O1JoJBz+wz0m7eNYBSfXuSzyCxtWX7/CIefsZ532sUvGa0InGWGGdibHb10/PkJimN7yVQsWsLrA9Xozm0fV/NWFklEL6zeY8cO4iiLWHG9k16/UYLrs8axR4ZuKfmpZEb+Wf04uWKf8SiYo7rmfoRUfF5DK8meZnc+FgrpfwpWuWkrBedpo1ZTjHBsuE4wNGs75czEvh7mvtVxQbOtVnkle/Efo4gPfK3aq0z8yujX8c8gstv0gkTsW6PKVnXMaEiizHNqBooFvgH+Ax0IiH8lzg+q7mX1/ajl5J+bnLvPInCiF988wzP9P/u1X3hG72ohJY+DhqmnMhIYHf9izC2znFi7iKrNF+aJjR1dMsH2vRKaLVPlh/SGvTi93D58+xzcEjOl+NjgEoz7WcGaPAJbEzizi+U8bBz4sYFJvS8HT1GbGQJmmsFhep5fOT6yECfREYfUGt+SBPDprk24eJX6K+1U81nBhS79F7hyNUWq4tvIL1VGA2epRM9E+55pUvYoOqTxGkrmoHJk7bhm2xlKc7GiNMvzw9d/yiQ9nybTDztpEnsbeoTTGkcktUKD3TSFI/j6WNBl1FzzQa8LdGthFz8UmXgK652t5FwD8tp9gpIvoFA+hEZOy8Ju4+FqCgso6UDRTN0iJftba4dQMHYR13gHhIWQ46x9x97S70+CORQ6yo0Ki+jP69KddvFiPyjsgr8d9p8/HqkAq3F5qdLNsZqaQfj9pgCMzWizA4N3CfbEAtDZn6qAFJqyp8V5QjIcZ36uU/qZvLMd6pAGlilixccG7LsrhYDyliWCBK3QxDOW+RV/gDq+uouYS9N0mk5cDAtbhvFM+NNBJbCNFy/ER1dLYIRNxOrLqODExFZr/qAgRAX9p1pmzaeILoAeFW7aQT4kWeZ7lP77WnZrIg1kYzt3RQMEX8kmL7f1rwfYTC+C4wffa3dqb6i6wpr2ojIz6N7HoPlO+qB1qDClm9urWG1UBY/Fde1sJiX4tDYrRfuyDlasVQFQt772rtnKKk5giPI2W+ccLiEMyWkIsEk1hmwDlh9hf6Z9QTiF9naiaKplqj23NGDPGQ7+aKNo8ORzKvFnCs0lkVWFO3V82l7kE8x70ZCC6Rp9v4hhXDkDRrEIiYFD10hz+dKURknY8E3xMu7sfBLWYKi8m97pKy0CPEfM/i7+8D092HNeRwYdy/LhZx4=
```

* Form submissions once received are sealed (encrypted) and stored&#x20;
  * Can only be unsealed with the secret key that only the form admin has. Any changes (even a single character) to the sealed data makes the unsealing fail as the data would be corrupted.
  * This results in a submission that is *write-once* and *tamper-proof.*
* Form submissions are non-fungible
  * Submissions are uniquely assigned to a response ID and cannot be replaced or exchanged.
* Form submissions are write-once only during submission.

Copies of the submission, including through emails, PDF copies can be used for easier processing. However, it is important to retain the secret key and access the data through FormSG in the event of a dispute.

***

{% tabs %}
{% tab title="Singpass" %}

### :flag\_sg: :closed\_lock\_with\_key: Singpass & Myinfo option

**Step 1: Click into "Settings" at the top**

This can be found to the top navigation bar in your form.&#x20;

<figure><img src="/files/QSQysaAQ3W7rzJ1TcQEG" alt=""><figcaption></figcaption></figure>

After clicking settings, click on "Singpass" on the left navigation panel.&#x20;

<figure><img src="/files/uM9VD7HH13qCxqdFkCDa" alt=""><figcaption></figcaption></figure>

**Step 2: Enable Singpass authentication**

Toggle/on the following:

* Enable Singpass authentication
* Collect NRIC/FIN/UENs with form submissions&#x20;

<figure><img src="/files/W8BvMGrqukvBpB86UgdZ" alt=""><figcaption></figcaption></figure>

After enabling Singpass authentication, respondents must log in with Singpass before filling the form.

<figure><img src="/files/88ODrmRZMKoLUTItsZsE" alt=""><figcaption></figcaption></figure>

<figure><img src="/files/uiFFfN3S777zbv5wwJ4D" alt=""><figcaption></figcaption></figure>

**Step 3: Create Myinfo fields (optional)**

With MyInfo, users can automatically pre-fill selected personal data fields using verified information from government sources, after providing consent through Singpass.

Navigate to Create -> Add fields

<figure><img src="/files/UZH046VtSgBNeEYC4eci" alt=""><figcaption></figcaption></figure>

Under the MyInfo tab, you will see MyInfo fields that can be created.

<figure><img src="/files/lDsR9MuCzpmdSTxrAtsI" alt=""><figcaption></figcaption></figure>

Each of these fields will state whether the data is verified for specific groups (Singaporeans, Permanent Residents, Foreigners with Singpass). If there is a green checkmark, it means that this is verified and the pre-filled information cannot be edited.&#x20;

<figure><img src="/files/RqeowDhEG1QCdETVwa23" alt=""><figcaption></figcaption></figure>

**Step 4: Receive output**

If form admin's email was included in the email notifications settings, they will receive an email response with the unique response ID and submission timestamp.

<figure><img src="/files/PUr7nhHCd0m0esiLJq3k" alt=""><figcaption></figcaption></figure>

If "Collect NRIC/FIN/UENs with form submissions" was toggled on, the NRIC will be captured in the response email under `Singpass Validated NRIC` .

If MyInfo fields were created and submitted, they will also be captured with the `[MyInfo]` tag added. You may save this email for audit purposes.

To view the responses later, you may also navigate to the form's Results and enter the secret key.

<figure><img src="/files/7z8gJGUO4ZPgBAPX9B1G" alt=""><figcaption></figcaption></figure>

Open the form response by clicking its response ID.

<figure><img src="/files/P4IZYVUVLIoGMSmWgapT" alt=""><figcaption></figcaption></figure>

Each response page also shows the unique response ID and timestamp.

<figure><img src="/files/UoKSh7Awcl4F0NSvieNc" alt=""><figcaption></figcaption></figure>

In this example, the MyInfo name will also be captured with the `[MyInfo]` tag.

<figure><img src="/files/bEnxEAUB4rCZVVheAmLs" alt=""><figcaption></figcaption></figure>

There is also a  `SingPass Validated NRIC` captured.&#x20;

<figure><img src="/files/DQpb2QxFj9uNGwmBjSmX" alt=""><figcaption></figcaption></figure>

Optionally, you may save this as a PDF:

* Right-click anywhere on the page.
* Select **Print**.
* In the printer destination, choose **Save as PDF**.
  {% endtab %}

{% tab title="Email OTP" %}

### :e-mail: Email OTP option

**Step 1: Click onto "Add Fields" icon.**

This can be found to the left panel in your form.&#x20;

<figure><img src="/files/fkWJhm3Ym3VQ0Hl0YRUP" alt=""><figcaption></figcaption></figure>

**Step 2: Create an "Email" field**

To quickly find the field, you may use the search function.

<figure><img src="/files/mbYCpXyZixX9BvQJZlBa" alt=""><figcaption></figcaption></figure>

**Step 3: Rename field name and toggle options**

The default field name can be changed. The Email field also has several options that can be toggled on.&#x20;

<figure><img src="/files/aHrlPB2kUSEnBG3RDC8b" alt=""><figcaption></figcaption></figure>

**Step 4: Set OTP verification (optional)**

If you enable "OTP verification", the respondent will be required to verify their email using a One-Time Password before submitting. This ensures that the email address is valid and the respondent is the owner.

<figure><img src="/files/UB5qpsDDsOcKuuYGifeI" alt=""><figcaption></figcaption></figure>

<figure><img src="/files/7LCfoZldRKAnWMYYoFY2" alt=""><figcaption></figcaption></figure>

<figure><img src="/files/wu6xZVHVNj15E1o8iFlq" alt=""><figcaption></figcaption></figure>

**Step 5: Restrict email domains (optional)**

If you enable "Restrict email domains", only email domains listed will be allowed to be entered into the field.&#x20;

<figure><img src="/files/nU1Z02kBihIlPYTrc2gy" alt=""><figcaption></figcaption></figure>

This will be useful in scenarios such as allowing only your agency emails to be entered.&#x20;

<figure><img src="/files/b2gWqYCHaRP4pbhkHEpH" alt=""><figcaption></figcaption></figure>

**Step 6: Receive outputs**

If form admin's email was included in the email notifications settings, they will receive an email response with the unique response ID and submission timestamp.

<figure><img src="/files/r67FGGLIpCkoTC4Weyes" alt=""><figcaption></figcaption></figure>

The email address will also be captured in the response email. Notice that there is a  `[verified]`  tag added by FormSG. You may save this email for audit purposes.

<figure><img src="/files/kMhF53U01z7BNcJ4G1rU" alt=""><figcaption></figcaption></figure>

To view the response later, you may also navigate to the form's Results and enter secret key.

<figure><img src="/files/US6z2hKpMo9bPOBsNAZO" alt=""><figcaption></figcaption></figure>

Search for the response ID and click into it.

<figure><img src="/files/P9Y8ypMjZWwvjihayFz3" alt=""><figcaption></figcaption></figure>

Similarly, the unique response ID and timestamp will be included in each response's page.&#x20;

<figure><img src="/files/fbkO3bQwcSJbnf4yPeBx" alt=""><figcaption></figcaption></figure>

In this example, the email address will also be captured with the `[verified]` tag.

<figure><img src="/files/BZ3reqQsWaOgsE621MFT" alt=""><figcaption></figcaption></figure>

Optionally, you may save this as a PDF:

* Right click on the page
* Click on "Print"
* Change printer destination to "Save as PDF"
  {% endtab %}

{% tab title="Checkbox" %}

### :ballot\_box\_with\_check: Checkbox option

**Step 1: Click onto "Add Fields" icon**

This can be found to the left panel in your form.&#x20;

<figure><img src="/files/iwLZaAbqc2NWqiaggOQC" alt=""><figcaption></figcaption></figure>

**Step 2: Create a "Checkbox" field**

To quickly find the field, you may use the search function.

<figure><img src="/files/HngJwx6uesk3Udpd712t" alt=""><figcaption></figcaption></figure>

**Step 3: Rename field name and options**

The default field name can be changed.&#x20;

<figure><img src="/files/ufYPs8VuK0R4hrSglkHh" alt=""><figcaption></figcaption></figure>

In this example, we changed the field name to Declaration (or Acknowledgement) and options to clauses (or terms & conditions).

<figure><img src="/files/jZGSn22JbtQxob4JsTIe" alt=""><figcaption></figcaption></figure>

**Step 4: Set selection limits (optional)**

In this example, the clauses must be checked completely in order to submit, hence we can set a minimum selection limit equal to number of clauses.&#x20;

<figure><img src="/files/ygDtmI4AbAOUH6MDsnPY" alt=""><figcaption></figcaption></figure>

**Step 5: Receive outputs**

If form admin's email was included in the email notifications settings, they will receive an email response with the unique response ID and submission timestamp.

<figure><img src="/files/Q0owgy1j5KnQ5GGJb0ll" alt=""><figcaption></figcaption></figure>

The declaration and clauses will also be captured in the response email. You may save this email for audit purposes.

<figure><img src="/files/C7Oef09CWFG3zntrQyVw" alt=""><figcaption></figcaption></figure>

To view the response later, you may also navigate to the form's Results and enter secret key.

<figure><img src="/files/6U7vAWEGKiFklgyICyMV" alt=""><figcaption></figcaption></figure>

Search for the response ID and click into it.

<figure><img src="/files/lqqZKrn0CIsJ6m8tG7ZB" alt=""><figcaption></figcaption></figure>

Similarly, the unique response ID and timestamp will be included in each response's page.&#x20;

<figure><img src="/files/0kvk2NVTP2nb2erZEnZ9" alt=""><figcaption></figcaption></figure>

In this example, the declaration and clauses checked will also be captured.

<figure><img src="/files/9TtoGxgv3xADZa8qne2W" alt=""><figcaption></figcaption></figure>

Optionally, you may save this as a PDF:

* Right click on the page
* Click on "Print"
* Change printer destination to "Save as PDF"
  {% endtab %}
  {% endtabs %}

:question: Refer to [FAQs](https://guide.form.gov.sg/faq/faq/signatures)&#x20;


# Singpass and MyInfo

Enabling **Singpass** for your form will require respondents to authenticate through Singpass app before they are able to fill the form.&#x20;

{% embed url="<https://form.gov.sg/6a3a33d15f21f9fe7ff2c7c1>" %}

{% tabs %}
{% tab title="Text tutorial" %}

### <img src="/files/j6GutTRDRrofXv3qKMKQ" alt="" data-size="line"> Text Tutorial: Singpass and MyInfo

**Step 1: Ensure that the form is CLOSED.**

<figure><img src="/files/asZUbiW2KrEmXKPN665M" alt=""><figcaption></figcaption></figure>

**Step 2: Navigate to Singpass in settings**

Enable Singpass authentication.

<figure><img src="/files/3DatdhSDftBsdlWF2aYC" alt=""><figcaption></figcaption></figure>

**Step 3: Choose an authentication method**

Two options will be available:

* Singpass (free)
* Corppass

<figure><img src="/files/wmcVIvqx263iRywWKvtn" alt=""><figcaption></figcaption></figure>

These are some of the differences between the two. Corppass transactions remain billable and requiring an e-service ID (approach Singpass team for this).

<table data-full-width="false"><thead><tr><th width="172">Feature</th><th width="275" data-type="checkbox">Singpass (Free)</th><th data-type="checkbox">Corppass (Paid)</th></tr></thead><tbody><tr><td>Does not require e-service ID</td><td>true</td><td>false</td></tr><tr><td>MyInfo</td><td>true</td><td>false</td></tr><tr><td>QR code login</td><td>true</td><td>true</td></tr><tr><td>Password login</td><td>true</td><td>true</td></tr></tbody></table>

**Step 4: Enter e-service ID if required**

{% hint style="info" %}
**For Corppass forms, an e-service ID is required.** To apply, please fill this Singpass partner support [form](https://partnersupport.corppass.gov.sg/hc/en-sg).
{% endhint %}

**Step 5: Enable optional features**

You may choose to enable one or more of the following features:

* **Collect NRIC/FIN/UENs with form submissions**: The form will automatically collect this information if you enable this option. This will be made known to the respondent.
* **Limit each unique NRIC/FIN/UEN to one response**: Prevents duplicate entries from the same NRIC/FIN/UEN. If you need to reset this, please duplicate the form.
* **Restrict form to eligible NRIC/FIN/UENs**: Only allows whitelisted individuals to submit your form.

<figure><img src="/files/7FNPryLB1xj4kCyLFhkR" alt=""><figcaption></figcaption></figure>

**Step 6: Create MyInfo fields**

You can only create MyInfo fields if using Singpass.&#x20;

Click the builder icon on the left <img src="/files/4CAHwqQURg52Pu3o7kab" alt="" data-size="line"> in your form and then click "MyInfo". Choose the MyInfo field (e.g. Name) you would like to create.&#x20;

<figure><img src="/files/BVCOxo1yyzzjs9BXzsZW" alt=""><figcaption></figcaption></figure>

Government-verified fields (e.g. Name, NRIC) are locked and cannot be edited as they are pre-filled with data from the MyInfo database. Some fields are available but editable, while others may have no data and will remain blank for the respondent to complete.&#x20;

<figure><img src="/files/a0SaEuVvuamXy28hs5Rh" alt=""><figcaption></figcaption></figure>
{% endtab %}
{% endtabs %}


# Pre-fill

A pre-filled field is when a field is **filled on behalf of the respondent, when a form is loaded**. This is done by adding the pre-filled value in a specific format to the form’s URL. Pre-filling adds convenience for the respondent when field values are known beforehand.&#x20;

For example, the names of your respondents can be pre-filled if you know them in advance.

{% hint style="info" %}
Pre-fills are currently only available on **Short answer** fields.
{% endhint %}

### Create pre-fills

{% tabs %}
{% tab title="Pre-fill examples" %}
**Original form**

<figure><img src="/files/evQzpRLAVUXjlIwK3qA6" alt=""><figcaption></figcaption></figure>

* [<mark style="color:red;">form.gov.sg/631707fe74cd7300119bc80f</mark>](https://form.gov.sg/#!/631707fe74cd7300119bc80f)

**Pre-fill Examples**

<figure><img src="/files/rPsP2uRrLTukXe1OK9YI" alt=""><figcaption></figcaption></figure>

<mark style="color:red;">**Form link**</mark>**&#x20;?&#x20;**<mark style="color:blue;">**Field ID**</mark>**&#x20;=&#x20;**<mark style="color:green;">**Pre-Fill**</mark>&#x20;

* <mark style="color:red;">form.gov.sg/631707fe74cd7300119bc80f</mark>?<mark style="color:blue;">62a997e37e757400142154ad</mark>=<mark style="color:green;">Sr</mark>%20<mark style="color:green;">PM</mark>
* <mark style="color:red;">form.gov.sg/631707fe74cd7300119bc80f</mark>?<mark style="color:blue;">62a997e37e757400142154ad</mark>=<mark style="color:green;">Intern</mark>

{% hint style="info" %}
%20 represents a space. The browser will still add this automatically when you use a space instead. (e.g. =<mark style="color:green;">Sr Pm</mark>)
{% endhint %}

<figure><img src="/files/fDRaTCPGQ5grRGreeSHL" alt=""><figcaption></figcaption></figure>

<mark style="color:red;">**Form link**</mark>**&#x20;?&#x20;**<mark style="color:blue;">**Field ID 1**</mark>**&#x20;=&#x20;**<mark style="color:green;">**Pre-Fill 1**</mark>**&#x20;&** <mark style="color:blue;">**Field ID 2**</mark>**&#x20;=&#x20;**<mark style="color:green;">**Pre-Fill 2**</mark>

* <mark style="color:red;">form.gov.sg/631707fe74cd7300119bc80f</mark>?<mark style="color:blue;">62a997e37e757400142154ad</mark>=<mark style="color:green;">Software</mark>%20<mark style="color:green;">Engineer</mark>&<mark style="color:blue;">62aae6db6e99e1001289415d</mark>=<mark style="color:green;">Open</mark>%20<mark style="color:green;">Government</mark>%20<mark style="color:green;">Products</mark>
  {% endtab %}

{% tab title=" Video Tutorial" %}

### <img src="/files/L6aeyturpbmqLw0lGpTf" alt="" data-size="line"> Video Tutorial: Pre-fill

{% embed url="<https://www.youtube.com/watch?v=4b3UbjZk0Cw>" %}

{% hint style="info" %}
The video above is outdated but still relevant. To use pre-fills, create a **Short answer** field.
{% endhint %}
{% endtab %}

{% tab title="Text tutorial" %}

### <img src="/files/j6GutTRDRrofXv3qKMKQ" alt="" data-size="line"> Text Tutorial: Pre-fill

**1) Click on "Short answer" field**

Go to the form builder. Look for and create the **Short answer** field. Click on it.&#x20;

<figure><img src="/files/SH4o9EWnEB1COkHoT9WR" alt=""><figcaption></figcaption></figure>

**2) Enable pre-fill and create the field**

Scroll down to bottom of the editor and enable pre-fill. Click on the "Create Field" button to proceed.&#x20;

<figure><img src="/files/iP6R9c4TX7We6F3iVRDe" alt=""><figcaption></figcaption></figure>

**3) Find the Field ID**&#x20;

To obtain the Field ID necessary to create the pre-filled link, click on the **Short answer** field that you have just created. Scroll down the editor and you should find a newly generated Field ID.

<figure><img src="/files/hBU9oGgTrmQi1k1VbmIZ" alt=""><figcaption></figcaption></figure>

**4) Create the pre-fill link**

Add the Field ID and pre-fill value to the back of your form link in this format:\ <mark style="color:red;">**Form link**</mark>**&#x20;?&#x20;**<mark style="color:blue;">**Field ID**</mark>**&#x20;=&#x20;**<mark style="color:green;">**Pre-Fill**</mark> \
\
In the URL, %20 represents a space while %23 represents a #.&#x20;

{% hint style="info" %}
To automate this process, you can create a spreadsheet to generate your pre-fill links quickly. You may also bulk create shortened links on go.gov.sg and send out the personalised links via postman.gov.sg.
{% endhint %}

<figure><img src="/files/vjD4OujyKshbfc4YDFZS" alt=""><figcaption></figcaption></figure>

Sample files to make creation of prefill links easier:

{% file src="/files/aejlwuPuq9NIjp7hO0D7" %}

{% file src="/files/Q17QukbUqLGQOA41CGgB" %}
{% endtab %}
{% endtabs %}


# Ranking options

FormSG does not have a field type for ranking options. However, there are many ways to present ranking of options. This section will show a creative workaround!

{% tabs %}
{% tab title="Text tutorial" %}

### <img src="/files/j6GutTRDRrofXv3qKMKQ" alt="" data-size="line"> Text Tutorial: Ranking options

**Step 1: Create a table field**

<figure><img src="/files/C8MmTlvJdOdh7uJYb61y" alt=""><figcaption></figcaption></figure>

**Step 2: Amend the question**

E.g. Rank your favourite fruits

Do provide clear instructions for your respondents so that they do not pick the same option twice (if that is intended).

<figure><img src="/files/sFXVfIYqT7jnPTcjnwcj" alt=""><figcaption></figcaption></figure>

**Step 3: Adjust number of rows**

The no. of rows depend on the ranks required.&#x20;

E.g. 5 rows are required for 1st-5th.

<figure><img src="/files/wMxNFBun5PItK1WdVG0s" alt=""><figcaption></figcaption></figure>

**Step 4: Create your ranks, as options**

E.g 1st, 2nd, 3rd

<figure><img src="/files/IX8U31lNpC8Heft209Ko" alt=""><figcaption></figcaption></figure>

**Step 5: Create an additional column**

<figure><img src="/files/DHFm5WVBgY3IxDt23MGc" alt=""><figcaption></figcaption></figure>

**Step 6: Create the options, that will be ranked**

E.g pear, apple, orange

<figure><img src="/files/XKWPceTx6xYC2ME0eda1" alt=""><figcaption></figcaption></figure>

**Step 7: Preview your question!**

<figure><img src="/files/b7Ctpg14rHAyAhx4WCgh" alt=""><figcaption></figcaption></figure>
{% endtab %}
{% endtabs %}


# Restricted Access

**Can I restrict a form to certain users?**

The unique form link acts as a password. You can circulate the form link only to users that you intend to gather responses from. As long as you do not add the form link to public channels (e.g. website), it will not be indexed by search engines. If the form link ends up widely circulated with non-authorised users, you may then filter such non-authorised submissions after export. &#x20;

See 3 other ways to restrict access to your form below.

{% tabs %}
{% tab title="Authentication" %}
You can use authentication to restrict your form responses and ensure that form responses are legitimate:

* [SingPass](/user-guides/advanced-guide/singpass-and-myinfo)/sgID
  * 1 Submission per NRIC/FIN/UEN
  * Whitelisted NRICs/FIN/UEN
* [Verified Emails](/user-guides/advanced-guide/email-confirmations-pdf-and-verification) (Including restricting form to certain email domains)
* [Verified SMSes](/user-guides/advanced-guide/verified-smses)&#x20;
  {% endtab %}

{% tab title="Response limit" %}
You may also limit number of responses your form can receive.

**Step 1: Click on settings**

<figure><img src="/files/ZJKoihsW5T1uLK5jB2jm" alt=""><figcaption></figcaption></figure>

**Step 2: Enable response limit**

<figure><img src="/files/5UVfTjRsVRQgzHVr89JW" alt=""><figcaption></figcaption></figure>

**Step 3: Set a response limit**

<figure><img src="/files/KovAg9z2GYd2LV0UFG0q" alt=""><figcaption></figcaption></figure>

When maximum number of responses have been reached, this will deactivate your form. You can still reactivate your form again if you need to receive more responses
{% endtab %}
{% endtabs %}

These methods are not mutually exclusive and may be combined. It depends on how many layers of restriction the form requires.


# Verified SMSes

{% hint style="info" %}
Starting **1 July 2025**, each FormSG form with mobile number OTP verification will be allocated **10,000 free SMS OTP** verifications. Once this limit is reached, the form will be automatically closed to new responses.

* For existing forms with mobile OTP verification enabled, the **SMS count will reset to zero on 1 July 2025**
* **Monitor your forms SMS usage** directly on FormSG by following the [steps below](#to-monitor-your-forms-sms-otp-usage)
  {% endhint %}

The Verified SMS feature on the **Mobile number** field triggers an SMS containing a One-Time Password (OTP) to the entered mobile number, where respondents have to verify before they are able to submit a response.&#x20;

{% tabs %}
{% tab title="Text Tutorial" %}

## To enable mobile number OTP verification

**Step 1: Add a mobile number field**

<figure><img src="/files/b79nfpm8nW2bK2eIaDL4" alt=""><figcaption></figcaption></figure>

**Step 2: Enable OTP verification**

<figure><img src="/files/ewLEPDnwTWI56t5z7jJj" alt=""><figcaption></figcaption></figure>

**Step 3: Acknowledge the 10,000 free SMS OTP limit for the form**

<figure><img src="/files/EJBF5j5JDKGJAOtTTXT0" alt=""><figcaption></figcaption></figure>

## To monitor your form’s SMS OTP usage

**Step 1: Click on your Mobile number field**&#x20;

<figure><img src="/files/TWeZE4vZs9GBRZH9ld8T" alt=""><figcaption></figcaption></figure>

**Step 2: Refer to the SMSes used under "OTP verification"**

<figure><img src="/files/I4gvMiiVzMGJN17CiDe8" alt=""><figcaption></figcaption></figure>
{% endtab %}
{% endtabs %}


# Webhooks

Webhooks are a standard means for applications like Form to **send real-time data to other applications and servers,** thus removing the need for a person to periodically export form response data from Form, then upload manually to an internally-used application.

{% tabs %}
{% tab title="Examples" %}
**Examples of Webhooks**

1. **TemperatureSG**: One of the early responses to COVID was to record and report temperature daily. Many agencies did that with FormSG, but sifting through the data, to figure out who had a fever or who had not responded was too onerous. TemperatureSG was a webhook integration, which made it easy to automate handling temperature responses. It would alert admins when one of their staff had high temperatures, and check daily for staff that had not reported their temperature.
2. **Zendemic operations:** When people were tested positive for Covid, a form was sent to them, so they can list their close contacts and give additional details about their health situation. As cases grew, handling the form responses became too onerous to do by hand, hence webhooks were implemented to read and process covid form responses, and inject data into a case management system.
   {% endtab %}

{% tab title="Why integrate with webhooks?" %}
**Recommended for:**

* forms with high response volumes
* internal systems/workflows that needs integration with form data collection
* creators with IT expertise capable of using our [software development kit](https://github.com/opengovsg/formsg-javascript-sdk) to prepare an internet endpoint for receiving response data

**Not recommended if:**

* Email or Excel spreadsheet is sufficient for form responses.
  {% endtab %}

{% tab title="Are webhooks secure?" %}
**Are webhooks secure?**

Yes. Your data is encrypted. Our [software development kit](https://github.com/opengovsg/formsg-javascript-sdk) (SDK) provides instructions on setting up your receiving system to:

* verify that each submission was sent by FormSG and not any other server.
* decrypt submissions using the secret key that only you own.
  {% endtab %}
  {% endtabs %}

{% hint style="info" %}
Webhooks are available for all Storage mode forms. For Multi-respondent forms, webhooks only support connecting to [Plumber](https://plumber.gov.sg) and don't support other tools. You'll need to set this up directly in Plumber.
{% endhint %}

{% hint style="success" %}
Consider using [Plumber.gov.sg](https://Plumber.gov.sg), a solution by OGP to help you automate some simple workflows and decrypt your FormSG responses.
{% endhint %}

### Setting up Webhooks (Developers)

{% tabs %}
{% tab title="Validation: IP Addresses" %}
Most agencies validate FormSG webhook calls based on payload and signature. If you need to validate webhook calls by whitelisting a fixed origin IP, please whitelist the following fixed origin IP address:.

* Production: **52.76.82.38 / 52.74.128.195 / 122.248.228.153** (form.gov.sg)
* UAT & Staging: **3.0.137.48 & 18.140.124.240** (uat.form.gov.sg / staging.form.gov.sg)

We are now using [NAT Gateways](https://docs.aws.amazon.com/vpc/latest/userguide/vpc-nat-gateway.html) for ALL our outbound traffic from FormSG, and so it is **guaranteed** that all webhook calls FormSG will originate from one of the 3 IPs listed above.
{% endtab %}

{% tab title="Text Tutorial" %}

#### <img src="/files/j6GutTRDRrofXv3qKMKQ" alt="" data-size="line"> Text Tutorial: Webhooks

**a) Set-Up Webhooks**

**Pre-requisite:** A HTTPS endpoint must be exposed over the Internet.

1. Follow [these instructions](https://github.com/opengovsg/formsg-javascript-sdk) to prepare your system to receive, verify and decrypt form responses.
2. Navigate to the form's settings and enter your endpoint URL in the 'Webhook Endpoint URL' field and save changes.

   ![](/files/hY9Ll1PclF9aer55Bt49)

   ![](/files/9XImjKxjinDsvoh6BU0g)

   ![](/files/uBpI8M4NlEVlcjdbMSYL)
3. Test that responses are received at your endpoint URL. If your IT system returns any [HTTP-2xx response code](https://developer.mozilla.org/en-US/docs/Web/HTTP/Status#successful_responses), the webhook is considered to have been successful.

❗ **Important to note**

* Please lock down the version of the SDK you are using and disable automatic upgrades to avoid disruption from breaking changes.
* You are responsible for correctly setting up your system to receive, verify and decrypt Form responses using our SDK. FormSG is not responsible for your setup, and only bears responsibility for ensuring our servers are correctly routing responses in accordance with our SDK.
* Most agencies validate FormSG webhook calls based on payload and signature. If you need to validate webhook calls by whitelisting a fixed origin IP, please see the "**Validation: IP addresses**" tab.
* Quickly return a successful status code (`2xx`) prior to any complex logic. FormSG will treat the attempt as a failure if the response is not completed within a reasonable timeframe.
* **FormSG only supports one webhook endpoint URL per form.** If you need to send data to multiple systems, forward it from your endpoint, or use a workflow automation tool.

**b) Enable Webhook retries**

If you switch on "Enable retries" under the Settings tab, Form will resend webhooks if your IT system fails to receive them. In order to safely receive webhook retries, your system *should* be designed to handle duplicate webhooks, out-of-order delivery, non-realtime submissions and submissions even after the form is no longer active.

The webhook is first attempted once immediately after the form is submitted. If this first attempt fails, the webhook will be retried up to 6 additional times over the next 24 hours, at the following intervals from the time of submission:

* 5 ± 1 minute
* 60 ± 15 minutes
* 2 ± 0.5 hours
* 4 ± 1 hours
* 8 ± 2 hours
* 20 ± 4 hours

Retries will cease whenever the webhook is successful. If your system fails to receive the final retry 16-24 hours after the form is submitted, the webhook will no longer be attempted. You may still retrieve the submission data under the Data tab.

{% hint style="info" %}
If you would like to try set-up webhooks on your own without a developer, you may explore this guide instead: <https://go.gov.sg/formsg-guide-webhooks-notion> (*not updated as of Dec 2022*).
{% endhint %}

**IMPORTANT**: Do note that this is for demonstration purposes only and does not explore the full capabilities of webhooks in FormSG. Some of the form fields like attachments, checkboxes and tables will not work in this demonstration unless you make changes to the payload.
{% endtab %}
{% endtabs %}


# Email / SMS campaigns

{% hint style="info" %}
These products are currently only for government and healthcare institutions. Use:<br>

* [legacy.postman.gov.sg](https://legacy.postman.gov.sg) to send out email campaigns
* [postman.gov.sg](https://postman.gov.sg) to send out SMSes campaigns
* [letters.gov.sg](https://letters.gov.sg) to send out e-Letters<br>
  {% endhint %}

{% embed url="<https://guide.postman.gov.sg/campaign-guide-general/quick-start>" %}


# Custom documents

FormSG collaborates with [docCentral](https://doccentral.e01.app.gov.sg/) (built by CPF Board), a Management Portal with a no-code Microsoft Word Add-In, to allow custom document generation based on FormSG inputs.

{% embed url="<https://youtu.be/2d0HJB7hNuQ>" %}


# Payments

Citizens can now pay for fees and services directly on your form. We partner with Stripe, a payment provider, to bring you a safe and reliable payment experience.

{% hint style="warning" %}
The payments section of the guide is currently not being maintained. There may be some information that is outdated.
{% endhint %}

<figure><img src="/files/LKygnYXfDhVgMkw2LVuc" alt=""><figcaption></figcaption></figure>

FormSG payments can be used for a variety of purposes like events, donations and more!&#x20;

### **Why use FormSG payments?**

1. **Streamline payment collection with a single form**
   * Eliminate the need to create and maintain websites for payment collection
2. **Save time on manual reconciliation and reporting**
   * Form and payments data are consolidated and accessible via your dashboard
3. **Safe and reliable experience for citizens**
   * Create intuitive forms that capture payments securely through a [PCI compliant ](https://stripe.com/en-gb-sg/guides/pci-compliance#introduction)gateway
4. **Integrate with other systems**
   * Connect FormSG to systems using [payment webhooks](/faq/faq/payments/payment-webhooks).


# Features

<img src="/files/fSV7c4rLO7a0KtqIz9zN" alt="" data-size="line">  **Self-service** \
Start collecting payments by following our guide.

<img src="/files/MgmYy6pDjOMcgYi7wSbz" alt="" data-size="line"> **Simple reconciliation**\
Associate a payment reference ID with every form submission. Track payments and payouts in one dashboard.

<figure><img src="/files/sECOj0WX73DlrmMGf79b" alt="" width="375"><figcaption></figcaption></figure>

<figure><img src="/files/UoW4zADBJemWsuqLeqyj" alt="" width="375"><figcaption></figcaption></figure>

<img src="/files/RZE6JEsVOWfsiglcQAQv" alt="" data-size="line">    **Trusted payment flows**\
Respondents receive notifications from official gov.sg domains. Payments captured securely through a [PCI compliant gateway](https://stripe.com/en-gb-sg/guides/pci-compliance#introduction).

<figure><img src="/files/977vPLVNRGft5VUHeEJu" alt="" width="375"><figcaption></figcaption></figure>

<img src="/files/vpGYofCiMFNDYSVDrp8j" alt="" data-size="line">    **Proof of payment**\
Respondents receive an invoice/receipt as proof of payment for each completed transaction.

<figure><img src="/files/5Yu5Emv2YF2BnpPNzcoe" alt="" width="375"><figcaption></figcaption></figure>

<img src="/files/3p3K6YoeU989R3XT87J0" alt="" data-size="line">   **Multiple payment methods**\
We support cards and PayNow as payment methods.

<img src="/files/UXWHD3T16SUFojma3Kzu" alt="" data-size="line">    **Flexible and integrates with systems**\
We got you covered whether you are collecting the same amount or varying amounts. FormSG can also be connected to systems using [payment webhooks](/faq/faq/payments/payment-webhooks).

<figure><img src="/files/W8YxNTSYRtRUyV2NPks2" alt=""><figcaption></figcaption></figure>

Try a demo on **go.gov.sg/formsg-payments-demo**:

{% embed url="<https://go.gov.sg/formsg-payments-demo>" %}


# Cost and benefits

FormSG payments is free to use. You only need to pay for transaction fees to Stripe and discounted rates are provided under government bulk tender (applicable to healthcare).

<figure><img src="/files/z7i0SzCjt5JHqgnKKENv" alt=""><figcaption></figcaption></figure>

We work with financial institutions, regulators, payment networks so government agencies who run on FormSG payments don't have to.

|                           | ✔️ Use FormSG payments                                                    | Build from scratch                                                                  |
| ------------------------- | ------------------------------------------------------------------------- | ----------------------------------------------------------------------------------- |
| **Development cost**      | ✔️ Only transaction fees paid to payment processor                        | Development, maintenance, training, transactional, and operational costs ($XXX,XXX) |
| **Time to market**        | ✔️ Complete onboarding in days, start accepting payments in minutes       | Require development work, usually take months                                       |
| **New Features**          | ✔️ Access to new features without additional work                         | <p>Require ongoing development and updates</p><p><br></p>                           |
| **Reliability and Trust** | ✔️ Established and trusted platform for government agencies and citizens. | Requires building and establishing trust                                            |
| **Vendor Management**     | ✔️ Minimal vendor management required                                     | Need to identify, hire, and manage vendors                                          |
| **Scalability**           | ✔️ Built-in scalability and infrastructure                                | Need to plan and implement scalable architecture                                    |
| **Regulatory Compliance** | ✔️ OGP handles compliance requirements                                    | Need to ensure compliance with industry regulations                                 |
| **Security**              | ✔️ 3D Secure 2 for enhanced security and annual security assessments.     | Requires building and implementing security measures                                |

{% hint style="info" %}
Jump to our launch [checklist](https://go.gov.sg/formsg-payments-checklist) if you like what you see.
{% endhint %}


# Payment field

{% hint style="success" %}
If you would like to test payments flow without Stripe account or real money, you may test on our User Acceptance Testing (UAT) platform instead. The steps are similar to this page except the first few steps which you may find in the guide [here](https://guide.form.gov.sg/user-guides/payments/testing-platform).
{% endhint %}

{% hint style="info" %}
Payments is supported on **Storage mode**.&#x20;
{% endhint %}

{% tabs %}
{% tab title="Text tutorial" %}

### <img src="/files/j6GutTRDRrofXv3qKMKQ" alt="" data-size="line"> Text Tutorial: Payments on Production

Production refers to forms created on form.gov.sg.\
\
If you are new to FormSG, we recommend to first learn how to [create storage mode forms](/user-guides/basic-guide/create-form/create-form) before embarking on this. Once you have learnt the basics, please proceed to edit a Storage mode form.

**Step 1: Click on form settings and go to payments section.**

<figure><img src="/files/FttkS4Gl7W1MUVZyx1wF" alt=""><figcaption></figcaption></figure>

**Step 2: Connect with Stripe.**

To connect to Stripe, acknowledge that if you do not submit your Stripe account ID and issue a PO to Stripe, you will have to pay default transaction rates.\ <br>

<figure><img src="/files/0qTHiFqi5edUwW3QwjkA" alt=""><figcaption></figcaption></figure>

**Step 3: Login to your Stripe account**&#x20;

{% hint style="info" %}
**Note:** The accounts you can connect are ones where you have "administrator" or "developer" [role ](https://stripe.com/docs/payments/account/teams/roles)in Stripe.
{% endhint %}

<figure><img src="/files/IwmtzZFRaTSXs722ltM3" alt=""><figcaption></figcaption></figure>

<figure><img src="/files/FCUWr1BSgRbCz5W8iIby" alt=""><figcaption></figcaption></figure>

Under payments setting again, you should see "Your account is linked to FormSG".

You will also be able to see an account ID. This is unique and how Stripe identifies your account. If you are preparing to get government rates, this is the account ID you would need to pass to Stripe.

You may also indicate if the payments you are collecting will be GST applicable, amend the GST registration and Business Address.

<figure><img src="/files/n3zbeIT6DQcjAmdK75Nr" alt=""><figcaption></figcaption></figure>

**Step 4: Add payment field**

On the left of your form builder, click on "add fields" followed by "payments" tab.

<figure><img src="/files/ns3gRgBKvNpARxDnmmnD" alt=""><figcaption></figcaption></figure>

Choose between "Product or service" or "Respondents choose what to pay".

<figure><img src="/files/QnoJawI2iDUn9p8MHrlu" alt=""><figcaption></figcaption></figure>

Enter product/service name and payment amount.

The product/service name you enter here will be reflected on the invoice ([Sample](https://file.go.gov.sg/formsg-guide-payments-invoice-example.pdf)).

Also note that there is a mandatory email address field with OTP verification. This is required so that FormSG can send the proof of payment to a verified inbox.&#x20;

<figure><img src="/files/iH1VMSBFbSUGDZMtzEHw" alt=""><figcaption></figcaption></figure>

**Step 5: Preview payment form**

Preview your form by pressing the eye symbol. Do note that in preview mode, you will not be able to test the payment flow.&#x20;

You may proceed to step 6 to try a real payment on the live view. If you do not wish to do a real payment, you may recreate the form on our test platform at uat.form.gov.sg which allows you to simulate a test payment.

<figure><img src="/files/LITOr1MxZbAYo31u2B7p" alt=""><figcaption></figcaption></figure>

**Step 6: Share the form and make a payment**

Open up your live form on a new tab.&#x20;

After filling in the form and verifying your email, click on proceed to pay. A window will pop up for your respondents letting them know that they will not be able to edit after proceeding to pay.

<figure><img src="/files/hrH7sqb9kESlNkpMPkqO" alt=""><figcaption></figcaption></figure>

<figure><img src="/files/M22KjTQegktO5OExSxAZ" alt=""><figcaption></figcaption></figure>

Your respondents will then be led to a page to choose their preferred payment methods.

Payment methods supported will be credit cards and Stripe PayNow. This can be modified on your Stripe dashboard.&#x20;

<figure><img src="/files/FBRRK0JtMt88BBhOQcbr" alt=""><figcaption></figcaption></figure>

**Step 7: View invoice**

After making a payment, you will be brought to the successful submission page where you can see the Response ID and download payment invoice.&#x20;

<figure><img src="/files/XIoaoiEhHsFVEPrgcz3o" alt=""><figcaption></figcaption></figure>

An email will also be sent to the respondent's email address where they can download the same payment invoice.

<figure><img src="/files/U7EoEfs48xKxJCuqjOod" alt=""><figcaption></figcaption></figure>
{% endtab %}

{% tab title="Video tutorial" %}

### <img src="/files/L6aeyturpbmqLw0lGpTf" alt="" data-size="line"> Video Tutorial: Payments on Production

Production refers to forms created on form.gov.sg.

{% embed url="<https://youtu.be/gPDNWCC4Xtk>" %}
Youtube [link](https://youtu.be/gPDNWCC4Xtk)
{% endembed %}
{% endtab %}
{% endtabs %}


# Payment field (to be updated to)

{% hint style="success" %}
If you would like to test payments flow without Stripe account or real money, you may test on our User Acceptance Testing (UAT) platform instead. The steps are similar to this page except the first few steps which you may find in the guide [here](https://guide.form.gov.sg/user-guides/payments/testing-platform).
{% endhint %}

{% hint style="info" %}
Payments is supported on **Legacy mode**. You may refer to how to set it up [here](https://guide.form.gov.sg/user-guides/advanced-guide/payments/pages/7HxuQXLv4BgTLcEQaL7Z#i-need-to-create-a-new-form-with-payments-or-myinfo-children.-what-should-i-do).
{% endhint %}

{% tabs %}
{% tab title="Text tutorial" %}

### <img src="/files/j6GutTRDRrofXv3qKMKQ" alt="" data-size="line"> Text Tutorial: Payments on Production

Production refers to forms created on form.gov.sg.\
\
If you are new to FormSG, we recommend to first learn how to create forms before embarking on this. Once you have learnt the basics, please proceed to edit a legacy version form.

**Step 1: Click on form settings and go to payments section.**

<figure><img src="/files/FttkS4Gl7W1MUVZyx1wF" alt=""><figcaption></figcaption></figure>

**Step 2: Connect with Stripe.**

To connect to Stripe, acknowledge that if you do not submit your Stripe account ID and issue a PO to Stripe, you will have to pay default transaction rates.\ <br>

<figure><img src="/files/0qTHiFqi5edUwW3QwjkA" alt=""><figcaption></figcaption></figure>

**Step 3: Login to your Stripe account**&#x20;

{% hint style="info" %}
**Note:** The accounts you can connect are ones where you have "administrator" or "developer" [role ](https://stripe.com/docs/payments/account/teams/roles)in Stripe.
{% endhint %}

<figure><img src="/files/IwmtzZFRaTSXs722ltM3" alt=""><figcaption></figcaption></figure>

<figure><img src="/files/FCUWr1BSgRbCz5W8iIby" alt=""><figcaption></figcaption></figure>

Under payments setting again, you should see "Your account is linked to FormSG".

You will also be able to see an account ID. This is unique and how Stripe identifies your account. If you are preparing to get government rates, this is the account ID you would need to pass to Stripe.

You may also indicate if the payments you are collecting will be GST applicable, amend the GST registration and Business Address.

<figure><img src="/files/n3zbeIT6DQcjAmdK75Nr" alt=""><figcaption></figcaption></figure>

**Step 4: Add payment field**

On the left of your form builder, click on "add fields" followed by "payments" tab.

<figure><img src="/files/ns3gRgBKvNpARxDnmmnD" alt=""><figcaption></figcaption></figure>

Choose between "Product or service" or "Respondents choose what to pay".

<figure><img src="/files/QnoJawI2iDUn9p8MHrlu" alt=""><figcaption></figcaption></figure>

Enter product/service name and payment amount.

The product/service name you enter here will be reflected on the invoice ([Sample](https://file.go.gov.sg/formsg-guide-payments-invoice-example.pdf)).

Also note that there is a mandatory email address field with OTP verification. This is required so that FormSG can send the proof of payment to a verified inbox.&#x20;

<figure><img src="/files/iH1VMSBFbSUGDZMtzEHw" alt=""><figcaption></figcaption></figure>

**Step 5: Preview payment form**

Preview your form by pressing the eye symbol. Do note that in preview mode, you will not be able to test the payment flow.&#x20;

You may proceed to step 6 to try a real payment on the live view. If you do not wish to do a real payment, you may recreate the form on our test platform at uat.form.gov.sg which allows you to simulate a test payment.

<figure><img src="/files/LITOr1MxZbAYo31u2B7p" alt=""><figcaption></figcaption></figure>

**Step 6: Share the form and make a payment**

Open up your live form on a new tab.&#x20;

After filling in the form and verifying your email, click on proceed to pay. A window will pop up for your respondents letting them know that they will not be able to edit after proceeding to pay.

<figure><img src="/files/hrH7sqb9kESlNkpMPkqO" alt=""><figcaption></figcaption></figure>

<figure><img src="/files/M22KjTQegktO5OExSxAZ" alt=""><figcaption></figcaption></figure>

Your respondents will then be led to a page to choose their preferred payment methods.

Payment methods supported will be credit cards and Stripe PayNow. This can be modified on your Stripe dashboard.&#x20;

<figure><img src="/files/FBRRK0JtMt88BBhOQcbr" alt=""><figcaption></figcaption></figure>

**Step 7: View invoice**

After making a payment, you will be brought to the successful submission page where you can see the Response ID and download payment invoice.&#x20;

<figure><img src="/files/XIoaoiEhHsFVEPrgcz3o" alt=""><figcaption></figcaption></figure>

An email will also be sent to the respondent's email address where they can download the same payment invoice.

<figure><img src="/files/U7EoEfs48xKxJCuqjOod" alt=""><figcaption></figcaption></figure>
{% endtab %}

{% tab title="Video tutorial" %}

### <img src="/files/L6aeyturpbmqLw0lGpTf" alt="" data-size="line"> Video Tutorial: Payments on Production

Production refers to forms created on form.gov.sg.

{% embed url="<https://youtu.be/gPDNWCC4Xtk>" %}
Youtube [link](https://youtu.be/gPDNWCC4Xtk)
{% endembed %}
{% endtab %}
{% endtabs %}


# UAT platform (testing)

Without Stripe account, you may also try creating a payment field and doing test submissions on FormSG's testing platform (uat.form.gov.sg). Test credentials will be provided at the payment checkout page.&#x20;

{% tabs %}
{% tab title="Text tutorial" %}

### <img src="/files/j6GutTRDRrofXv3qKMKQ" alt="" data-size="line"> Text Tutorial: Payments on UAT

**Step 1: Login to** [**uat.form.gov.sg**](https://uat.form.gov.sg)

Do note that forms cannot be transferred to form.gov.sg.

**Step 2: Create Storage mode form**<br>

<figure><img src="/files/BMXfPyVtTAW9j0TJPzHt" alt=""><figcaption></figcaption></figure>

<figure><img src="/files/BRQ59mHSQvGPz4jIYENx" alt=""><figcaption></figcaption></figure>

**Step 3: Click on form settings and go to payments section.**

<figure><img src="/files/H3ZGAITETDxsUdmwbT6O" alt=""><figcaption></figcaption></figure>

**Step 4: Connect with Stripe.**

{% hint style="info" %}
Register with your official email at [dashboard.Stripe.com/register](https://dashboard.Stripe.com/register) to proceed. There are no charges associated with signing up and maintaining account.
{% endhint %}

<figure><img src="/files/KKnWIwmpYmw8KLwSccDC" alt=""><figcaption></figcaption></figure>

**Step 5: Click on "Skip this form"**

<figure><img src="/files/mfBhoGZVgtcsfBdPB2fh" alt=""><figcaption></figcaption></figure>

You will be provided with a random Stripe business account ID.

<figure><img src="/files/KRuX784Zi31FtBNnUFyt" alt=""><figcaption></figcaption></figure>

Return to [creating payment field](/user-guides/advanced-guide/payments/payment-field) to learn about various settings.

{% hint style="info" %}
Some notes if you try UAT:

* While you can use FormSG to export payment results, Stripe has a powerful [dashboard ](https://dashboard.stripe.com)that allows you to view payment records, payouts and more, for **all forms** connected to the account!
* You need to complete the Stripe account set-up in order to customise the proof of payment (logo, color, organisation name), because these settings are configured on Stripe.
  {% endhint %}
  {% endtab %}
  {% endtabs %}


# Payment workflows


# Payment integrations / automations

You can integrate payments with external systems using our webhooks functionality.

{% hint style="info" %}
Basic overview of what webhooks are and how it works can be found [here](https://guide.form.gov.sg/user-guides/advanced-guide/webhooks).
{% endhint %}

With payment webhooks, FormSG can be all your online payment form needs, connected to backend systems

* using a workflow builder like Plumber.gov.sg or
* with the help of an IT team to integrate with agency systems.

### Setting up through Plumber

1. **Have your form URL and secret key ready**\
   \
   Before embarking on the steps below, ensure that your form is already [ready to collect responses](https://guide.form.gov.sg/user-guides/basic-guide/publish-form/publish-storage-mode-form) and a [payment field](https://guide.form.gov.sg/user-guides/payments/creating-payment-field) has been created. <br>
2. **Login to** [**plumber.gov.sg**](https://plumber.gov.sg) **(automation workflow builder)**<br>

   <figure><img src="/files/XtbaeglmCGidBqM7EHtQ" alt=""><figcaption></figcaption></figure>
3. **Create new pipe (workflow)**<br>

   <figure><img src="/files/ZY16uNO99CnHs6k94KPa" alt=""><figcaption></figcaption></figure>
4. **Choose FormSG as a trigger**\
   \
   Click on the dropdown to "Choose an app". <br>

   <figure><img src="/files/ycNInjs5WwIhhTJM1mYH" alt=""><figcaption><p><br></p></figcaption></figure>

   \
   For our payments tutorial, choose "FormSG" for the trigger app.<br>

   <figure><img src="/files/cVl199Q2TlEuua5sHVHn" alt=""><figcaption></figcaption></figure>

   \
   Choose "New form submission" as trigger event. Selecting this means that the workflow runs whenever a new form submission is received.<br>

   <figure><img src="/files/EMhjB9KEIQbDc0FiLpr3" alt=""><figcaption><p><br></p></figcaption></figure>

   Once you have done so, you may click continue.<br>

   <figure><img src="/files/N7XgKm4TILQg4a4Khien" alt=""><figcaption></figcaption></figure>
5. **Add connection**\
   \
   To set-up a connection between FormSG and Plumber, we make use of [webhooks](/user-guides/advanced-guide/webhooks). Click on "Add new connection".<br>

   <figure><img src="/files/5kiuNxzRF8eqoKeOo08U" alt=""><figcaption><p><br></p></figcaption></figure>

   Enter your form URL and secret key. Do ensure that the URL is in the correct format and does not contain /admin/form in it. \
   \
   Click "Submit".<br>

   <figure><img src="/files/OmXlu1tFBxX4jYx56Neh" alt=""><figcaption><p><br></p></figcaption></figure>

   Once you have successfully connected, a green tick will appear and you may continue.<br>

   <figure><img src="/files/CAw84eDPSoroDcOsK4am" alt=""><figcaption><p><br></p></figcaption></figure>

   You will also notice on your form settings, that an endpoint URL has been automatically added. Note that FormSG only supports one webhook URL at a time. \
   \
   Toggle "Enable retries" to on.<br>

   <figure><img src="/files/uUeqBIQjj2wn7Pdk3kSK" alt=""><figcaption></figcaption></figure>
6. **Perform a test submission**\
   \
   In order for Plumber to identify what appears in a form submission, you would need to perform a test submission in FormSG (not in preview mode). <br>

   <figure><img src="/files/b8PGYPZoIGksVJ4iat4v" alt=""><figcaption><p><br></p></figcaption></figure>

   To do this, open up your form. Back in FormSG, you may locate the form link in the share button. <br>

   <figure><img src="/files/hXBhiFtWWunkVfiKSXQ2" alt=""><figcaption><p><br></p></figcaption></figure>

   For a payments form, you would need to make a real payment as well. We suggest creating a category that collects $0.50 (minimum amount to transact) for this purpose.\
   \
   Enter **all** **mandatory** and **optional** fields that you would like Plumber to pick up. Plumber is not able to handle hidden fields via logic at this point. \
   \
   *If hidden fields are necessary, you may reach out to the Plumber/FormSG team for direct assistance if required.*<br>

   <figure><img src="/files/4xznlI3WHuyi1dViMukn" alt=""><figcaption><p><br></p></figcaption></figure>

   Proceed to complete payment. PayNow is recommended due to lower fees and there is no fixed fee involved. For a $0.50 payment, you will be incurring $0.01 fees (rounded up).<br>

   <figure><img src="/files/1sWvm3DzdqfICMi3UW7n" alt=""><figcaption><p><br></p></figcaption></figure>

   If you have reached the payment success page, it means a form submission has been recorded. You may switch back to Plumber.<br>

   <figure><img src="/files/zy9rAoVFXq18ou1UoOzi" alt=""><figcaption><p><br></p></figcaption></figure>

   On Plumber, click "Test Step".\ <br>

   <figure><img src="/files/0OgPRbY3PvHkLcI50NMI" alt=""><figcaption><p><br></p></figcaption></figure>

   Plumber will display received test data. These can be used for all subsequent actions for automations such as customised emails, updated to databases or as conditions for branching automations.\
   \
   For payment forms, we also include additional variables such as receipt URL, payment type, payer email, gross amount, transaction fees, product/service and quantity chosen.<br>

   <figure><img src="/files/XsL5bp9dgRwpGzVekw55" alt=""><figcaption></figcaption></figure>

   <figure><img src="/files/Dtfu8eWHHjyu764eqHfj" alt=""><figcaption><p><br></p></figcaption></figure>

   Note that if you add any new fields into your form, you will need to repeat step 7 again. <br>
7. **Automate your workflow by adding more actions for endless possibilities!**<br>

   * [Send customised notifications](https://guide.plumber.gov.sg/use-cases/dynamic-link-generation-based-on-respondent-selections) to different departments based on payment service chosen.
   * Consolidate payments from different forms into a single database
   * [Track payments statuses](https://guide.plumber.gov.sg/use-cases/attendance-taking) from a list of payees
   * Perform [logic](https://guide.plumber.gov.sg/use-cases/get-updated-on-urgent-requests) based on payment value (Greater than, less than)
   * Send reminders for a specific payment
   * Create unique entry codes for an event

   \
   Not sure what you can automate? Chat with us [here](https://go.gov.sg/formsg-payments).


# Payment websites

You can [iframe](/faq/faq/developers-it-teams#how-do-i-embed-formsg-onto-a-website) FormSG onto websites or make it a clickable button/link. Non-exhaustive list below:

* NEA [example](https://www.nea.gov.sg/corporate-functions/resources/tender-notices)

<figure><img src="/files/8Xq0kgUACg8jFvpz2A0O" alt=""><figcaption></figcaption></figure>

* ICA [example](https://www.ica.gov.sg/enter-depart/for-singapore-citizens/renunciation)

<figure><img src="/files/l3RT50ZQyTSdD49KxkxR" alt=""><figcaption></figcaption></figure>

* URA [example](https://www.ura.gov.sg/Corporate/Property/Residential/Renting-Property)
* Or use [Isomer.gov.sg](https://isomer.gov.sg/) (OGP suite static website builder)


# Pre-filling payment value

{% hint style="info" %}
Read more about pre-filling [here](https://guide.form.gov.sg/user-guides/advanced-guide/pre-fill).
{% endhint %}

<mark style="color:red;">form link</mark> ? <mark style="color:blue;">payment\_variable\_input\_amount\_field\_id</mark> = <mark style="color:green;">{{amount in cents}}</mark>

* [Example](https://form.gov.sg/6567e96ed7792e001270f6f0?64fec662783057001240c35c=Kenneth%20Tan&64fec7b386905700125c51a5=21-192-12345\&payment_variable_input_amount_field_id=200000) ($2000)
* [Example](https://form.gov.sg/6567e96ed7792e001270f6f0?64fec662783057001240c35c=Amit&64fec7b386905700125c51a5=71-123-54191\&payment_variable_input_amount_field_id=300000) ($3000)

<figure><img src="/files/qYJRzN081tuFPyglgYsg" alt=""><figcaption></figcaption></figure>

Other examples:

* Pull e-service account data and pre-fill payment form
  * Ngee Ann Polytechnic [example](https://go.gov.sg/formsg-payments-demo-prefill-buttons)
* Use a checker like CheckFirst.gov.sg
  * Calculation [example](https://www.checkfirst.gov.sg/c/a54cedd0-c16c-40a1-866b-86e8aca3f322)


# Payment results

{% tabs %}
{% tab title="Text tutorial" %}

### <img src="/files/j6GutTRDRrofXv3qKMKQ" alt="" data-size="line"> Text Tutorial: Payments results

To view your payment results, go to the results page of your form and enter the secret key. Clicking on your response will show you the submission with additional details captured for the payment.&#x20;

<figure><img src="/files/4DqkAqhW1w26vIwa0Cix" alt=""><figcaption></figcaption></figure>

<figure><img src="/files/8zrNiGFzUEwC0rjttzep" alt=""><figcaption></figcaption></figure>

You may also search or filter the form submissions before exporting. Depending on how often you reconcile, you can filter by day, week or month.

<figure><img src="/files/2ge6Nm7yvefrhxHVnU9g" alt=""><figcaption></figcaption></figure>

<figure><img src="/files/ARyMHiZWS0GvTwHXnqzW" alt=""><figcaption></figcaption></figure>

The additional details captured with payments will also show up in the CSV export.

<figure><img src="/files/VNIEklvgRUkcVASZDYfN" alt=""><figcaption></figcaption></figure>

{% hint style="info" %}
Also learn how to view results in Stripe on [Youtube video](https://youtu.be/Csqt5awHMmQ).
{% endhint %}

{% endtab %}

{% tab title="Video tutorial" %}

### <img src="/files/L6aeyturpbmqLw0lGpTf" alt="" data-size="line"> Video Tutorial: Payment results

{% embed url="<https://youtu.be/Csqt5awHMmQ>" %}
{% endtab %}
{% endtabs %}


# Payout reports

Payouts are how money from your payers gets deposited into your bank account. Depending on your payout schedule, funds from your transactions will be paid out to your bank account on a rolling basis.

FormSG results already has a column in the reports that show when money is paid out. This is typically sufficient for operations.

<figure><img src="/files/hM4wl4Ou7zGIySNBhLIl" alt=""><figcaption></figcaption></figure>

However, if the Finance representative wants to see an overview of all form payments connected to the Stripe account, they may do so following the steps below:

However, if you would like to see a breakdown of payments and payouts through the Stripe account, this can be done by following the steps below:

1. **In Stripe dashboard, go to "More" on the left tab**\ <br>

   <figure><img src="/files/w9gpZKG3S1L9Pe2hZQkx" alt=""><figcaption></figcaption></figure>
2. **Click on "Reports"**<br>

   <figure><img src="/files/CvMPkFNdLXirkQKzFRK8" alt=""><figcaption></figcaption></figure>
3. **Click on payout reconciliation**\ <br>

   <figure><img src="/files/VoQdglOt72vEKkHRp6sF" alt=""><figcaption></figcaption></figure>
4. **Choose which accounts to export, filter by date and even schedule**<br>

   <figure><img src="/files/2u5cVMqiZsezCfbMiv00" alt=""><figcaption></figcaption></figure>
5. **Scroll to payout reconciliation and download.**\ <br>

   <figure><img src="/files/0ysvDYib7F8qM0jNrCDU" alt=""><figcaption></figcaption></figure>

   Choose which columns to include. Metadata from FormSG should be included to make identifying payments from which forms better.<br>

   <figure><img src="/files/10sDUwVz1aIYG3NC1NWo" alt=""><figcaption></figcaption></figure>
6. **View report!** Sample payout report:

{% file src="/files/XME1fayDZSjqQY2WejL7" %}


# Stripe dashboard features

### Stripe dashboard

{% hint style="info" %}
This is not meant to be an exhaustive list of the features you can find on Stripe dashboard. Please use Stripe's search bar or visit the Stripe documentations if it is not covered in this section.
{% endhint %}

Use the links below to navigate to the section quicker.

* [Search](#search)
* [Account ID](#account-id)
* [Payments](#payments)
* [Refunds](#refunds)
* [Notifications](#notifications)
* [Branding and public details](#branding-and-public-details)
* [Payout](#payout)
* [Bank account and payout schedule](#bank-account-and-payout-schedule)
* [Team and roles](#team-and-roles)
* [Security history](#security-history)
* [Payment methods](#payment-methods)
* [Tax invoices reports](#tax-invoices-reports)

#### Search

You may use the search bar in Stripe for different purposes. For example, you may search the form submissionID for the payment record.

<figure><img src="/files/xknGnW8wPPWElQAn8OW0" alt=""><figcaption></figcaption></figure>

#### **Account ID**

You may find your account ID in the Stripe dashboard profile.&#x20;

<figure><img src="/files/U1bFpyP5eVQqcmoCrtRP" alt=""><figcaption></figcaption></figure>

Scroll down to the Accounts section. Here you will find all the account IDs of business accounts associated with your email address.&#x20;

<figure><img src="/files/4PRsldcSOfbp44XE24Nd" alt=""><figcaption></figcaption></figure>

#### **Payments**

Every payment submission made on FormSG will be automatically be populated in Stripe. Navigate to Payments in the Stripe dashboard.&#x20;

Here, you will all payment records associated with your business account / account ID.&#x20;

<figure><img src="/files/P9waLoz0wVPMR1f9wCJk" alt=""><figcaption></figcaption></figure>

Stripe also provides you various ways to filter you payments, such as statuses, date, amount and payment method.

<figure><img src="/files/20fn0TRamiyc3wnkVt8T" alt=""><figcaption></figcaption></figure>

Clicking into a payment record will provide more details

<figure><img src="/files/Afb5PDmPgyFbl3RATS2K" alt=""><figcaption></figcaption></figure>

You will be able to see some details about the customer, payment method and timeline of the payment. *In this example, you can see that payment was started on 12 May and refunded on 15 May.*&#x20;

<figure><img src="/files/CzIaJgJTdmNyFV9aqOX9" alt=""><figcaption></figcaption></figure>

If you scroll down further, you will find the metadata section that will be automatically populated with some FormSG details such as form title, email and submissionid.

<figure><img src="/files/k0NNeYcHyhRPKyWafgy2" alt=""><figcaption></figcaption></figure>

You can also export the results.&#x20;

<figure><img src="/files/gfM1hGiFNvgddIwmkYdp" alt=""><figcaption></figcaption></figure>

Choose the date range and headers you would like to export.&#x20;

<figure><img src="/files/ituEy57uSfIlz7GvMoIc" alt=""><figcaption></figcaption></figure>

Sample (21 columns): <https://go.gov.sg/formsg-guide-payments-stripe-export-sample>

#### Refunds

Stripe also provides a way for you to refund the payments. Simply click on refund and specify the reason.

<figure><img src="/files/JNNmWNga9HjcxZ7UqFrJ" alt=""><figcaption></figcaption></figure>

<figure><img src="/files/4ULMLys7CyESnW6aP51U" alt=""><figcaption></figcaption></figure>

The status of your payment will immediately turn to "refunded" but will still take 5-10 days to reach the payer's bank account.

<figure><img src="/files/6OfkMUEGA3CwcWDRuT8v" alt=""><figcaption></figcaption></figure>

#### Notifications

Even though storage mode does not have notifications, you can enable notifications for every successful payments in the Stripe dashboard profile settings.

<figure><img src="/files/cPhcCjXTqaqDRExA0Ey8" alt=""><figcaption></figcaption></figure>

If you are looking for notifications that include data collected, consider using [webhooks](/user-guides/advanced-guide/webhooks).

#### Branding and public details

Stripe provides some limited customisation for your tax invoice. These can be found in the public and business details section in the ⚙️ settings.&#x20;

<figure><img src="/files/GysOE6h7pJkYA55xGzZ1" alt=""><figcaption></figcaption></figure>

The public business name will show up at the top of invoice as "Invoice from xxx" while the support email will appear at the bottom as contact information showing "If you have any questions, please contact us at xxx".

<figure><img src="/files/6QTORLfYP6g71ISx2mqn" alt=""><figcaption></figcaption></figure>

You can change the logo and color of the invoice under branding.

<figure><img src="/files/mqKKDwItjcb9Pdo9z87Y" alt=""><figcaption></figcaption></figure>

#### Payout

Navigate to the Reports tab to find your payout reconciliation reports.&#x20;

<figure><img src="/files/zdyry8UzB9aoXvdimrxJ" alt=""><figcaption></figcaption></figure>

Click on download to view your payout breakdown in CSV format.

<figure><img src="/files/KkygYsFwk6Wr9Xf7kjdn" alt=""><figcaption></figcaption></figure>

<figure><img src="/files/3ls2DlERZVxJDkPZXIEo" alt=""><figcaption></figcaption></figure>

The settlement period for payments is 3 days and done in one lump sum.&#x20;

One payout ID will be generated for the lump sum and you can see the breakdown of the payments/refunds in this report.&#x20;

Sample: <https://go.gov.sg/formsg-guide-payments-stripe-payout-csv-sample>

<figure><img src="/files/2nGQEXlakfYyr7685lbu" alt=""><figcaption></figcaption></figure>

You can also enable notifications for your payouts in Stripe's [communication preferences.](https://guide.form.gov.sg/user-guides/payments/stripe-dashboard-features#notifications)

<figure><img src="/files/MwIRUDLeYW0AmadQzpEw" alt=""><figcaption></figcaption></figure>

#### Bank account and payout schedule

You can look for the bank account details under the ⚙️ settings.&#x20;

<figure><img src="/files/yn98lUK9a8TiER5qUbg7" alt=""><figcaption></figcaption></figure>

Here, you can find the settlement currencies and bank accounts. You must be an administrator of the business account in order to make changes.

By default, the payout schedule is automatic and we recommend to keep it this way to keep a breakdown of the transactions.

<figure><img src="/files/KikVcTQB1cpZ8ky8sVOL" alt=""><figcaption></figcaption></figure>

#### Team and roles

Detailed permission of [roles](https://stripe.com/docs/account/teams/roles) on Stripe.

You can add different members to your business accounts and assign them a role.

<figure><img src="/files/zRia2IzAbu7lvMXwKzaD" alt=""><figcaption></figcaption></figure>

Here, you can see all team members and their roles. You may add a new member.

{% hint style="info" %}
IAM administrators have ability to connect FormSG to Stripe, but do not have access to other features like payment records.
{% endhint %}

<figure><img src="/files/y27hIeQ9WepkRvEjGCjv" alt=""><figcaption></figcaption></figure>

To add a new member, enter their email address and choose a role for them. You can find out more about the role with the role description on the right.&#x20;

<figure><img src="/files/zpTe3RSzTagKkgepjHeN" alt=""><figcaption></figcaption></figure>

#### Security history

There are audit logs for various activities/actions for the business account. You can find this in the security history section.

<figure><img src="/files/3vgaaIHmfCgdFWNGMaql" alt=""><figcaption></figcaption></figure>

Here, you can view the logs such as logins, exporting data and more.

<figure><img src="/files/xxsupiArEQHeqNPXWvEw" alt=""><figcaption></figcaption></figure>

#### Payment methods

{% hint style="info" %}
Card payments cannot be disabled for now.
{% endhint %}

Look for payment methods in search bar or in settings on the gear icon on the top right.

<figure><img src="/files/NkD8SbjZvZ7aEtkgtRR3" alt=""><figcaption></figcaption></figure>

Under "Your account", click on "edit settings ->"

<figure><img src="/files/M98NSEbyVbWgSJZSw4Cu" alt=""><figcaption></figcaption></figure>

Under the profile configuration, choose a profile under "FormSG configurations".

<figure><img src="/files/np9urAn6kLazZP8mwdfi" alt=""><figcaption></figcaption></figure>

Look for the payment methods and turn off payment methods that you do not need.

<figure><img src="/files/z7XYUmCXCCFrEkM1XFEF" alt=""><figcaption></figcaption></figure>

<figure><img src="/files/cVucS06zg5yCiGzkWxSQ" alt=""><figcaption></figcaption></figure>

Add payment method domains for form.gov.sg and uat.form.gov.sg.&#x20;

<figure><img src="/files/4Odgaz1mmjv1X0jZ8wXI" alt=""><figcaption></figcaption></figure>

#### Tax invoices reports

You can download your tax invoices from the [Documents](https://dashboard.stripe.com/account/documents) section of the Dashboard (Settings > Reporting and Documents > Documents). More information [here](https://support.stripe.com/questions/download-tax-invoices-for-stripe-fees).


# Launch checklist

### &#x31;**) Sign up for Stripe account**

* [ ] [Sign-up](https://dashboard.stripe.com/register) to Stripe and verify with official agency email \
  (can be group email e.g. <finance@xxx.gov.sg>)
* [ ] Follow the step-by-step guided onboarding process online
* [ ] Verify identity through Singpass as administrator of the account
* [ ] Create a [Stripe business account](broken://pages/4H1jR8rtAScKZxjG6sjv).&#x20;
* [ ] Authorised senior representative sends [Letter of Authorisation](https://go.gov.sg/ogp-stripe-loa) to <sggovloa@stripe.com> ([details](https://support.stripe.com/questions/representative-authority-verification)) to activate the account

{% hint style="info" %}
This step can be skipped if your agency already has a Stripe business account.
{% endhint %}

### **2) Apply for discounted rates with Stripe**

* [ ] Prepare documents for Stripe & FormSG&#x20;

<table data-full-width="false"><thead><tr><th></th><th>Cards</th><th>Stripe PayNow</th></tr></thead><tbody><tr><td><strong>Government</strong></td><td>Send purchase order via GeBiz (GVT-24010 (T))</td><td>Send purchase order via GeBiz (GVT-24010 (T))</td></tr><tr><td><strong>Healthcare clusters / others</strong></td><td>Contact ogp@stripe.com</td><td>Contact ogp@stripe.com</td></tr></tbody></table>

* [ ] For government agencies applying via GeBiz, Stripe will respond with a Fee Schedule to be signed through DocuSign. On receiving this, Stripe will apply discounted pricing based on the tender

{% hint style="info" %}
Stripe will take 2-4 weeks processing time to apply the discount rates on your Stripe account(s). Please factor this into your launch. However, you may still launch with default rates if necessary.
{% endhint %}

### **3a) Pre-launch (Stripe)**

* [ ] Search for business settings and configure industry as "Government Services" (type to find).
* [ ] Set-up [team](/user-guides/advanced-guide/payments/stripe-dashboard-features) members
* [ ] Set-up [branding and public details](/user-guides/advanced-guide/payments/stripe-dashboard-features) for issuance of proof of payment
* [ ] Turn on notifications for successful payments, payouts
* [ ] Set payment methods (default to cards, PayNow, Apple/Google Pay)&#x20;

Refer to [Stripe dashboard features](/user-guides/advanced-guide/payments/stripe-dashboard-features) or watch a [YouTube video](https://youtu.be/Rx9nIJySXCk).&#x20;

{% hint style="info" %}
If there is a banner message and email asking you to complete verification details for your Stripe account, please do so as failure to do this may cause the payouts to be withheld.&#x20;
{% endhint %}

### **3b) Pre-launch (FormSG)**

* [ ] Create a Storage mode form or [duplicate](/user-guides/basic-guide/admin-dashboard) an existing form to storage
* [ ] Save secret key securely (we cannot retrieve a lost key)
* [ ] Add [collaborators](/user-guides/basic-guide/add-or-remove-collaborators) to your form
* [ ] [Connect](/user-guides/advanced-guide/payments/payment-field) FormSG to Stripe in form settings
* [ ] Toggle GST applicable (if relevant). Fill in GST registration number (if relevant) and business address details
* [ ] Create payment field
* [ ] Optional settings
  * Turn on Singpass authentication
  * Turn off reCaptcha (especially for internal use cases)
  * Remove existing email field

Refer to [Creating payment field](/user-guides/advanced-guide/payments/payment-field) or watch a [Youtube video](https://youtu.be/gPDNWCC4Xtk).

<details>

<summary>Marketing options</summary>

* Turn your form link into a short link
  * Government: go.gov.sg
  * Education: for.edu.sg
  * Healthcare: for.sg
* Download QR code from go.gov.sg
* Embed FormSG onto a website like isomer.gov.sg
* Use postman.gov.sg to send out email campaigns
* Use plumber.gov.sg to set-up FormSG notifications ([guide](https://guide.plumber.gov.sg/use-cases/notifications-for-formsg))

</details>


# Multi-respondent form Guide

A multi-respondent form (MRF) allows collecting form responses by multiple respondents, sequentially in a single form.

<div align="left"><figure><img src="/files/qEPG5mI1aN2PKjZU9h0h" alt="Multi-respondent forms" width="563"><figcaption></figcaption></figure></div>

### Why use Multi-respondent forms?

1. Customise your workflows
   * Use a **workflow builder** to **assign fields** that each respondent are allowed to fill at each step.
   * Enable **respondent** **approvals** to determine whether an existing workflow should continue
2. Save time to collect data from multiple respondents.
   * **Automatic routing** to the next respondent in sequence.
3. Export collated responses securely&#x20;
   * Responses from different respondents can be **exported from one database with secret key**.


# Features

<img src="/files/3p3K6YoeU989R3XT87J0" alt="" data-size="line">   **Workflow builder**\
We have an inbuilt workflow builder to support your needs to collect data from multiple respondents (e.g. account creation, audit, fault reporting, interview processes, leave approvals and more).

<figure><img src="/files/NUgYJnCt3E1EZzmpqMC1" alt="" width="563"><figcaption></figcaption></figure>

<img src="/files/MgmYy6pDjOMcgYi7wSbz" alt="" data-size="line"> **Form routing**\
Form owners can assign the respondent email in each step or let respondents specify. Next respondent can see previously filled field(s).

<figure><img src="/files/NqzGLNvYBMmIbX22CCmx" alt="" width="563"><figcaption></figcaption></figure>

<img src="/files/vpGYofCiMFNDYSVDrp8j" alt="" data-size="line">    **Assign fields**\
Gives admins more autonomy and power over which fields are editable. When you want to lock certain fields so that the next respondent will not be able to edit them.

<figure><img src="/files/i0Mq9A1Rt9fkGR3DRTib" alt="" width="563"><figcaption></figcaption></figure>

<img src="/files/UXWHD3T16SUFojma3Kzu" alt="" data-size="line">    **Attachment support**&#x20;

Admins can download each of the uploaded files. Next respondent can download and view all previous attachments uploaded. If they are given the option to edit, they will also be able to edit or delete previous attachments.

<figure><img src="/files/9XTIi9MYx021RuhF44tl" alt="" width="563"><figcaption></figcaption></figure>

<img src="/files/fSV7c4rLO7a0KtqIz9zN" alt="" data-size="line">  **Export results**\
Download all responses into a CSV file to view.

<figure><img src="/files/Tjg34VpthmrSFYV1pQtp" alt="" width="563"><figcaption></figcaption></figure>

<img src="/files/MgmYy6pDjOMcgYi7wSbz" alt="" data-size="line"> **Approval Workflows**

Admins are given more options to adjust the workflow's path. By enabling approvals, admins can determine whether an existing workflow should continue based on the approval of the current step.


# Example use cases

{% hint style="info" %}
You may use /use-template at the back of any public form link to use the template.\
\
E.g. <https://form.gov.sg/65a0c954399a250012906319/use-template>
{% endhint %}

**Case Studies (Operations):**

{% embed url="<https://youtu.be/DevGiA8ubTg>" %}

{% embed url="<https://form.gov.sg/65a0c954399a250012906319>" %}

{% embed url="<https://form.gov.sg/668039e9ff07f079327582a9>" %}

**Case Studies (Manpower/HR)**

{% embed url="<https://form.gov.sg/66d951aad607d961cf65ae55>" %}

{% embed url="<https://form.gov.sg/66d98a6eb1173bf5b49cec5d>" %}

**Case Studies (Finance)**

{% embed url="<https://form.gov.sg/6680e3ffe827f5869eae608a>" %}

**Case Studies (Schools)**

{% embed url="<https://form.gov.sg/667260371a9506387e8deb42>" %}

{% embed url="<https://form.gov.sg/6680d7ad8abd79e1b3697822>" %}


# Create Multi-respondent form

{% tabs %}
{% tab title="Interactive tutorial" %}

### :joystick: Interactive Tutorial: Multi-respondent form

{% embed url="<https://app.arcade.software/share/8J1dz1nm5OeE4UtODEdn>" %}
{% endtab %}

{% tab title="Text tutorial" %}

### <img src="/files/Evbqvm1BnUx6ONI3szxV" alt="" data-size="line"> Text Tutorial: Multi-respondent form

If you are new to FormSG, we recommend to first learn how to [create storage mode forms](/user-guides/basic-guide/create-form/create-form) before embarking on this. Once you have learnt the basics, please proceed to create a multi-respondent form in the following tutorial.

***

### **Step 1: Create form and choose "Multi-respondent form".**

MRF is similar to Storage mode forms and will generate a secret key.&#x20;

<figure><img src="/files/BP4BL8sQRGQ2j1ftyaEV" alt=""><figcaption></figcaption></figure>

In this example, I would like to design an account creation approval form. There is an applicant and a reporting officer (RO). I have populated the fields as follows.

{% hint style="info" %}
Before you proceed, you will either need to send the form to a RO using a (1) specific email or (2) from an email field. If it is scenario 2, please create an email field for the tutorial purposes.
{% endhint %}

<figure><img src="/files/fU3wGeZw069OHGCFbvGc" alt="" width="375"><figcaption></figcaption></figure>

You will notice that respondent 1 is able to fill all parts of the form at this point, which includes an email and Yes/No field (approve/reject) meant for RO to fill in. How do we restrict the fields that can be answered for each respondent? \
\
Let's fix that in the workflow builder in step 2.

### **Step 2: Determine your form routing under "Add Workflow"**<img src="/files/rw9X2UYsN92FhfKIMtjU" alt="" data-size="line">&#x20;

First, click on the workflow icon <img src="/files/rw9X2UYsN92FhfKIMtjU" alt="" data-size="line"> to the left.

<figure><img src="/files/SoxlIrnKGGmSzfHJR2Wp" alt=""><figcaption></figcaption></figure>

This brings you to the workflow builder, which allows you to set-up the routing and questions to fill at each step.&#x20;

Create workflow.

<figure><img src="/files/PGY2vhwsPo75mrHBZ5ul" alt=""><figcaption></figcaption></figure>

Select fields that respondent 1 needs to fill

<figure><img src="/files/OKm0yCQQm472gBpm1yUy" alt=""><figcaption></figcaption></figure>

Questions need to be filled by respondent 1 have to be checked.

<figure><img src="/files/zgqj7VGXI4RaTrylL6nh" alt=""><figcaption></figcaption></figure>

Once you have made your selection, click on save.&#x20;

<figure><img src="/files/On44qQAc1hiCBOxGKKD6" alt=""><figcaption></figcaption></figure>

This is the updated view when an applicant opens up the form as respondent 1.

<figure><img src="/files/8SeF9pBfYSwL8e9fZ2XS" alt="" width="375"><figcaption></figcaption></figure>

### **Step 3: Choose how to determine the next respondent**&#x20;

In multi-respondent forms, you can route submissions to the next person. In the workflow section again, click on "+ Add step".&#x20;

<figure><img src="/files/PtncFF3GaL61gGo8WMXa" alt=""><figcaption></figcaption></figure>

You will be presented with three options on routing rules:

a) Specific email(s) → Send to the **same** email each time

b) An email field from the form → Send to a **different** email each time, specified by the previous respondent.

c) Emails assigned to options in a dropdown field → Send to **certain** email(s), based on **an option that the previous respondent chooses**&#x20;

<figure><img src="/files/Nao9K2sg9d7a2vdIwQos" alt=""><figcaption></figcaption></figure>

If you choose "Specific email(s)", simply add an email address like this example:

<figure><img src="/files/Qh7RQsGYerNsNCqNYLDu" alt=""><figcaption></figcaption></figure>

If you choose "An email field from the form", pick an email field you have created.

<figure><img src="/files/JybMaigow6ded2K6dypm" alt=""><figcaption></figcaption></figure>

If you choose "emails assigned to options in a dropdown field", you will need to:&#x20;

* Choose an existing dropdown field in your form&#x20;
* Select "add emails to options"
* Download and edit the CSV template provided
* Assign email(s) to each option in the CSV template

<figure><img src="/files/7q85EPkdcI7I2A606bwJ" alt=""><figcaption></figcaption></figure>

*Refer below to more detailed steps:*&#x20;

<div><figure><img src="/files/s1CZBpWU4OapeYhQACcO" alt=""><figcaption></figcaption></figure> <figure><img src="/files/j9uem4x3TxS6CAhCTwvo" alt=""><figcaption></figcaption></figure> <figure><img src="/files/B6CBQ98F4sDsG23fB4Gt" alt=""><figcaption></figcaption></figure> <figure><img src="/files/0b2WfXuQWzqNzVERV4GK" alt=""><figcaption></figcaption></figure> <figure><img src="/files/ojC4U3zcsfFrPZKD7n7i" alt=""><figcaption></figcaption></figure></div>

### **Step 4: Assign fields to the next respondent** &#x20;

You may then specify which questions respondent 2 (RO) can fill. In our use case, we have selected the email and the Yes/No (approve/reject) fields.

<figure><img src="/files/wnLd6UoTbfTDppZaaqWZ" alt=""><figcaption></figcaption></figure>

### **Step 5: Add approval steps to your workflow (optional)**

If your workflow has approvals, you may enable "This respondent is an approval" from step 2 onwards. This requires a Yes/No field. When enabled:

* Yes - The workflow will continue to proceed to the next step
* No - The workflow will end here.&#x20;

<figure><img src="/files/sHLIZso8AMEHk2urXPd1" alt=""><figcaption></figcaption></figure>

Enable approval using the toggle.

<figure><img src="/files/hjEqBqkqs0iXxnAeEyhZ" alt=""><figcaption></figcaption></figure>

Select a Yes/No field on your form. If you currently do not have one, you would need to create one under the Create Field tab. Do also ensure that the field has been assigned to this respondent in this step.

<figure><img src="/files/RDyQwuV305ZwF6SctJRT" alt=""><figcaption></figcaption></figure>

Save the field.

<figure><img src="/files/1gjcG5ZQSnfkiPxKDcty" alt=""><figcaption></figcaption></figure>

### **Step 6: Determine who will receive email notifications (optional)**

Click on Settings, and then Email notifications

<figure><img src="/files/qVik85D1EDcmg8ny8ufc" alt=""><figcaption></figcaption></figure>

<figure><img src="/files/8U7fRgNM12Sd09Bq8cgR" alt=""><figcaption></figcaption></figure>

Select and enter respondents to be notified after the entire workflow has been completed

* Notify respondent in Step 1 -> Select an email field from the form that represents Step 1.
* Notify other respondents in your workflow -> Toggle the steps in your workflow for which respondents should receive notifications.
* Notify others -> If there are any recipients outside your form and workflow, you can specify them here.

<figure><img src="/files/c0XFCP1VVPqPnzeAPClI" alt=""><figcaption></figcaption></figure>

### **Step 7: Enable status tracking (optional)**

If you would like your respondents view and track their submission status, you may refer to [this page](/user-guides/multi-respondent-form-guide/managing-responses/status-tracking-link) on how to set this up.&#x20;

### **Step 8: Sharing the form**

Once you are ready, you may share your form!

<figure><img src="/files/RQzUuCAnYP1AB1p9U9D7" alt=""><figcaption></figcaption></figure>

<figure><img src="/files/Xhg847iTrIJ8WoFaYQ6N" alt="" width="375"><figcaption></figcaption></figure>

Upon submission of form by the applicant, an email will be forwarded to the RO.&#x20;

<figure><img src="/files/9YCaQouM5kniqIq6kg39" alt=""><figcaption></figcaption></figure>

They will be prompted to click on "fill form."

<figure><img src="/files/2BP5wkoMgiqXJ1pv5xKQ" alt=""><figcaption></figcaption></figure>

When the form is opened, notice that the RO can see applicant's submission but the responses cannot be amended, as configured in the workflow builder.

<figure><img src="/files/lSr4Pyoiwu6s31uXSOvY" alt="" width="375"><figcaption></figcaption></figure>

That's it!

If you have more steps, it will be routed to the next person and so on. Once the workflow has been completed, a notification will be sent to all selected parties. The final approval status will also be included if this has been enabled in the workflow.

<figure><img src="/files/mv2A8VVredBty4M2bJUg" alt=""><figcaption></figcaption></figure>
{% endtab %}
{% endtabs %}


# Managing responses


# Results dashboard

Form admins can view the workflow status and the pending step of a workflow directly on the Results page. The displayed workflow statuses will differ depending on whether the approval feature is enabled in the workflow.

<figure><img src="/files/6v0jnEQu7ChLGbXdn3I1" alt=""><figcaption></figcaption></figure>

The workflow status and the pending step of a workflow are also included in the exported CSV.

<figure><img src="/files/piU4R34NrDEFKM8nNIxv" alt=""><figcaption></figcaption></figure>


# Sending reminders

To send a reminder email for pending respondents/approvers to take action, you can identify 'Pending' submissions on the Results page and click on the “Send reminder” button.

<figure><img src="/files/5XUpRRwk3ggnhIdu2S8p" alt=""><figcaption></figcaption></figure>

An email reminder will be sent to the pending respondents/approvers to review and complete their part of the form.

<figure><img src="/files/yicqLgKEkVb05aMQ9eky" alt=""><figcaption></figcaption></figure>


# Status tracking link

If you would like your respondents to be able to view and track their submission status, you can enable the “Allow respondents to track their submission status” toggle at the top of the Workflow page.

<figure><img src="/files/zoAtLxwA0BuI4FAKha55" alt=""><figcaption></figcaption></figure>

This will display a status tracking link on the Thank You page upon submission, allowing respondents to view the status tracking page anytime later.

<figure><img src="/files/S4D5M3P4sXkLHM4bEanG" alt=""><figcaption></figcaption></figure>

The status tracking page displays the response ID, each workflow step and the current status. There will also be colour indicators for different statuses. The status tracking page looks like [this](https://go.gov.sg/mrf-status-tracking-13aug):

<figure><img src="/files/CGk7czCnDl7TIlRaANwj" alt=""><figcaption></figcaption></figure>

Form admins can also retrieve the status tracking link by clicking into individual response under the Results page.

<figure><img src="/files/3p3ChiUQamsSdFaUB67c" alt=""><figcaption></figcaption></figure>

To edit the step name on the status tracking page, go to the Workflow page. Click on the pencil icon to edit the workflow step.

<figure><img src="/files/M4nxIcjFoB4PrH4KL84a" alt=""><figcaption></figcaption></figure>

You may then change the step name and click on the "Save step" button.

<figure><img src="/files/0ucWxK60y9kwGkDhw4gD" alt=""><figcaption></figcaption></figure>

Note: Workflows started will retain all the step names configured previously, even if it is not completed yet.


# MRF roadmap

## Newly Released

<table data-view="cards"><thead><tr><th><select><option value="1bd36e67fde24806bfbf7d8495ec3526" label="New" color="blue"></option></select></th><th></th><th></th><th><select><option value="O2BwE0qziLP2" label="Q3 2024" color="blue"></option><option value="gGxdBEDBIfpd" label="Q4 2024" color="blue"></option></select></th><th data-hidden data-card-cover data-type="image">Cover image</th></tr></thead><tbody><tr><td><span data-option="1bd36e67fde24806bfbf7d8495ec3526">New</span></td><td><strong>Respondent status tracking link</strong></td><td>Allow respondents to track the status of their submission (<a href="https://go.gov.sg/mrf-preview-status-tracking">Example</a>)</td><td></td><td><a href="/files/8puSMLOUD86ayeBMmI3s">/files/8puSMLOUD86ayeBMmI3s</a></td></tr><tr><td><span data-option="1bd36e67fde24806bfbf7d8495ec3526">New</span></td><td><strong>Route based on Dropdown field</strong></td><td>Send forms to different parties based on option chosen in FormSG. (e.g. if select Finance, go to Finance's email)</td><td></td><td><a href="/files/IrD6fdVYD3Z97AEwnKof">/files/IrD6fdVYD3Z97AEwnKof</a></td></tr><tr><td><span data-option="1bd36e67fde24806bfbf7d8495ec3526">New</span></td><td><strong>Singpass &#x26; Myinfo Support (Step 1 only)</strong></td><td>Singpass &#x26; Myinfo can now be enabled for Multi-respondent forms. <em>It is currently supported for step 1 only.</em></td><td></td><td><a href="/files/Xcghza0cIhEApxWNaw1P">/files/Xcghza0cIhEApxWNaw1P</a></td></tr><tr><td><span data-option="1bd36e67fde24806bfbf7d8495ec3526">New</span></td><td><strong>Respondent Copy</strong></td><td>Respondents can now receive an email confirmation with a PDF copy of their responses in Multi-respondent forms (2+ respondent flows)</td><td></td><td><a href="/files/C14VLU3hSnS39ADSvbbb">/files/C14VLU3hSnS39ADSvbbb</a></td></tr><tr><td><span data-option="1bd36e67fde24806bfbf7d8495ec3526">New</span></td><td><strong>Bulk PDF Downloads</strong></td><td>Admins can now download multiple copies of responses (.pdfs) quickly in the Results page.</td><td></td><td><a href="/files/e0ByvxfdpNZVOGzNdboU">/files/e0ByvxfdpNZVOGzNdboU</a></td></tr></tbody></table>

## Upcoming

<table data-view="cards"><thead><tr><th><select><option value="1bd36e67fde24806bfbf7d8495ec3526" label="New" color="blue"></option><option value="2mPIDCJKP2pp" label="Beta" color="blue"></option></select></th><th></th><th></th><th><select><option value="603a660ca5f747d28165e901581f6857" label="Q4 2024" color="blue"></option><option value="i2YrTwVw3weG" label="Future" color="blue"></option><option value="XBj3D2VVDYoL" label="Q1 2025" color="blue"></option><option value="Jb7hcN0LU5Bk" label="Q2 2025" color="blue"></option><option value="YhPP0DhWlSVn" label="Q3 2025" color="blue"></option><option value="naEiyKYd2XCz" label="Q4 2025" color="blue"></option><option value="cDUEM1NRL61v" label="Q3 2026" color="blue"></option></select></th></tr></thead><tbody><tr><td></td><td><strong>Webhooks support</strong></td><td>Currently MRF can be integrated with plumber. Wider integrations coming soon!</td><td><span data-option="cDUEM1NRL61v">Q3 2026</span></td></tr></tbody></table>


# FAQ


# Phasing out Email mode

{% hint style="warning" %}
**This page is only applicable to form admins who have remaining Email Mode forms.** This has no impact on email functionalities on Storage Mode/Multi-Respondent forms.&#x20;
{% endhint %}

***

## What is happening?

<table><thead><tr><th width="214.1875">Period</th><th width="461.14453125">What is happening?</th></tr></thead><tbody><tr><td><strong>Before 31 Aug 2025</strong></td><td>All <strong>OPEN</strong> Email mode forms will turned to CLOSED in batches; form admins will receive an email notification with the date and time of this change.</td></tr><tr><td><strong>After</strong> <strong>31 Aug 2025</strong></td><td>All remaining Email mode forms will be removed</td></tr></tbody></table>

## Why is FormSG moving away from Email mode only forms?

### Reliability concerns

* In Email Mode, the risk of losing data is high as it depends on the availability of all the various mail services for successful delivery. Since FormSG team does not store the emails, any lost email results in a potential and permanent loss of the submission, posing a significant issue for admins handling critical information. This has happened on multiple occasions at varying degrees of impact (permanent loss of emails, temporary closure of forms, etc).
* Such issues are also difficult to detect, diagnose, and recover as opposed to Storage Mode, where response data is securely stored within FormSG, ensuring that even if an email notification fails or is lost, the submission remains accessible on our platform.

NOTE: Email functionalities still remain on FormSG. This is referring to the mode.

### Decision fatigue for public officers

* Admins must choose between modes when setting up their forms, which adds a layer of decision-making and complicates the setup process.
* Most admins are here to quickly set-up a form and get it running. This may also turn away admins who are starting out their digitalisation or learning journey as it can be overwhelming.

### Documentation complexity

* The need to support and document separate modes, because of differences, increases the administrative burden for the FormSG team.
* Having to navigate different sets of documentation for each mode is also confusing for admins.

### Double maintenance&#x20;

* The team needs to decide if new features are compatible with both Email and Storage Modes, which are structurally different.
* This duplication of effort slows down team’s development and limits the ability to implement newer improvements quickly.

### What have we done so far?

* Over the past year, the team has made efforts to ensure Storage Mode meets admins’ needs in Email Mode by introducing new features:

<table><thead><tr><th width="244">Feature</th><th>Storage Mode</th><th>Email Mode</th></tr></thead><tbody><tr><td>Charts (beta)</td><td>Yes</td><td><mark style="color:red;">No</mark></td></tr><tr><td>Payments</td><td>Yes</td><td><mark style="color:red;">No</mark></td></tr><tr><td>Webhooks </td><td>Yes</td><td><mark style="color:red;">No</mark></td></tr><tr><td>1 submission per NRIC</td><td>Yes</td><td><mark style="color:red;">No</mark></td></tr><tr><td>Whitelisted NRIC</td><td>Yes</td><td><mark style="color:red;">No</mark></td></tr><tr><td>NRIC Opt in/out</td><td><mark style="color:green;">Yes (new)</mark></td><td>Yes</td></tr><tr><td>MyInfo</td><td><mark style="color:green;">Yes (new)</mark></td><td>Yes</td></tr><tr><td>PDF copy for Respondent</td><td><mark style="color:green;">Yes (new)</mark></td><td>Yes</td></tr><tr><td>Email notification</td><td><mark style="color:green;">Yes (new)</mark></td><td>Yes</td></tr><tr><td>JSON in email notification</td><td><mark style="color:green;">Yes (new)</mark></td><td>Yes</td></tr><tr><td>Attachment included in email notification</td><td><mark style="color:green;">Yes (new)</mark></td><td>Yes</td></tr><tr><td>Sensitive High Support</td><td><mark style="color:green;">Yes (new)</mark></td><td>Yes</td></tr></tbody></table>

## Frequently asked questions

### Will the phasing out of Email mode impact my existing Storage mode and Multi-respondent forms?&#x20;

No. The phasing out of Email mode forms only impact email mode forms specifically. Email functionalities under Storage mode and Multi-respondent mode forms are not impacted.&#x20;

### Are Storage mode email notifications the same as Email mode?

**Email functionalities continue to be available in Storage mode.**&#x54;he same email responses can still be received through Storage mode, supporting form responses, attachments and JSON.&#x20;

If you are using a CRM with a receiving email inbox to create cases/tickets, this will work similarly for Storage mode email notifications.

<figure><img src="/files/om2GgbstN6VcA9n1sMDk" alt=""><figcaption><p><br></p></figcaption></figure>

### Do I need a secret key?

Yes. Moving forward, you will need a secret key to access your form responses. We are already in the process of experimenting with better ways to help you manage your secret keys. For now, please manage your secret keys securely as the security feature will be here to stay.

### What happens after the phase-out date?

All admins will be asked to migrate early before the phase out date on 30 June 2025. After 30 June, we will inform admins that the Email mode forms will be progressively turn to CLOSED by the 30 August 2025.&#x20;

As this is concerning reliability, and there are incidents of emails lost periodically, there is a shorter time frame we are getting admins to migrate.&#x20;

### Can I retain my form link when migrating to Storage mode?

Admins with OPEN Email mode forms who wish to retain the current form link will soon be able to convert their Email mode forms to Storage mode to reopen them. This option will be progressively available starting **30 Jun 2025**, no need to contact FormSG to request this.

Step 1: Wait for the respective email notifications before proceeding. ONLY AFTER these dates will you be able directly convert your Email mode forms.

Step 2: Locate these Email mode forms in your homepage.

<figure><img src="/files/C6ylaS0QPWnveqRAs7ZO" alt=""><figcaption></figcaption></figure>

Step 3: Select the form settings > general and then turn the toggle next to "Your form is CLOSED to new responses"

<figure><img src="/files/dAKwLjQiOQtAjpYywp8I" alt=""><figcaption></figcaption></figure>

Step 4: Download and safely store the secret key provided before clicking "I have saved my secret key"

<figure><img src="/files/Wu2GW0B8dg9ZUD6oFvWz" alt=""><figcaption></figcaption></figure>

Step 5: The form should now be labelled as a storage mode form. Your form is now converted to Storage mode. You can now proceed to turn the form OPEN to responses again. &#x20;

<figure><img src="/files/vUGU6ViVKmwypSVxhtyD" alt=""><figcaption></figcaption></figure>

Step 6: Input the secret key you just saved and click "Activate Form". You should receive a message and the toggle should be changed to green. Your newly converted form is now OPEN to responses.&#x20;

<div><figure><img src="/files/NZOrfvewHHEcUVHkAVXg" alt=""><figcaption></figcaption></figure> <figure><img src="/files/dmKy8GYeDesJZ90pFs63" alt=""><figcaption></figcaption></figure></div>

### Are only form owners allowed to convert their Email mode forms?&#x20;

Form owners and collaborators (editor access) can convert CLOSED Email mode forms to storage mode at any point after the communicated date.&#x20;

### Will there be downtime if I choose to wait to directly convert my Email mode form?&#x20;

Yes, form admins will need to wait for the FormSG team to close **OPEN** Email Mode forms before converting them to Storage Mode using the secret key. During this time, the form will be **temporarily unavailable to respondents**, so a short downtime is expected.

Unfortunately, downtime is necessary because admins must download the secret key securely—**without the FormSG team having any access to it.**&#x20;

To manage user expectations, you may wish to set a **custom closure message** that will be shown when the form is closed (see screenshot below).&#x20;

If you want to have zero downtime, you may also consider [duplicating your Email mode form](#how-do-i-duplicate-my-email-mode-form-as-a-storage-mode-or-multi-respondent-form) as a new Storage mode form instead.&#x20;

<figure><img src="/files/z0QQDTNWBI6mAwrRbqU2" alt=""><figcaption><p>Set message for closed forms to be displayed to respondents </p></figcaption></figure>

### I have an existing shortened link. How can I route it to my new form link?

Official short link creation platforms are a good way to easily swap out links to be displayed in multiple touch-points:

Government: [go.gov.sg](http://go.gov.sg)

Education: [for.edu.sg](http://for.edu.sg)

Healthcare: [for.sg](http://for.sg)

If you have already created an official short link, you can replace the original link with your newly created storage mode link.&#x20;

<figure><img src="/files/FjL1rfISadvRN3BGXgpp" alt=""><figcaption><p>Example of how to update go.gov links</p></figcaption></figure>

### How long does FormSG store form responses?

Currently there is no expiration. However, we are considering a potential enhancement to allow expiry of responses after the migration. If required today, you may duplicate the form periodically, and purge the previous form and secret key. If you have created the short links, it will be simpler to switch out the forms.

### How do I duplicate my Email mode form as a Storage mode or Multi-Respondent form?

You can duplicate your form in your [admin dashboard](https://guide.form.gov.sg/user-guides/basic-guide/admin-dashboard). \
\
In the admin dashboard, click on the arrow to the right of the form (beside the edit button) and select "Duplicate".

<figure><img src="/files/sWH3GK5qS8TP1wObRkmV" alt=""><figcaption></figcaption></figure>

Select Storage mode form and enter email addresses that you would like to be notified whenever there is a new response.

<figure><img src="/files/cDhJsDNzac4BCpTwQyGH" alt=""><figcaption></figcaption></figure>

To amend the emails later, navigate to the form settings.

<figure><img src="/files/J9ZMG5fWkFInTu3kii6t" alt=""><figcaption></figcaption></figure>

Click on "Email notifications" and amend email address(es) here.&#x20;

<figure><img src="/files/S7O9z7zF5kCFnPGUFCrt" alt=""><figcaption></figcaption></figure>

We recommend creating short links so you can easily change your form links in future.  [Short links / QR code](/user-guides/advanced-guide/short-links-qr-code)

### How do I customise the message shown to my users for CLOSED forms?

You may choose to change the default message that is shown for users who click on CLOSED forms. To do so, go to your form settings and edit the default message as seen below:&#x20;

<figure><img src="/files/vpIyjl6jf4gLnEG6wPu1" alt=""><figcaption></figcaption></figure>

### How can I get in touch?

In addition, while a majority would be willing to transition to Storage mode, some have expressed concerns. We are here to work with you during or after the migration on how to smoothen the process.&#x20;

For assistance, please [contact support](https://guide.form.gov.sg/contact/get-help).


# Simplifying form modes

## What's happening?

| **Period**            | **What is happening?**                                                                                                                                                                                                                    |
| --------------------- | ----------------------------------------------------------------------------------------------------------------------------------------------------------------------------------------------------------------------------------------- |
| July (Exact date TBC) | <p>Storage mode/ Single-respondent forms and Multi-respondent forms are merging into a simplified form mode.<br><br>Admins will see the latest version of FormSG and no longer need to choose between modes when creating a new form.</p> |

## Why is FormSG simplifying form modes?&#x20;

Admins previously must choose between modes when setting up their forms, which adds a layer of decision-making and complicates the setup process. For those new to FormSG, it was one more thing to figure out before building anything.

Having two modes also meant that the FormSG team had to support and document two modes. This duplication of effort slows down team's development limits the team's ability to implement newer improvements quickly.

## Frequently asked questions

#### What happens to the forms I've already created?

Your existing forms are not affected and will continue to work as normal. **No action is needed for now.**

#### What is a legacy form?

Legacy form refers to storage mode/Single-respondent forms that were created before we simplified the modes. They continue to work as normal.&#x20;

#### I used to create Storage mode/Single-respondent forms. How do I do that now?

Simply click on "Create form" at the admin dashboard. The latest version of forms works the same way — you can build your form, collect responses, and export data without setting up a workflow.

#### I created a new form and I see a “Workflow” section. Do I have to use it?

No. Workflow is optional. It's there if the form needs to be routed to multiple people for input or approval. If you just need a simple form, you can ignore it and your form will work as normal.

#### I used to create Multi-respondent forms. How do I do that now?

Simply click on "Create form" at the admin dashboard. Once your form is set up, select “Workflow” from the side navigation to build your workflow.

#### I need to create a new form with Payments, or Myinfo Children. What should I do?

On the form set-up page, you'll see at the bottom: "Need payments or Myinfo Children fields? Use the legacy version of FormSG." Click "legacy version of FormSG" link to create a form using the legacy version of FormSG, which supports these features.

<figure><img src="/files/fFTjiRfTKGWqFkxkDXUB" alt=""><figcaption></figcaption></figure>

#### I created a new form but now realise I need payments or Myinfo Children. What should I do?

You'll need to duplicate your form into the legacy version of FormSG. Here's how:

1\. Duplicate your existing form from the admin dashboard. This will copy over all your form fields and settings.

<figure><img src="/files/RL10iK2JAJi5F0cO3adm" alt=""><figcaption></figcaption></figure>

2\. On the form set-up page, click "legacy version of FormSG" to create a form using the legacy version of FormSG.&#x20;

<figure><img src="/files/fFTjiRfTKGWqFkxkDXUB" alt=""><figcaption></figcaption></figure>

## Still have questions?

Please [contact support](https://guide.form.gov.sg/contact/get-help).


# Access

### Is FormSG free?

Yes, officers can build any number of forms to collect any number of submissions for free.

### I did not receive my OTP. Where is it?

The OTP is sent immediately, but might take a while to arrive in your government email if there is high traffic on the government network. **OTPs are sent almost immediately when requested.** Hence most OTP delay issues tend to be on the recipients' agency's mail server end, due to a large email campaign, or emails subjected to security checks. If there is widespread OTP issues, we will inform admins via our communication channels.

{% hint style="info" %}
If you have already requested a second OTP, the first OTP will be invalid.\
If you have not received your OTP after 10 minutes:
{% endhint %}

1. Check if your login email is keyed in correctly and you are looking at the right inbox.
2. Search for "One-Time Password (OTP) for FormSG".&#x20;
3. Check junk/spam boxes.&#x20;
4. Look at outlook rules/junk email filter as FormSG OTPs come from an internet source.&#x20;
5. Use other browsers and/or personal devices (e.g. mobile device).&#x20;
6. Check if colleagues are also experiencing this delay.&#x20;

*For DefenceMail, please reach out to <DMZSupport@dsta.gov.sg> and inform them as well.*

### The previous form owners have left or my email has changed.

These are some steps that you can take:

* If the owner/editors of the form are still in your agency, ask for access.&#x20;
* Obtain internal approval for your IT Department to temporarily reinstate the email address, so that the email can be used to obtain OTP required to login and transfer ownership of the form.&#x20;
* If you still need urgent access, we will only accept the request once you have added your ITD/HR involved in off-boarding to confirm that they will include off-boarding processes in future.&#x20;

:exclamation:To prevent such incidents from occurring, we strongly recommend that all IT departments add form ownership transfer in off-boarding for staff leaving.

### Is Form accessible on intranet/overseas?

FormSG is accessible on WOG Intranet in addition to the Internet. If you still cannot access [https://form.gov.sg](https://form.gov.sg/) on your Intranet, please [contact us](https://go.gov.sg/formsg-support) for help.

As long as you have an Internet / WOG Intranet connection, you can access form.gov.sg from all around the world.

### Can non-government agencies or students create forms?

No. Only government agencies and approved organisations by Ministries can create forms.&#x20;

### Is Form really up 24/7?

Yes, we have a measured uptime of 99.93% since we launched. You may also view if FormSG is down on <https://status.form.gov.sg/>.&#x20;

With regards to maintenance, there is no planned maintenance window. Most features are constantly deployed without downtime. We will typically inform FormSG users in advance for any major upgrades that may affect your existing workflows.

Because we do not charge for the service, we do not have an SLA.

The exception is other integrations such as Singpass, who operate separately from FormSG. Some of these services have planned maintenance, and you can find out more by contacting them.

### Do I need internet access to use Form?

You cannot use FormSG offline.


# Form

### Where is my form link?

You can find the form link in the share button on the top right of each form.&#x20;

<figure><img src="/files/Iz3hLfdcZ5fgHXA3GLBa" alt=""><figcaption></figcaption></figure>

### Why am I not receiving my test responses?

Please ensure you are not submitting your responses in preview mode. To identify this, your form link should not have a /preview at the end. If you are still encountering missing responses. Please fill this [form](https://form.gov.sg/#!/5d6dd66ad6754c0012d7dc82).&#x20;

### How will I be informed of any issues with my form?

We have multiple tests and detection tools to flag issues on forms. If we detect an issue with your forms, we will email/phone you. Although rare, if the entire platform has downtime, we will announce it on [Telegram](/contact/telegram), and enable a maintenance page on all forms. You can also view the site status on [status.form.gov.sg](https://status.form.gov.sg). We have engineers on-call to react to issues as fast as we can. If there are issues with your form, you can contact us through our [Support Form](https://go.gov.sg/formsg-support).

### How do I convert my form from 1 mode to another?

You can do so in your [admin dashboard](https://guide.form.gov.sg/user-guides/basic-guide/admin-dashboard).&#x20;

### If I duplicate my form, do I keep responses?

No. Duplicating your form only keeps the form fields, logic and settings. Responses will start from **zero**.

### Can I maintain the same link if I duplicate my form?

You will not be able to maintain the same link as every form generated is unique. You may consider using go.gov.sg for your short link instead. Read more [here](/user-guides/advanced-guide/short-links-qr-code).

### How many questions can I put in a form?

Our longest forms have more than 1900 questions, and more than 100 deployed forms have over 100 questions. To make forms easier to fill, form creators used [logic](/user-guides/advanced-guide/logic) to shorten their forms and only show relevant questions.

### What happens to my responses when I add or remove questions?

Old and new data will be handled accordingly with their respective column headers.

### Can I limit responses based on a field?&#x20;

No, currently you can only limit responses by setting a limit on the overall form submission. See [here](https://guide.form.gov.sg/user-guides/advanced-guide/restricted-access) for how you can do this. A potential workaround would be to create different forms for each session, and do a response limit on each form.&#x20;

If your use case involves booking appointment slots, you may consider using cal.gov.sg.

### Can Form manage a high volume of responses?

Some of our forms already have a high number of responses (>million). There is no limit. However, note that you should filter by dates before exporting because it may take more time to export on older devices.

### How do I send an email acknowledgement?

Email acknowledgement is a [setting](/user-guides/advanced-guide/email-confirmations-pdf-and-verification) you can find in each email field you create.

### How do I link a public file?

You can use go.gov.sg to upload Official Open files and turn them into a publicly accessible link.

### Is there a limit to the number of collaborators?

Up to 30 collaborators per form.

### Can I bold or highlight certain words in field instructions for emphasis?

Yes — FormSG supports simple markdown-style formatting. See the [formatting](https://guide.form.gov.sg/user-guides/advanced-guide/formatting) guide.

### Is FormSG screen reader friendly?

Yes public forms are accessible for visually impaired respondents. They would be able to use a screen reader when filling the form.

Here are some guidelines we recommend when creating forms that are intended to be filled by visually impaired respondents:

* Use clear and simple language for questions.
* Keep the form short and with essential fields. Long forms might overwhelm the user.
* Use headings where appropriate to structure the form. This helps in organising relevant information and increases understandability.

### Does FormSG have virus scanning?

Yes, FormSG does virus scanning on file attachments on submission.

### My respondents cannot load the form.

Please make sure that the browser, device software versions are all up to date. If you are still encountering issues, you may write in to us.

### Can I hide the form from search engines?

By default, each form link is unique. If the form is not linked on any site, it should not be indexable.

### What if my form is expected to have a huge volume of submissions?&#x20;

Form admins who are expecting a sudden surge in traffic for your form (e.g. more than 10,000 respondents at form opening), may [contact us](https://go.gov.sg/formsg-support) in advance to request activation of the waiting room. An example that this may be applicable to is NDP balloting and is not meant for general use.

The waiting room gracefully handles large spikes in traffic. This ensures that the system is not overloaded and form respondents will have a positive form filling experience.

<figure><img src="/files/iap4XPHaOE8RITcdxs5O" alt=""><figcaption></figcaption></figure>

When the waiting room is activated for your form by the FormSG team, form respondents attempting to access the form will first be directed to a waiting room page (see example above). They will then be admitted into the form based on the order in which they first loaded the page (like a queue), and can proceed to fill in the form.&#x20;

The waiting room can also be configured to start the queue at a specific time (e.g. 9am on 1 January 2024).&#x20;

* **Q: Does the waiting room follow a first-come-first serve queue order?**\
  A: Yes. When the waiting room is activated, form respondents will be queued in the waiting room, and admitted based on the order in which they first loaded the page.<br>
* **Q: Is there a way to know the wait time before respondents can enter the form?**\
  A: An estimated wait time is displayed on the waiting room page.<br>
* **Q: Do respondents need to enable cookies on their browser?**\
  A: Yes, respondents will need to enable cookies as this is how FormSG keeps track of the queue order.<br>
* **Q: Will respondents be slotted into the queue if they load the page before the opening time?**\
  A: Form respondents will be queued only after the form opens. If they visit the form before the start time, they will be advised to return later, and will not be given a queue position.\
  \
  For example, if the form opens at 9am on 1 Jan 2024, their queue position will be based on the time that they loaded the page after 9am on 1 Jan 2024, regardless of how many times they loaded the page before 9am on 1 Jan 2024.&#x20;

### My agency is migrating email domains, what should I do?

As forms are tied to email addresses, this means that you will lose access to all forms if a proper transition period is not in place. Please set a transition period where each admin have to transfer all active forms to their new email addresses.

**Step 1: Login to form.gov.sg with the old email address.**

**Step 2: Click on the profile icon and "Transfer all forms".**

<div align="left"><figure><img src="/files/cAZFLke7a7o0tJ9y4UUT" alt="" width="375"><figcaption></figcaption></figure></div>

**Step 3: Enter the new email address you will be using.**

<div align="left"><figure><img src="/files/8CiElUBliqLV3WVZsx90" alt="" width="563"><figcaption></figcaption></figure></div>

This will transfer ownership of all the forms that you currently are a **owner** (not editor or viewer). The existing email address will be made an editor.

{% hint style="info" %}
If you are not an owner but an editor/viewer, please ask the form owners to perform the transfer.
{% endhint %}


# Fields

### How do I insert a question?

You can use our drag and drop builder by holding the field you wish to create, and placing at the spot desired.

### Differences between radio, checkbox and dropdown field?

For 6 or fewer choices, it is advisable to use a radio button, as there are only few options to display. Vice versa, we recommend using dropdown for more than 6 choices. If you require your respondents to choose multiple options, you can create a checkbox field.

### Can I change my existing field to another type?

No it is not possible as they are structurally different. You may recreate the fields if necessary using our drag and drop builder.

### Can I change the sequence of the fields?

Yes, you can reorder the fields by clicking and dragging the entire field to where you want it.

### How do I increase attachment size limit? And what if there are many attachments for my form?

The current attachment size limit for each form submission is 20mb for now due to limitations of mail attachment limit.

As the smallest unit you can attach per attachment field is 1 MB, you can have up to 20 attachment fields on your form.

There is no limit on the total size of attachments across all form submissions.

### Can logic support (blank)?

Logic enhancements is in our product development roadmap. If you are interested in sharing your use case for our research, please fill in this form: [Feature Requests](https://form.gov.sg/5fc76b61454d0100111038e6).

### Are fields hidden by logic still included in my CSV export?

Yes. If logic hides a field from a respondent, it is still included as a column when you export your responses, it will just show an empty cell for that response.&#x20;

### Is there a character limit for short answer and long answer fields?

There is currently a 10,000 character limit for both fields.

### Can we attach videos for respondents to view?

It is currently not possible to embed videos directly. But you can put a link on the form for the respondents to click.

### Excel responses from table style questions are clumped into one line, how do I separate them?

* Open the excel sheet
* Select the entire column of the responses
* Go to the Data tab and choose Text to Columns > Delimit by comma (,).


# Attachments

### Are attachments scanned for viruses?

Yes we do virus scanning on submission.&#x20;

### Unsupported file types?

We do not support password-protected ZIP files, as the system must be able to scan all contents to confirm they meet the supported file type requirements.

### What are the supported file types?

| Extension         | Description                                                                                                                                                                              |
| ----------------- | ---------------------------------------------------------------------------------------------------------------------------------------------------------------------------------------- |
| asc               | Ascii file                                                                                                                                                                               |
| avi               | Microsoft Audio Video Interleave format                                                                                                                                                  |
| bmp               | Microsoft bitmap                                                                                                                                                                         |
| cer               | Internet Security Certificate File (\[Crypto Shell Extensions, Internet Control Panel])                                                                                                  |
| class             | Java Binary format                                                                                                                                                                       |
| csv               | comma separated values                                                                                                                                                                   |
| dat               | anti-virus signature file                                                                                                                                                                |
| dgn               | ArcView Design Drawing File (ArcView), Intergraph Graphics (Intergraph software), MicroStation CAD (MicroStation, Autodesk Architect Desktop, many other CAD applications)               |
| doc               | Word document                                                                                                                                                                            |
| docx              | Word document (Office 2007)                                                                                                                                                              |
| dot               | MS Word Document Template (OpenOffice, MS Word)                                                                                                                                          |
| dwf               | Autodesk Design Web Format (Autodesk, other graphic applications)                                                                                                                        |
| dwg               | AutoCAD Drawing Database (Autodesk, Adobe Illustrator, MicroStation, Intergraph, many other drawing applications including MS Office)                                                    |
| dxf               | AutoCAD Drawing Interchange Format (AutoCAD, Intergraph, Adobe Illustrator, many other CAD applications)                                                                                 |
| ent               | Molecular file format                                                                                                                                                                    |
| eps               | Encapsulated PostScript format                                                                                                                                                           |
| gif               | Graphic Interchange Format                                                                                                                                                               |
| gz                | GNU Zip compression format                                                                                                                                                               |
| htm               | Hypertext markup (Webpage)                                                                                                                                                               |
| html              | Hypertext markup (Webpage)                                                                                                                                                               |
| jfif              | Joint photographic experts group File Interchange Format                                                                                                                                 |
| jpeg              | Joint photographic experts group bitmap                                                                                                                                                  |
| jpg               | Joint photographic experts group bitmap                                                                                                                                                  |
| log               | Log file                                                                                                                                                                                 |
| mov               | MPEG 4 video container file that is primarily used with Apple's QuickTime program                                                                                                        |
| mpeg              | Motion picture experts group video                                                                                                                                                       |
| mpg               | Motion picture experts group video                                                                                                                                                       |
| mpp               | Project Project; BX-24 Basic Express Compiler Map; CAD Drawing File; Musepack Audio File; Zortech 3 README File                                                                          |
| msg               | Microsoft Outlook Item; used to represent individual email messages, appointments, contacts, tasks, and so on in the file system.                                                        |
| mso               | Microsoft FrontPage                                                                                                                                                                      |
| oa                | File type used by [https://www.verify.gov.sg](https://www.verify.gov.sg/), used by Notarize                                                                                              |
| odb               | OpenOffice/StarOffice OpenDocument (Ver 2) Database (XML); ABAQUS File; ArcView Object Database ASCII File; Psion Organiser Datafile and LZ Diary File                                   |
| odf               | OpenOffice/StarOffice OpenDocument (Ver 2) Formula (XML); BattleZone Cartographers Guild File; OnkoS Data; Open Document Interchange (ODIF); Star Trek Armada Ship/Structure Information |
| odg               | OpenOffice/StarOffice OpenDocument (Ver 2) Graphics Document (XML)                                                                                                                       |
| odp               | OpenOffice/StarOffice OpenDocument (Ver 2) Presentation (XML); Oedipus                                                                                                                   |
| ods               | OpenOffice/StarOffice OpenDocument (Ver 2) Spreadsheet (XML); NCompass Labs Internet Script; Outlook Express Mailbox                                                                     |
| odt               | OpenOffice/StarOffice OpenDocument (Ver 2) Text Document (XML); MindRender Virtual Reality Explorer Kit (VREK) Object File Format                                                        |
| p7m               | Secure Email 2; PKCS #7 MIME Message                                                                                                                                                     |
| p7s               | Secure Email 2; PKCS #7 Signature                                                                                                                                                        |
| pcx               | Paintbrush bitmap                                                                                                                                                                        |
| pdf               | Adobe Portable Document File                                                                                                                                                             |
| png               | Portable Network Graphic format                                                                                                                                                          |
| pot               | PowerPoint Template; Animation; Fractint Continuous Potential Bitmap (Graphic); GNU Gettext Portable Object Base Translation                                                             |
| pps               | Microsoft power point slideshow                                                                                                                                                          |
| ppsx              | Power Point Microsoft Office Open XML Format Presentation Slide Show                                                                                                                     |
| ppt               | Microsoft power point slide presentation                                                                                                                                                 |
| pptx              | Power Point Microsoft Office Open XML Format Presentation Slide                                                                                                                          |
| psd               | Adobe Photoshop                                                                                                                                                                          |
| pub               | Public Key for PGP                                                                                                                                                                       |
| rtf               | Microsoft rich text format                                                                                                                                                               |
| svg               | Scalable Vector Graphics                                                                                                                                                                 |
| sxc               | OpenOffice Calculator (SXC)                                                                                                                                                              |
| sxd               | OpenOffice Draw (SXD)                                                                                                                                                                    |
| sxi               | OpenOffice Impress (SXI)                                                                                                                                                                 |
| sxw               | OpenOffice Write (SWX)                                                                                                                                                                   |
| tar               | Tape archive                                                                                                                                                                             |
| tif               | Tag image bitmap file                                                                                                                                                                    |
| tiff              | Tagged Image Format File                                                                                                                                                                 |
| txt               | Text                                                                                                                                                                                     |
| vcf               | Virtual Card File                                                                                                                                                                        |
| vsd               | Microsoft Visio                                                                                                                                                                          |
| wav               | Wave audio format                                                                                                                                                                        |
| wmv               | Microsoft Windows Media Video                                                                                                                                                            |
| xls               | Microsoft Excel                                                                                                                                                                          |
| xlsx              | Microsoft Excel (Office 2007)                                                                                                                                                            |
| xml               | Extensible Markup Language                                                                                                                                                               |
| Zip (No Password) | Compressed archive                                                                                                                                                                       |

### How do I increase attachment size limit?

The current size limit is 20 MB for each form submission.

Because the smallest unit you can attach per attachment field is 1 MB, you can have a max of 20 attachments in storage mode. You may also created and advise your user to zip documents up and submit as one attachment.

There is no limit on the total size of attachments across all form submissions.


# Storage

{% hint style="info" %}
To learn how to use Storage mode, see [here](/user-guides/basic-guide/create-form/create-form).
{% endhint %}

### I have lost my Secret Keys! What should I do?

If you have lost your secret key, take these steps immediately:

1. If your form is live, [**duplicate**](/user-guides/basic-guide/admin-dashboard) **your form immediately**, **save the new secret key** securely and replace the original form’s link with the new form’s link to continue collecting responses.&#x20;
2. **Deactivate the original form** as soon as possible to avoid losing further responses. Do note that duplicating your form only copies all the fields but not existing responses.
3. On the computer you used to create the original form, **search for ‘Form Secret Key’**. Secret keys are downloaded as .txt files with ‘Form Secret Key’ in the filename.
   1. You can also search for **your Form ID** as it may also included in the filename. You can find your Form ID in the Form URL **(ie.** [**http://form.sg/***<mark style="background-color:yellow;">**65dd469fc150f58af9eb71b5**</mark>*](http://form.sg/65dd469fc150f58af9eb71b5)**)**.&#x20;
4. If you have created multiple forms with similar titles in the past, it is possible that you have confused the different forms’ secret keys with each other. **Try all secret keys with similar filenames** on your form.
5. If you remember sending an email to share your secret key with collaborators, **search the Sent folder in your email for the keyword ‘secret key’** and your form title.
6. If you are still unable to find your secret key, you will not be able to access your existing response data.&#x20;

As a best practice, it is highly recommended to convert your form links using [go.gov.sg](/user-guides/advanced-guide/short-links-qr-code) which allows you to quickly swap out form links in the event of secret key loss.

### Can FormSG team help me retrieve my secret key?

No. It is not possible for us to recover your lost secret key or response data on your behalf. This is because FormSG team does not retain your secret key or provide other ways to unlock your encrypted data - this is the only way to ensure response data is truly private to agencies only. This is an important security benefit, because that means even if our server were to be compromised, an attacker would never be able to unlock your encrypted responses.

### If I transfer ownership, does the secret key auto-transfer to the new owner?

No. You have to pass the secret key to the new owner manually.

### Can I delete or edit my responses?

This is currently not possible. However, if you wish to reset your response count to zero after testing your form, you can simply duplicate your test form and create another form. You can then use your new form as your live form instead.

### Is there a storage limit?

No. There have been forms with over a million submissions on Storage mode. As a best security practice, do duplicate your forms over time.

### What is the storage duration? How long will my responses be stored for?

Form will store your encrypted responses indefinitely, and they will be accessible as long as you have the secret key. If there are changes to this policy, we will inform all form users.

If you no longer need to access your form responses, you can simply discard your secret key. Without your secret key, your form responses cannot be decrypted, and are unreadable.

### How does encryption work?

When a respondent submits a response, response data is encrypted in the respondent’s browser before being sent to our servers for storage. This means that by the time Form’s servers receive responses, they have already been scrambled and are stored in this unreadable form. Your response data remains in this encrypted state until you decrypt your responses with your secret key, transforming them into a readable format.

The benefit of encryption is that response data enters and remains in FormSG’s servers in an encrypted state. This ensures that even if our servers are compromised by an attack, attackers will still not be able to decrypt and view your response data, as they do not possess your secret key(s).

### I am not receiving responses even though I am a collaborator!

Adding a collaborator does not mean that they receive responses immediately. You need to add them as recipients in the form's settings.

### Why do I have an additional quote in some of my responses?

For some context, it is possible to create formulas using +, -, @ or = signs in file types such as Excel. The FormSG team found a security vulnerability where respondents could type a formula into responses which may cause malicious codes to be injected and ran in exports when you open them.&#x20;

As such, your responses may now have a single quote added to it to prevent this from happening.&#x20;

<table><thead><tr><th></th><th width="168">Before</th><th>After (Security enhancement)</th></tr></thead><tbody><tr><td>CSV</td><td>=cmd</td><td><mark style="background-color:red;">'</mark>=cmd</td></tr><tr><td>Excel</td><td>[=cmd]</td><td>[<mark style="background-color:red;">'</mark>=cmd]</td></tr></tbody></table>

You may simply remove the quotes from those responses if required.

### I am unable to fully download all my attachments on my corporate device!

Please check if you have safe.menlosecurity.com/ included in your URL page. This will cause issues with exporting. Remove it and just download from form.gov.sg without it.

### How to convert CSV to Excel properly?

You may have encountered auto modifications of the timestamp or response ID to scientific values. To fix this:

1. Open Excel on a blank document
2. In the data tab, click "Get External Data", "From Text" or equivalent
3. Select the downloaded CSV file from FormSG

More info can be found on Microsoft's support [page](https://support.microsoft.com/en-au/office/import-or-export-text-txt-or-csv-files-5250ac4c-663c-47ce-937b-339e391393ba#:~:text=Click%20the%20cell%20where%20you,to%20import%2C%20and%20click%20Import.).


# Storage (to update to this)

### I have lost my Secret Keys! What should I do?

If you have lost your secret key, take these steps immediately:

1. If your form is live, [**duplicate**](/user-guides/basic-guide/admin-dashboard) **your form immediately**, **save the new secret key** securely and replace the original form’s link with the new form’s link to continue collecting responses.&#x20;
2. **Deactivate the original form** as soon as possible to avoid losing further responses. Do note that duplicating your form only copies all the fields but not existing responses.
3. On the computer you used to create the original form, **search for ‘Form Secret Key’**. Secret keys are downloaded as .txt files with ‘Form Secret Key’ in the filename.
   1. You can also search for **your Form ID** as it may also included in the filename. You can find your Form ID in the Form URL **(ie.** [**http://form.sg/***<mark style="background-color:yellow;">**65dd469fc150f58af9eb71b5**</mark>*](http://form.sg/65dd469fc150f58af9eb71b5)**)**.&#x20;
4. If you have created multiple forms with similar titles in the past, it is possible that you have confused the different forms’ secret keys with each other. **Try all secret keys with similar filenames** on your form.
5. If you remember sending an email to share your secret key with collaborators, **search the Sent folder in your email for the keyword ‘secret key’** and your form title.
6. If you are still unable to find your secret key, you will not be able to access your existing response data.&#x20;

As a best practice, it is highly recommended to convert your form links using [go.gov.sg](/user-guides/advanced-guide/short-links-qr-code) which allows you to quickly swap out form links in the event of secret key loss.

### Can FormSG team help me retrieve my secret key?

No. It is not possible for us to recover your lost secret key or response data on your behalf. This is because FormSG team does not retain your secret key or provide other ways to unlock your encrypted data - this is the only way to ensure response data is truly private to agencies only. This is an important security benefit, because that means even if our server were to be compromised, an attacker would never be able to unlock your encrypted responses.

### If I transfer ownership, does the secret key auto-transfer to the new owner?

No. You have to pass the secret key to the new owner manually.

### Can I delete or edit my responses?

This is currently not possible. However, if you wish to reset your response count to zero after testing your form, you can simply duplicate your test form and create another form. You can then use your new form as your live form instead.

### Is there a storage limit?

No. There have been forms with over a million submissions on Storage mode. As a best security practice, do duplicate your forms over time.

### What is the storage duration? How long will my responses be stored for?

Form will store your encrypted responses indefinitely, and they will be accessible as long as you have the secret key. If there are changes to this policy, we will inform all form users.

If you no longer need to access your form responses, you can simply discard your secret key. Without your secret key, your form responses cannot be decrypted, and are unreadable.

### How does encryption work?

When a respondent submits a response, response data is encrypted in the respondent’s browser before being sent to our servers for storage. This means that by the time Form’s servers receive responses, they have already been scrambled and are stored in this unreadable form. Your response data remains in this encrypted state until you decrypt your responses with your secret key, transforming them into a readable format.

The benefit of encryption is that response data enters and remains in FormSG’s servers in an encrypted state. This ensures that even if our servers are compromised by an attack, attackers will still not be able to decrypt and view your response data, as they do not possess your secret key(s).

### I am not receiving responses even though I am a collaborator!

Adding a collaborator does not mean that they receive responses immediately. You need to add them as recipients in the form's settings.

### Why do I have an additional quote in some of my responses?

For some context, it is possible to create formulas using +, -, @ or = signs in file types such as Excel. The FormSG team found a security vulnerability where respondents could type a formula into responses which may cause malicious codes to be injected and ran in exports when you open them.&#x20;

As such, your responses may now have a single quote added to it to prevent this from happening.&#x20;

<table><thead><tr><th></th><th width="168">Before</th><th>After (Security enhancement)</th></tr></thead><tbody><tr><td>CSV</td><td>=cmd</td><td><mark style="background-color:red;">'</mark>=cmd</td></tr><tr><td>Excel</td><td>[=cmd]</td><td>[<mark style="background-color:red;">'</mark>=cmd]</td></tr></tbody></table>

You may simply remove the quotes from those responses if required.

### I am unable to fully download all my attachments on my corporate device!

Please check if you have safe.menlosecurity.com/ included in your URL page. This will cause issues with exporting. Remove it and just download from form.gov.sg without it.

### How to convert CSV to Excel properly?

You may have encountered auto modifications of the timestamp or response ID to scientific values. To fix this:

1. Open Excel on a blank document
2. In the data tab, click "Get External Data", "From Text" or equivalent
3. Select the downloaded CSV file from FormSG

More info can be found on Microsoft's support [page](https://support.microsoft.com/en-au/office/import-or-export-text-txt-or-csv-files-5250ac4c-663c-47ce-937b-339e391393ba#:~:text=Click%20the%20cell%20where%20you,to%20import%2C%20and%20click%20Import.).


# Emails

### I am not receiving email responses even though I am a collaborator!

Adding a collaborator does not mean that they receive responses immediately. You need to add them as recipients in the form's settings.

### What do I do in the event of an email bounce?

1. Check if the emails have full mail boxes and free up capacity immediately (e.g. by archiving old emails).
2. **Add an email address with spare inbox capacity** to your form’s email recipients, under Settings > Email Notifications.&#x20;
3. Check if the form has been CLOSED under Settings. If so, make your form OPEN again.&#x20;
4. Submit a test response on your OPEN form, and check that you receive it.
5. Retrieve the results from FormSG directly using the secret key.

### How do I ensure my form responses will not bounce?

If your mailbox is full or your email address is no longer valid, form responses will bounce and be permanently lost. Here are some ways to prevent this:

1. Set up auto-archiving on your mailbox to ensure that your mailbox will never hit full capacity.

   You can set up auto-archiving in your Outlook by navigating to `File` > `Options` (left) > `Advanced` (left) > `AutoArchive Settings` (right). Run `AutoArchive` as often as you expect your mailbox to be full - if you expect high response volume, you can run `AutoArchive` every day.
2. Enter 2 or more email addresses where responses will be sent, for all your forms.

   You can find this setting by logging in to form.gov.sg, clicking on your form, navigating to `Settings` > `Emails where responses will be sent`.
3. If you are leaving your department, make sure to update “Emails where responses will be sent” so that form responses will go to a colleague after you leave.

### What is the purpose of the JSON at the bottom of the email?

<figure><img src="/files/6yVZ4nyEL8oKeqrJegiZ" alt=""><figcaption></figcaption></figure>

We provide the JSON for any custom automations admins wish to build (e.g. RPA, integrations to CRM systems) when receiving their email notifications.&#x20;

There is currently no way to remove the JSON at the end of the email notifications.&#x20;

If you wish to send email notifications to your form respondents **without** the JSON, you may explore sending email notifications, you may exploring setting it up in [Plumber](https://plumber.gov.sg). (Guide to set up [here](https://guide.plumber.gov.sg/all-workflows/email-customised-acknowledgements-to-respondent))

### Why are my form's email notifications not being sent out at all?

If you have manually keyed in email addresses under Settings > Email Notifications and notifications are not being received, there may be hidden or invalid characters in the email addresses.\
\
To fix this, try the following:<br>

1. Delete the existing email addresses in your form's email settings.
2. Paste them into a plain text editor (e.g. Notepad) first, then copy from there and paste into the form. This strips out any hidden characters.
3. Submit a test response to verify that notifications are coming through.


# Singpass, Myinfo

{% hint style="info" %}
**SingPass and CorpPass are separate entities from FormSG.**&#x20;
{% endhint %}

### Can Singpass be made optional to cater to respondents with and without Singpass?

This is currently not possible. A workaround to this is to create a directory leading to two different forms. See an example: go.gov.sg/formsg-payments-demo.

### My respondents are having issues on mobile.

Please send them some of these troubleshooting steps:

1. Check your internet connection to ensure it is stable.&#x20;
2. Make sure device and Singpass is updated to latest version.
3. Ensure cookies are not blocked on browser.
4. Use Safari/Chrome as recommended browsers.
5. Try logging in to other government websites/apps to determine if issue occurs on other platforms.

### **I am unable to authenticate (iOS)**

Your respondents encounter an issue that says "unable to launch Singpass app".

This can sometimes happen on iOS devices as the Apple app site association ([AASA](https://developer.apple.com/documentation/xcode/supporting-associated-domains)) is not initialised due to factors like low battery and poor cellular connection. Here are some ways you can troubleshoot.

1. Charge your phone on wifi and wait for iOS to batch process the AASA
2. Reinstall Singpass app to trigger a new download of AASA

### After Singpass app authentication, users are not auto redirected back to the digital service (iOS)

This is currently not supported.  Apple currently restricts automatic redirection to webpages on iOS.

### How long do MyInfo forms last before expiring?

The respondent can leave the form open for up to 3 hours before it will be automatically closed.

### How can I test MyInfo data without e-service ID?

You can test MyInfo on uat.form.gov.sg. For children records, you can use the following profiles:

1. F1612364K
2. F1612366T
3. S2043629H
4. S4000002Z&#x20;

If you encounter issues with MyInfo, please contact <support@myinfo.gov.sg>.

### Where do we get the MyInfo data?

MyInfo data is obtained through MyInfo APIs (data catalog [here](https://api.singpass.gov.sg/library/myinfo/business/implementation-myinfo-data)).&#x20;

Please write in to us if you have a significant volume use case requiring an additional field.&#x20;

### My respondents are unable to see their children's records!

Please check if their children are recorded under **Local Registered Birth Records** in the Singpass app. This can be found under "My Profile" => "Family". Also, the children must not be 21 years old and above.

If they are but it does not appear in FormSG, please report to us.&#x20;

In other cases, please approach **<support@myinfo.gov.sg>.**

![](/files/b4J2BmHmVGPHdtsVxkT4)

### Why are some MyInfo fields verified and not others?

MyInfo data obtained will always be categorised into one of these:

* 1 - Government-verified Data
* 2 - User Provided Data
* 3 - Not Applicable (e.g. CPF data for foreigners)
* 4 - Data retrieved from SingPass (e.g. email, mobileno)

For 1, it will have a \[verified] tag to your responses and the field is locked.

There are some fields which will always be editable even if there are data provided (e.g. Marital status).

<figure><img src="/files/pgpnCHF0uCZrG9lxXlD3" alt=""><figcaption></figcaption></figure>

### How should I automate and handle Singpass data?

**Recommended handling of Webhooks:**

```
const verifiedUin =
      (verified?.uinFin as string)
    if (!verifiedUin) {
      throw new Error('FormSG response is missing a verified uin')
    }
```

**Recommended handling of JSON:**

* Not recommended to do an exact match.
* Check for "NRIC" instead as this will be future proof if FormSG makes any changes.


# Signatures

### What signatures can be done electronically?

Under the Electronics Transaction Act, the following are excluded:

1. The creation or execution of a will
2. The creation, performance or enforcement of an indenture, declaration of trust or power of attorney, with the exception of implied, constructive and resulting trusts and a lasting power of attorney defined under section 2(1) of the Mental Capacity Act 2008
3. Any contract for the sale or other disposition of immovable property, or any interest in such property
4. The conveyance of immovable property or the transfer of any interest in immovable property

(source: [Singapore Statutes Online](https://sso.agc.gov.sg/Act/ETA2010?ProvIds=Sc1-#Sc1-))

### Difference between Secure Electronic Signatures and Ordinary Electronic Signatures? <a href="#difference-between-secure-electronic-signatures-and-ordinary-electronic-signatures" id="difference-between-secure-electronic-signatures-and-ordinary-electronic-signatures"></a>

Both options are legally valid. Ordinary Electronic Signatures (OES) is a broad category that refers to electronic signatures that are not SES.

SES are accorded the following presumptions:

* It is the signature of the person to whom it correlates;
* It is affixed by that person with the intention of signing or approving the electronic record; and
* It is authentic and has integrity.

These presumptions are important in disputes over the validity of electronic signatures, as they will automatically apply for secure electronic signatures. The disputing party will then have to adduce evidence to the contrary if it is claiming that the electronic signature is not valid.

As there is need to provide evidence to prove the authenticity of an OES if challenged, Agencies shall put in place risk mitigation features, i.e. steps to help ensure the authenticity of the signature and keep records of the process. For example, where email is used, keep the email trail, verify the recipient’s email address, send any signed document via an official government email address to the recipient’s official email address, and communicate with counterparties on the signing method used.&#x20;

For this reason, we recommend that agencies utilise the In-System Approval Method in FormSG where possible.

(source: [Singapore Legal Advice](https://singaporelegaladvice.com/law-articles/legally-use-e-signatures-singapore-contracts/))

(source 2: [PMO (SNDGO) CIRCULAR MINUTE NO. 5/2021](https://intranet.mof.gov.sg/portal/IM/Circulars/ICT/Circular-Minutes/2021/Use-of-Electronic-Signatures.aspx)) (Government intranet only)

### Can I use Sign with Singpass with FormSG?

You can use Singpass login and MyInfo (different from Sign with Singpass) and that will count as OES. FormSG does not have integration with the Sign with Singpass feature at this point.


# Developers / IT teams

### URLs and IP address ranges to whitelist

To ensure FormSG functions properly in your network environment, specific URLs and IP addresses may need to be whitelisted in your organisation's firewall or proxy settings.

**FormSG**

| Domain name                                                                       | Purpose                               |
| --------------------------------------------------------------------------------- | ------------------------------------- |
| <https://s3.ap-southeast-1.amazonaws.com/prod-virus-scanner-guardduty-quarantine> | Uploading Attachments for Respondents |
| <https://s3.ap-southeast-1.amazonaws.com/prod.virus.scanner.quarantine>           | Uploading Attachments for Respondents |
| <https://s3.ap-southeast-1.amazonaws.com/images.form.gov.sg>                      | Uploading Images for Form Admins      |
| <https://s3.ap-southeast-1.amazonaws.com/logos.form.gov.sg>                       | Uploading Logos for Form Admins       |

**IP Addresses**

| IP address                                            | Purpose                                                |
| ----------------------------------------------------- | ------------------------------------------------------ |
| **52.76.82.38 / 52.74.128.195** **/ 122.248.228.153** | Webhooks will be fired from these IPs (Production)     |
| **3.0.137.48 / 18.140.124.240**                       | Webhooks will be fired from these IPs (Non-production) |

**External Domains**

| Domain name                                                                                                                                                                                                                                                                                                                                                                                                                                                                                                                                                                                                                                                                                                        | Purpose                                                                                                            |
| ------------------------------------------------------------------------------------------------------------------------------------------------------------------------------------------------------------------------------------------------------------------------------------------------------------------------------------------------------------------------------------------------------------------------------------------------------------------------------------------------------------------------------------------------------------------------------------------------------------------------------------------------------------------------------------------------------------------ | ------------------------------------------------------------------------------------------------------------------ |
| <p>a.stripecdn.com<br>api.stripe.com<br>atlas.stripe.com<br>auth.stripe.com<br>b.stripecdn.com<br>billing.stripe.com<br>buy.stripe.com<br>c.stripecdn.com<br>checkout.stripe.com<br>climate.stripe.com<br>connect.stripe.com<br>dashboard.stripe.com<br>express.stripe.com<br>f.stripecdn.com<br>files.stripe.com<br>hcaptcha.com<br>hooks.stripe.com<br>invoice.stripe.com<br>invoicedata.stripe.com<br>js.stripe.com<br>m.stripe.com<br>m.stripe.network<br>manage.stripe.com<br>merchant-ui-api.stripe.com<br>pay.stripe.com<br>payments.stripe.com<br>q.stripe.com<br>qr.stripe.com<br>r.stripe.com<br>stripe.com<br>terminal.stripe.com<br>uploads.stripe.com<br>verify.stripe.com<br>pm-hooks.stripe.com</p> | Stripe domains used by FormSG Payment                                                                              |
| \*.hcaptcha.com                                                                                                                                                                                                                                                                                                                                                                                                                                                                                                                                                                                                                                                                                                    | [Used by Stripe](https://support.stripe.com/questions/troubleshooting-login-captcha-issues) to deter bots and spam |

### How do I embed FormSG onto a website?

You can do this by going into your form and clicking on the "Share" button on the top right. Then click on "Embed".&#x20;

If you embed FormSG within your site using an iframe, any form responses will still be sent to the form admin. The form responses cannot be 'intercepted' by the parent website hosting the iframe.

We don't have guidelines for how to embed the form into your website as the look and feel would differ between websites. It is not necessary to set the sandbox attribute as the website you are embedding is FormSG, not an external untrusted third party site.

<figure><img src="/files/UxAYORyzH1yx5jDjZohQ" alt=""><figcaption></figcaption></figure>

### Does FormSG team provide direct support for setting up webhooks?

We currently do not provide direct support for setting up the webhooks as this can be mostly self served using our SDK.&#x20;

We may assist to help answer some of your queries and investigate set-up issues but this will not be considered an urgent priority.

### Why is FormSG attempting a retry even though our system has processed it successfully?

Our webhooks require an acknowledgement (a HTTP 200 OK response) within 10 seconds. If the acknowledgement is delayed or missing, FormSG might retry sending it because it assumes a failure.&#x20;

Example of this is becoming an issue is when your system performs other tasks (such as sending out emails) before acknowledging the webhook. The best practice is to acknowledge the webhook on receipt.&#x20;


# Payments


# Payment field

### What can I use FormSG payments for?

You can use FormSG payments for all kinds of use cases including donations, conferences, invoicing and application fees.&#x20;

Please also see list of prohibited services here: <https://stripe.com/en-gb-sg/legal/restricted-businesses>.

### How can I receive notifications when there is a new form submission and payment is made?

For successful payments, you may enable notifications in your Stripe dashboard. Follow our guide [here](https://guide.form.gov.sg/user-guides/advanced-guide/payments#notifications). Note that this does not come with form submission details.

If you want to receive notifications, you can consider using plumber.gov.sg with webhooks to send emails. See [guide](https://guide.plumber.gov.sg/use-cases/notifications-for-formsg).&#x20;

### Does FormSG store card details?

FormSG does not store card details.


# Onboarding

### What do I need to start collecting payments?

You will need to open up a [Stripe account](https://dashboard.stripe.com/register) and link it with FormSG. Stripe is a payment provider that is [PCI DSS v3.2.1 compliant](https://stripe.com/en-gb-sg/guides/pci-compliance#introduction), the highest level in the payment industry.&#x20;

To use FormSG payments, you simply need to do these 4 steps:

* Get budgeting for fees if required
* Create a Stripe account
* Connect to Stripe
* Edit payment field
* Publish!

In order to enjoy government rates:

* Provide documents and Stripe account ids to Stripe

See our [launch checklist](/user-guides/advanced-guide/payments/launch-checklist).

### Who should create Stripe account or approve documents?

Account creation is left up to agencies. Typically the Stripe accounts are held by the Finance team while the business/ops admins will handle the forms. For approval/signing of documents, this can be sent to directors/finance.

### Which MOE schools are eligible for special pricing?

Stripe can only extend Government rates to Government entities / fully owned by Government entities. If your school is "Government Owned" and can be found to be in this [MOE portal](https://www.moe.gov.sg/schoolfinder), they can extend the government rates to you.


# Fees, payment and payout

### I am seeing a blank screen on the payment page&#x20;

You may have to test the form submission on your personal devices as you may not be able to view the checkout page on WOG/intranet laptop.

### What are the payment modes supported?

Currently, we supported credit/debit cards, PayNow (Stripe), Apple Pay and Google Pay.

You may change the payment methods you want to support in your Stripe dashboard. Go to settings > payment methods > your account > edit settings. ([Guide](https://guide.form.gov.sg/user-guides/payments/stripe-dashboard-features#payment-methods))

### Do I need to pay transaction fees?

Yes. The fees are automatically deducted from the amount collected on FormSG. Hence you receive the net amount after fees have been deducted.

However, government agencies and healthcare clusters can enjoy preferential rates. Verify with your email at form.gov.sg/payments to download deck that shows the discounted rates and our calculator.

### Are there additional fees other than transaction fees?

All fees on Stripe are subjected to GST with the exception of card transaction fees.

For card payments, the bank might issue a 3DSecure verification and this would incur a small fee paid completely to the issuing bank.&#x20;

### Is non-SGD supported?

For use of Stripe cards, yes. You will still collect the full amount indicated in SGD indicated on your form and the fees will be calculated and deducted accordingly.

### How do I configure bank account

This can be done on your Stripe dashboard only by the administrator role. You can search for "bank account".

### Can I block international cards?

Yes you can do so using Radar. This is free on if you are under government pricing. Read more [here](https://support.stripe.com/questions/block-a-card-based-on-location-using-radar).

### When does the payment arrive in the bank account?

Stripe will consolidate all transactions in a day and do a single deposit into your bank account. On the government arrangement:\
\
**Card payments**: 3 business days

**PayNow**: 1 business day


# Receipt / Invoices

### How will payment be receipted? Is there a proof of payment?

When a payment is made:

1. Stripe will send a receipt of payment.&#x20;
2. FormSG will send a confirmation email with FormSG proof of payment.
   * **GST applicable**: Proof of payment will show "invoice", "inclusive of GST" and GST registration number. See [sample](https://go.gov.sg/formsg-guide-payments-invoice-example).
   * **Not GST applicable**: Proof of payment will show "receipt" and does not have GST related details.

Read the next item to find out more about differences between simplified tax invoice and regular tax invoice.

### Simplified tax invoices versus regular tax invoices?

For non-businesses, FormSG's receipts are sufficient.

If you are trying to invoice businesses, FormSG currently only supports simplified tax invoices. &#x20;

According to IRAS ([source](https://www.iras.gov.sg/taxes/goods-services-tax-\(gst\)/basics-of-gst/invoicing-price-display-and-record-keeping/invoicing-customers)), you may issue a simplified tax invoice instead of a regular tax invoice to a **business** if the **total amount payable does not exceed $1000**. A simplified tax invoice only requires the following information:

1. Supplier's name, address and GST registration number
2. Date of issue of invoice
3. An identifying number (e. g. invoice number)
4. Description of the goods or services supplied
5. Total amount payable including GST
6. A statement similar to "price payable includes GST"

A regular tax invoice, instead, must contain the following information:

<figure><img src="/files/5Y3QB2EyowvJ2yrAE3JM" alt=""><figcaption></figcaption></figure>

In the meantime, if you need regular tax invoices, you may still use FormSG but must generate your own.

### How long is the retention period for receipts / invoices?

The receipts / invoices can be stored indefinitely for now.

### How do I modify the receipts / invoices?

GST registration number and business address can be modified in the form settings.

Organisation name, logo, colour, support email and number can be modified in Stripe. [Stripe dashboard features](/user-guides/advanced-guide/payments/stripe-dashboard-features#branding-and-public-details)


# Process flows

{% hint style="info" %}
Jump to our launch [checklist](https://go.gov.sg/formsg-payments-checklist) if you are ready to onboard.
{% endhint %}

### Flow charts of journeys

These overviews are meant to be bite-size to be readily understood in few minutes. If you need further explanations, please refer to the respective pages.

{% tabs %}
{% tab title="Payer" %}
This is the flow of the payer's journey. They will encounter the form on various channels like links, emails, QR codes and websites.&#x20;

<figure><img src="/files/RpMgXXTtUtsK2DWHyupH" alt=""><figcaption></figcaption></figure>

The payer then fills in the form and proceeds to checkout with different payment methods like cards (local/foreign, debit/credit), PayNow, Apple/Google Pay.&#x20;

Upon successful payment, they will receive an email directly to their inbox with the proof of payment. They may also choose to download at the success page.&#x20;

In rare occasions, they might want a refund which is possible for you to issue.

If you have not tried a demo, you may try [here](https://go.gov.sg/formsg-payments-demo).
{% endtab %}

{% tab title="Creation of form" %}
To create a form, a form creator must login to FormSG using an email address with domains whitelisted (e.g. @open.gov.sg) with One-time password.

<figure><img src="/files/D03jW2kHmlPSQeqwztI3" alt=""><figcaption></figcaption></figure>

The form admin can then create a Storage mode form, download the secret key (like a password) to create a blank slate for their form.&#x20;

To create a payment field, they must first connect to Stripe (payment provider) in the settings (see [testing platform](/user-guides/advanced-guide/payments/uat) section on how to try without creating an account).&#x20;

After connection, the form creator can create the payment field and other fields.

After all that is done, they may publish the form!

To find out more, go to [creating payment field](/user-guides/advanced-guide/payments/payment-field).
{% endtab %}

{% tab title="Receiving responses" %}
The form collaborators may go to the Results page of their form to view successful payments. Here, only payments that have been successfully transacted at checkout page will be recorded. *I.e. If a payer decides not to pay at checkout, it will not be recorded in FormSG even if they have filled in the rest of the form.*

<figure><img src="/files/LBcteYHhqp1uSYCGMPy6" alt=""><figcaption></figcaption></figure>

The dashboard will show an overview of the successful payments. The payout date would be reflected once the money reaches bank account. Collaborators may view and search for records in the dashboard. They may also export the results to spreadsheet.

<figure><img src="/files/0nTHweZB7QJqfbHhIO8n" alt="" width="563"><figcaption></figcaption></figure>

Read more about [payment results](/user-guides/advanced-guide/payments/payment-results).
{% endtab %}

{% tab title="Payment flow" %}
This is the payment flow in FormSG before money reaches the agency bank account.&#x20;

Stripe will process all transactions in a given day and payout depending on PayNow (1 business day) or cards (3 business days) to the agency's bank account. These will be reflected in FormSG.

<figure><img src="/files/7v94FCHjxO4pUKqoPxqX" alt=""><figcaption></figcaption></figure>
{% endtab %}
{% endtabs %}


# Payment webhooks

### When will the payment webhooks trigger?

Webhooks will only trigger upon successful payment.

### What information is supported?

We support the following payment details found [here](https://github.com/opengovsg/formsg-javascript-sdk?tab=readme-ov-file#format-of-payment-content). Payouts, payment statuses updates are currently not supported as these are updated after a certain period. We will be looking into supporting it in future if there is enough demand!\
\
If there are any additional fields added, it will be included in the same payment payload.

### What is "formsg payments - type"?

Card payments are usually labelled as "Charge" while PayNow is "Payment".&#x20;


# Stripe security and support

{% hint style="info" %}
As a global company, Stripe complies with various privacy laws across regions, including the Singapore Personal Data Protection Act (PDPA). Protecting users' personal data are their utmost priority. These are some common FAQs agencies want to know about Stripe. For more information, please look for Stripe's [documentation](https://stripe.com/en-gb-sg/guides).&#x20;
{% endhint %}

### Does Stripe capture any data?

FormSG only provide payer's information to Stripe from the payment field that is necessary for processing the payment, including email address. There are also other metadata includes form title and responseID. Some of these are already publicly available.

We do not pass Stripe other collected data from your form. See how Stripe collects and share your data.

{% embed url="<https://stripe.com/in/legal/privacy-center>" %}

{% embed url="<https://stripe.com/en-gb-sg/privacy#1-personal-data-that-we-collect-and-how-we-use-and-share-it>" %}

### How secure is Stripe?

Stripe is governed by MAS under the Payment license PSN-01, they are regulated by MAS across multiple technical and functional items that build into Stripe being able to conduct payment services for SG Government & the private sector.

{% embed url="<https://stripe.com/en-gb-sg/guides/sg-payment-services-act-2019>" %}

Stripe is governed by a requirement called PCI Compliance, to which they are a certified PCI Service Provider Level 1

{% embed url="<https://stripe.com/docs/security>" %}

### Stripe's data retention policy

{% embed url="<https://stripe.com/in/privacy#5-security-and-retention>" %}

Stripe is PCI DSS v3.2.1 compliant. That's the highest level of compliance in the payment industry. Card Holder's data is securely tokenised and the raw PAN is never available to any Merchant.&#x20;

{% embed url="<https://stripe.com/en-gb-sg/guides/pci-compliance#introduction>" %}

### How is fraud detected through Stripe?&#x20;

Stripe has an internal fraud detection engine called [Radar](https://www.google.com/url?q=https://stripe.com/radar\&source=gmail-imap\&ust=1684129751000000\&usg=AOvVaw2lpBJwdjx-ZCUA_gn6ezPU). It uses a multitude of signals from user behavior, location to historical card data and data from financial partners to detect fraud. You can read more about the machine learning aspect of [radar here](https://www.google.com/url?q=https://stripe.com/guides/primer-on-machine-learning-for-fraud-protection%23introduction\&source=gmail-imap\&ust=1684129751000000\&usg=AOvVaw1uI8zPTY4DuJj_65tEPijw).&#x20;

### What is 3D secure, radar and connect?

* [3D Secure](https://stripe.com/docs/payments/3d-secure) - A fraud protection method provided by Card Networks to protect Merchants from fraudulent card transactions. 3D Secure is not required for all credit card payments. The Issuing bank of the customer's card decides if it wishes to trigger a 3D Secure based on several signals associated with the time of charge, location of charge, value of charge etc. You will not be charged the 3D Secure fee if a 3D Secure transaction is not triggered.
* [Radar](https://stripe.com/en-gb-sg/radar) - Stripe Radar is Stripe's inbuilt fraud protection engine based on advanced machine learning algorithms.
* [Connect](https://stripe.com/docs/connect/standard-accounts) - You are connecting your Stripe Account to FormSG Platform so that FormSG can create charges on your Stripe Account.&#x20;

### I have issues with Stripe, how can I get help?

Stripe has [24x7 support](https://support.stripe.com/?contact=true) on standby that responds typically within 3 minutes. They have the highest uptime in the industry, and you can always monitor the current status of Stripe's availability on this [dashboard](https://status.stripe.com/).

### How do I add collaborators for Stripe dashboard?

You can add more people to the Stripe account you create by adding them in the "[Team](https://dashboard.stripe.com/settings/team)" section of your Dashboard.&#x20;

* [FormSG guide](https://guide.form.gov.sg/user-guides/advanced-guide/payments#team-and-roles)
* [Stripe guide](https://stripe.com/docs/account/teams)

{% hint style="info" %}
While "administrators" are the only one who can connect FormSG to Stripe and change bank account details, "developers" can do the connection but not change bank account details.
{% endhint %}


# Stripe account management

### Are there charges to opening Stripe account?

There are no charges and minimum amount to transact to opening and maintaining the Stripe account.

### Managing Stripe business accounts

Before you connect FormSG to Stripe, do note that there are various ways you can organise yourself within your agency.&#x20;

{% hint style="info" %}
Some pointers:

* The email that you sign up to Stripe is **not** a business account
* A business account creation is an action you may do after signing in
* You may have more than 1 business acount you are a member of
* Only team members with "administrator" and "developer" role can connect FormSG to Stripe with their email address. However only "administrator" can change bank account.
* Each business account can only have **1** bank account
* Changes to Stripe business account are logged under security history.
  {% endhint %}

<figure><img src="/files/XXXIEi5Qyxwxcgt1XOCC" alt=""><figcaption></figcaption></figure>

Here are some examples on how you may organise:

1. **1 form connected to 1 Stripe account**\
   \
   In this case, a payment form has been created by an owner. He/she has added a collaborator with the "view" only permissions. They connect to their agency's business account on Stripe which has an administrator who may or may not be the form owner. \
   \
   This business account is linked to the agency's official bank account.\ <br>

   <figure><img src="/files/ZPPDozZrjumOsdIefuFu" alt=""><figcaption></figcaption></figure>

2. **2 forms (or more) connected to 1 Stripe account**\
   \
   In this second example, two forms are being connected to the same business account on Stripe. The payouts will be still 1 lump sum to the agency bank account.\ <br>

   <figure><img src="/files/KDxjd6a7RVzmUAFvUpVg" alt=""><figcaption></figcaption></figure>

3. **x forms connected to 2 Stripe accounts (or more) with&#x20;**<mark style="background-color:orange;">**different**</mark>**&#x20;bank accounts**\
   \
   In the next example, the agencies decided to keep their business accounts separate because they have different bank accounts. In these case, both bank accounts will receive their own payouts.\ <br>

   <figure><img src="/files/PqJgPTQVFdvbND5LGFLG" alt=""><figcaption></figcaption></figure>

4. **x forms connected to 2 Stripe accounts (or more) with&#x20;**<mark style="background-color:orange;">**same**</mark>**&#x20;bank account**\
   \
   In the last example, an agency might want to create more business accounts but the payouts lead to the same bank account. In this case, the bank account will different payouts from the different business accounts separately in a given day.\
   \
   This would happen if an agency decides to create different business accounts for different use cases (e.g. donations, fees) or departments (pharmacy, academy).<br>

   <figure><img src="/files/cX1APmO06V1vyl5xsCAU" alt=""><figcaption></figcaption></figure>


# Multi-respondent forms

Some frequently asked questions!


# Creating forms

### What data classification level does MRF support?

All FormSG forms support up to Confidential (Cloud-Eligible) and Sensitive (High) data.

### I can't see the workflow builder in my form.

Make sure you selected "Multi-respondent form" mode when creating the form. "Storage mode" forms do not have a workflow builder.

### What is the maximum number of steps I can include in one MRF approval flow?

There is currently no limit on how many steps you wish to include in your approval flow. However, we recommend to keep your workflows to a maximum of 5 steps.

### Some of my fields are grayed out after I created a new field.

Do ensure that when new fields are added, you would need to assign them in the workflow builder.

### Can I configure the form so approver's signature is optional or only shown on approval?

Yes. Make the signature field optional, or use logic to show/hide it based on the Yes/No approval field.

### How can respondents receive a PDF copy of the completed form?

Add an email field to the form, then enable "Respondent copy of submissions" in Settings.

If it is a workflow completion email, go to settings > email notifications and add the corresponding email field in "Step 1".

### How can I keep someone informed throughout the workflow, or send them a copy?

If you just want to CC someone a copy of a specific step's submission, add an email field, then enable "Respondent copy of submissions" in Settings for that field.

If you want someone dynamically notified as the workflow progresses (including at the end), assign their email field to the relevant step(s) in the workflow builder. To be notified when the whole workflow completes, their email field must also be assigned at the final step, so the notification fires again there.

Alternatively, for more customised notifications, you can set these up via [Plumber](https://plumber.gov.sg).


# Routing Forms

### **If an approver clicks "No", can it still be sent to the next approver?**

Yes. Do not toggle the "Make this step an approval". The form will continue regardless of the answer.

Note that the approval status will not be tracked this way.

<figure><img src="/files/iER369hlY5k2mWvNg0z9" alt=""><figcaption></figcaption></figure>

### Are there restrictions on sending notifications to group email addresses?

FormSG does not restrict email sending to group email addresses. If you cannot receive emails, check with your IT department as some email services may filter them.

### **I want to route my form based on an option the previous respondent chooses. Which option should I select?**

You should select the third option "emails assigned to options in a dropdown field". Do note that only dropdown fields can be selected for this option.&#x20;

<figure><img src="/files/7q85EPkdcI7I2A606bwJ" alt=""><figcaption></figcaption></figure>

### I want to update my dropdown options and change the assigned emails. How can I update the form routing as well?

To update your options and emails, edit the original CSV template you uploaded, then re-upload the updated file in the Workflow section:&#x20;

1. Go to "add workflow" and choose the step you want to edit&#x20;
2. Click on the <img src="/files/QXmHp5aaoHpJXbu6SHLe" alt="" data-size="line"> icon next to the CSV file&#x20;
3. Upload the updated CSV template&#x20;
4. Save the step to confirm the changes

<div><figure><img src="/files/VKfGN7zJjooTB8pvGkPo" alt=""><figcaption></figcaption></figure> <figure><img src="/files/5MrAGYwVjd045deKix0S" alt=""><figcaption></figcaption></figure> <figure><img src="/files/xERRhPLVPLEMzcbBngOx" alt=""><figcaption></figcaption></figure> <figure><img src="/files/G3G4ws9I6kpelWWMhLkf" alt=""><figcaption></figcaption></figure></div>

### **How do I assign multiple emails to each dropdown option?**

In your CSV template under the "Emails" column, simply separate each email with commas.&#x20;

<figure><img src="/files/e3hDrcou6rkvb2Mb5DYz" alt=""><figcaption></figcaption></figure>

### What happens if the submission is routed to 2 or more emails?

It will be sent to both. Once one of them submits, the other can no longer submit.

### If the respondent is away or a wrong email has been keyed in, can I change who should respond?

This is currently not possible and is being tracked as a feature improvement.

The respondent can also forward their link to a cover person. Note that whoever holds the link can view submission data, so handle with care for confidentiality.

### Can I route differently based on option selected (e.g. amount > $500 → 2 approvers, else 1)?

Not currently supported. As a workaround, you can create a directory that leads to different forms. See example: [go.gov.sg/formsg-ogp-directory-demo](https://go.gov.sg/formsg-ogp-directory-demo).&#x20;

Please submit a feature request.

### Can forms be routed back to the previous respondent for amendments?

Not currently supported. A new workflow/submission would need to be started.

Please submit a feature request.

### Will attachments be included in the approval email sent to the approver?

The approver can view attachments by clicking the emailed approval link. Attachments are not directly embedded in the email.

Please submit a feature request.

### Will attachments be included in the final outcome email?

Yes — attachments are included in the final outcome email sent when the workflow is complete.

### Can subsequent respondents view and download attachments submitted in earlier steps?

Yes — approvers can view attachments submitted in previous steps via the approval link.

### Can Singpass be required for approval steps (Step 2 onwards)?

Not currently — Singpass is only supported for Step 1. Support for subsequent steps is being planned.

### Can we prevent the requestor email from being the same as the approval email?

FormSG currently cannot enforce this check. You would need to verify this post-submission.


# Filling in forms

### **Do respondents need to log in to FormSG to fill in the MRF form?**

No, respondents do not need to log in to FormSG to fill in the form.

### **Can Respondent 1 and Respondent 2 be the same person?**

Yes.

### **Can multiple approvers approve concurrently (parallel approval)?**

Not supported currently. Only sequential approvals are available. Please submit a feature request.

### **Can I hide responses from previous respondents in earlier steps?**

MRF currently does not support this.

### **Can I edit my responses after submitting the form?**&#x20;

You won't be able to edit your responses once the form has already been routed to the next approver.

### Can the subsequent respondents view/download documents before providing their inputs?

Yes this is possible. If the same field is re-assigned again, the document can be deleted and a new one can be uploaded.

### **Can I stop the workflow if the current respondent rejects the submission?** &#x20;

Yes, you can do this through enabling approvals in your MRF workflow builder by turning on the toggle "This respondent is an approver".&#x20;

<figure><img src="/files/osIQJihoALng11MECzeQ" alt="" width="563"><figcaption></figcaption></figure>

### If the approver rejects, will the requestor be notified of the rejection?

Yes this is possible and can be configured under settings > email notifications.


# Managing form responses

### **Will subsequent respondents be able to view previous form responses?**

Yes. \
\
However, MRF currently does not support the ability to hide previous responses from subsequent respondents. Do get in touch with us if this is an important feature for your needs!&#x20;

### **Can I track the sequential flow of my MRF form?**&#x20;

Yes, you can do that by viewing the 'Results' page of your FormSG. You will be able to view the workflow status and the pending step of a workflow and in the CSV file.&#x20;

To view the status of each submission (Pending/Completed/Approved/Not Approved), refer to the columns "<kbd>Workflow Status</kbd>" and "<kbd>Pending response at</kbd>".  &#x20;

<figure><img src="/files/zmWOh3fcjtwyPDTrfFVw" alt=""><figcaption></figcaption></figure>

By clicking into each submission or downloading the CSV, you will also be able to see which rows have missing columns, i.e. fields which have not been filled.&#x20;

### Can I send a follow-up email to respondents/approvers for pending submissions?&#x20;

Yes, simply identify '<kbd>Pending</kbd>' submissions on the Results page and click on the '<kbd>Send reminder</kbd>' button, which will send a reminder email for pending respondents/approvers to take action.&#x20;

<figure><img src="/files/KhJskX218LNx9TKhLblt" alt=""><figcaption></figcaption></figure>

Do note that there is no limitation on reminders for each submission, please refresh the page to click the '<kbd>Send Reminder</kbd>' button again.&#x20;

### Can I send reminders via Chat messaging applications/SMS?

Not currently supported.&#x20;

### Can reminders be sent automatically after X days?

No — reminders are manually triggered via the "Send Reminder" button on the dashboard.

Please submit a feature request.

### **Can I notify others on the outcome of a form submission?**

Yes, you can notify both the form respondents and external parties through the "email notifications" page under settings.&#x20;

<figure><img src="/files/ucUwmk013fGSv2SidaU0" alt=""><figcaption></figcaption></figure>


# Webhooks

### Why doesn't my Plumber webhook link show up on the Webhooks **page** for my Multi-respondent form?

Multi-respondent forms can still connect to Plumber for webhooks, it's just that the connection is set up and managed entirely on the Plumber side, so it won't appear on FormSG's Webhooks page. On the FormSG Webhooks page, you'll see this screen instead:

<figure><img src="/files/vrQWH4XP63nPc93rZbdC" alt=""><figcaption></figcaption></figure>

To confirm your connection is active, check it directly in Plumber rather than in FormSG.


# Forms with workflow (to use this)

Some frequently asked questions!


---

[Next Page](/llms-full.txt/1)